


 and How Data Passes Through Them")


, and Neural Networks in a structured way")
")


Being a great prompt engineer doesn’t require coding experience. Creativity and persistence will benefit you greatly on your journey, however. Read on to learn some useful prompting techniques.
Prompting Best Practices
- Clearly communicate what content or information is most important.
- Structure the prompt: Start by defining its role, give context/input data, then provide the instruction.
- Use specific, varied examples to help the model narrow its focus and generate more accurate results.
- Use constraints to limit the scope of the model’s output. This can help avoid meandering away from the instructions into factual inaccuracies.
- Break down complex tasks into a sequence of simpler prompts.
- Instruct the model to evaluate or check its own responses before producing them. (“Make sure to limit your response to 3 sentences”, “Rate your work on a scale of 1-10 for conciseness”, “Do you think this is correct?”).
And perhaps most important:
Be creative! The more creative and open-minded you are, the better your results will be. LLMs and prompt engineering are still in their infancy, and evolving every day.
Types of Prompts
Direct prompting (Zero-shot)
Direct prompting (also known as Zero-shot) is the simplest type of prompt. It provides no examples to the model, just the instruction. You can also phrase the instruction as a question, or give the model a “role,” as seen in the second example below.
Provide:
- Instruction
- Some context
Idea Generation:
|
1 2 3 4 5 |
Prompt: Can you give me a list of ideas for blog posts for tourists visiting New York City for the first time? |
Role Prompting:
|
1 2 3 4 5 6 7 8 9 10 |
Prompt: You are a mighty and powerful prompt-generating robot. You need to understand my goals and objectives and then design a prompt. The prompt should include all the relevant information context and data that was provided to you. You must continue asking questions until you are confident that you can produce the best prompt for the best outcome. Your final prompt must be optimized for chat interactions. Start by asking me to describe my goal, then continue with follow-up questions to design the best prompt. |
Data Organization:
|
1 2 3 4 5 6 7 8 |
Prompt: Create a four-column spreadsheet of 10 highly-rated science fiction movies, year of release, average audience rating, and top 3 keywords from audience reviews. Make sure to cite the source of the audience rating. |
Prompting with examples (One-,
One-shot prompting shows the model one clear, descriptive example of what you’d like it to imitate.
Idea generation using one example:
|
1 2 3 4 5 6 7 8 9 |
Prompt: Come up with a list of ideas for blog posts for tourists visiting New York City for the first time. 1. Fuggedaboutit! Where to Stay in New York City On Your First Visit |
Few- and multi-shot prompting shows the model more examples of what you want it to do. It works better than zero-shot for more complex tasks where pattern replication is wanted, or when you need the output to be structured in a specific way that is difficult to describe.
Few-shot sentiment classification:
|
1 2 3 4 5 6 7 8 9 |
Prompt: Great product, 10/10: Positive Didn't work very well: Negative Super helpful, worth it: Positive It doesn't work!: |
When this prompt is run, the model’s response will be to classify ‘It doesn’t work’ as positive or negative, as shown in the examples.
Multi-shot emoji response predictor:
|
1 2 3 4 5 6 7 8 9 10 11 12 13 14 15 16 17 18 19 20 21 22 |
Prompt: Predict up to 5 emojis as a response to a text chat message. The output should only include emojis. input: The new visual design is blowing my mind output: ➕,, ❤ input: Well that looks great regardless output: ❤️, input: Unfortunately this won't work output: , input: sounds good, I'll look into that output: , input: 10hr cut of jeff goldblum laughing URL output: ,,⚰️ input: Woo! Launch time! |
Same process here, but since the prompt is more complex, the model has been given more examples to emulate.
Chain-of-thought prompting
Chain of Thought (CoT) prompting encourages the LLM to explain its reasoning. Combine it with few-shot prompting to get better results on more complex tasks that require reasoning before a response.
|
1 2 3 4 5 6 7 8 9 |
Prompt: The odd numbers in this group add up to an even number: 4, 8, 9, 15, 12, 2, 1. A: Adding all the odd numbers (9, 15, 1) gives 25. The answer is False. The odd numbers in this group add up to an even number: 15, 32, 5, 13, 82, 7, 1. A: |
Zero-shot CoT
Recalling the zero-shot prompting from earlier, this approach takes a zero-shot prompt and adds an instruction: “Let’s think step by step.” The LLM is able to generate a chain of thought from this instruction, and usually a more accurate answer as well. This is a great approach to getting LLMs to generate correct answers for things like word problems.
|
1 2 3 4 5 6 7 8 9 10 |
Prompt: I went to the market and bought 10 apples. I gave 2 apples to the neighbor and 2 to the repairman. I then went and bought 5 more apples and ate 1. How many apples was I left with? Let's think step by step. |
Prompt iteration strategies
Learn to love the reality of rewriting prompts several (possibly dozens) of times. Here are a few ideas for refining prompts if you get stuck:
Note: These strategies may become less useful or necessary over time as models improve.
- Repeat key words, phrases, or ideas
- Specify your desired output format (CSV, JSON, etc.)
- Use all caps to stress important points or instructions. You can also try exaggerations or hyperbolic language; for example: “Your explanation should be absolutely impossible to misinterpret. Every single word must ooze clarity!”
- Use synonyms or alternate phrasing (e.g., instead of “Summarize,” try appending “tldr” to some input text). Swap in different words or phrases and document which ones work better and which are worse.
- Try the sandwich technique with long prompts: Add the same statement in different places.
- Use a prompt library for inspiration. Prompt Hero and this prompt gallery are two good places to start.
LLM Settings
When designing and testing prompts, you typically interact with the LLM via an API. You can configure a few parameters to get different results for your prompts. Tweaking these settings are important to improve reliability and desirability of responses and it takes a bit of experimentation to figure out the proper settings for your use cases. Below are the common settings you will come across when using different LLM providers:
Temperature – In short, the lower the temperature, the more deterministic the results in the sense that the highest probable next token is always picked. Increasing temperature could lead to more randomness, which encourages more diverse or creative outputs. You are essentially increasing the weights of the other possible tokens. In terms of application, you might want to use a lower temperature value for tasks like fact-based QA to encourage more factual and concise responses. For poem generation or other creative tasks, it might be beneficial to increase the temperature value.
Top P – A sampling technique with temperature, called nucleus sampling, where you can control how deterministic the model is. If you are looking for exact and factual answers keep this low. If you are looking for more diverse responses, increase to a higher value. If you use Top P it means that only the tokens comprising the top_p probability mass are considered for responses, so a low top_p value selects the most confident responses. This means that a high top_p value will enable the model to look at more possible words, including less likely ones, leading to more diverse outputs.
The general recommendation is to alter temperature or Top P but not both.
Max Length – You can manage the number of tokens the model generates by adjusting the max length. Specifying a max length helps you prevent long or irrelevant responses and control costs.
Stop Sequences – A stop sequence is a string that stops the model from generating tokens. Specifying stop sequences is another way to control the length and structure of the model’s response. For example, you can tell the model to generate lists that have no more than 10 items by adding “11” as a stop sequence.
Frequency Penalty – The frequency penalty applies a penalty on the next token proportional to how many times that token already appeared in the response and prompt. The higher the frequency penalty, the less likely a word will appear again. This setting reduces the repetition of words in the model’s response by giving tokens that appear more a higher penalty.
Presence Penalty – The presence penalty also applies a penalty on repeated tokens but, unlike the frequency penalty, the penalty is the same for all repeated tokens. A token that appears twice and a token that appears 10 times are penalized the same. This setting prevents the model from repeating phrases too often in its response. If you want the model to generate diverse or creative text, you might want to use a higher presence penalty. Or, if you need the model to stay focused, try using a lower presence penalty.
Similar to temperature and top_p, the general recommendation is to alter the frequency or presence penalty but not both.
Before starting with some basic examples, keep in mind that your results may vary depending on the version of LLM you use.
Basics of Prompting
Prompting an LLM
You can achieve a lot with simple prompts, but the quality of results depends on how much information you provide it and how well-crafted the prompt is. A prompt can contain information like the instruction or question you are passing to the model and include other details such as context, inputs, or examples. You can use these elements to instruct the model more effectively to improve the quality of results.
Let’s get started by going over a basic example of a simple prompt:
Prompt
|
1 2 3 |
contrast-more="nx-border" contrast-more="nx-border-primary-900/20" contrast-more="nx-contrast-150" contrast-more="dark:nx-border-primary-100/40" nx-py-4 data-language="md" data-theme="default"]<code class="nx-border-black nx-border-opacity-[0.04] nx-bg-opacity-[0.03] nx-bg-black nx-break-words nx-rounded-md nx-border nx-py-0.5 nx-px-[.25em] nx-text-[.9em] dark:nx-border-white/10 dark:nx-bg-white/10" dir="ltr" data-language="md" data-theme="default"><span class="line">The sky is</span> |
Output:
|
1 2 3 |
contrast-more="nx-border" contrast-more="nx-border-primary-900/20" contrast-more="nx-contrast-150" contrast-more="dark:nx-border-primary-100/40" nx-py-4 data-language="md" data-theme="default"]<code class="nx-border-black nx-border-opacity-[0.04] nx-bg-opacity-[0.03] nx-bg-black nx-break-words nx-rounded-md nx-border nx-py-0.5 nx-px-[.25em] nx-text-[.9em] dark:nx-border-white/10 dark:nx-bg-white/10" dir="ltr" data-language="md" data-theme="default"><span class="line">blue.</span> |
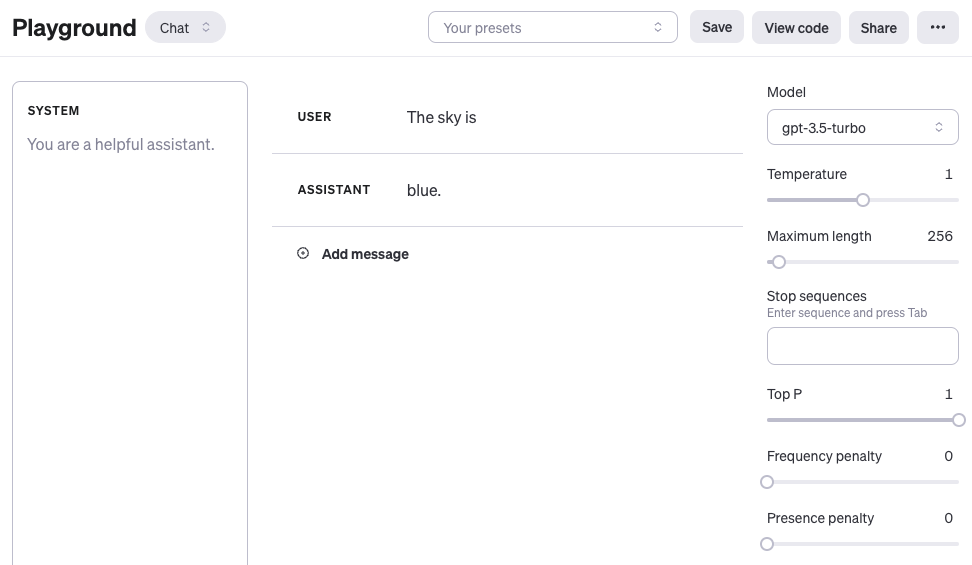
Something to note is that when using the OpenAI chat models like gpt-3.5-turbo or gpt-4, you can structure your prompt using three different roles: system, user, and assistant. The system message is not required but helps to set the overall behavior of the assistant. The example above only includes a user message which you can use to directly prompt the model. For simplicity, all of the examples, except when it’s explicitly mentioned, will use only the user message to prompt the gpt-3.5-turbo model. The assistant message in the example above corresponds to the model response. You can also define an assistant message to pass examples of the desired behavior you want. You can learn more about working with chat models here(opens in a new tab).
You can observe from the prompt example above that the language model responds with a sequence of tokens that make sense given the context "The sky is". The output might be unexpected or far from the task you want to accomplish. In fact, this basic example highlights the necessity to provide more context or instructions on what specifically you want to achieve with the system. This is what prompt engineering is all about.
Let’s try to improve it a bit:
Prompt:
|
1 2 3 |
contrast-more="nx-border" contrast-more="nx-border-primary-900/20" contrast-more="nx-contrast-150" contrast-more="dark:nx-border-primary-100/40" nx-py-4 data-language="text" data-theme="default"]<code class="nx-border-black nx-border-opacity-[0.04] nx-bg-opacity-[0.03] nx-bg-black nx-break-words nx-rounded-md nx-border nx-py-0.5 nx-px-[.25em] nx-text-[.9em] dark:nx-border-white/10 dark:nx-bg-white/10" dir="ltr" data-language="text" data-theme="default"><span class="line">Complete the sentence: </span><span class="line">The sky is</span> |
Output:
|
1 2 3 |
contrast-more="nx-border" contrast-more="nx-border-primary-900/20" contrast-more="nx-contrast-150" contrast-more="dark:nx-border-primary-100/40" nx-py-4 data-language="text" data-theme="default"]<code class="nx-border-black nx-border-opacity-[0.04] nx-bg-opacity-[0.03] nx-bg-black nx-break-words nx-rounded-md nx-border nx-py-0.5 nx-px-[.25em] nx-text-[.9em] dark:nx-border-white/10 dark:nx-bg-white/10" dir="ltr" data-language="text" data-theme="default"><span class="line">blue during the day and dark at night.</span> |
Is that better? Well, with the prompt above you are instructing the model to complete the sentence so the result looks a lot better as it follows exactly what you told it to do (“complete the sentence”). This approach of designing effective prompts to instruct the model to perform a desired task is what’s referred to as prompt engineering in this guide.
The example above is a basic illustration of what’s possible with LLMs today. Today’s LLMs are able to perform all kinds of advanced tasks that range from text summarization to mathematical reasoning to code generation.
Prompt Formatting
You have tried a very simple prompt above. A standard prompt has the following format:
|
1 2 3 |
contrast-more="nx-border" contrast-more="nx-border-primary-900/20" contrast-more="nx-contrast-150" contrast-more="dark:nx-border-primary-100/40" nx-py-4 data-language="text" data-theme="default"]<code class="nx-border-black nx-border-opacity-[0.04] nx-bg-opacity-[0.03] nx-bg-black nx-break-words nx-rounded-md nx-border nx-py-0.5 nx-px-[.25em] nx-text-[.9em] dark:nx-border-white/10 dark:nx-bg-white/10" dir="ltr" data-language="text" data-theme="default"><span class="line"><Question>?</span> |
or
|
1 2 3 |
contrast-more="nx-border" contrast-more="nx-border-primary-900/20" contrast-more="nx-contrast-150" contrast-more="dark:nx-border-primary-100/40" nx-py-4 data-language="text" data-theme="default"]<code class="nx-border-black nx-border-opacity-[0.04] nx-bg-opacity-[0.03] nx-bg-black nx-break-words nx-rounded-md nx-border nx-py-0.5 nx-px-[.25em] nx-text-[.9em] dark:nx-border-white/10 dark:nx-bg-white/10" dir="ltr" data-language="text" data-theme="default"><span class="line"><Instruction></span> |
You can format this into a question answering (QA) format, which is standard in a lot of QA datasets, as follows:
|
1 2 3 |
contrast-more="nx-border" contrast-more="nx-border-primary-900/20" contrast-more="nx-contrast-150" contrast-more="dark:nx-border-primary-100/40" nx-py-4 data-language="text" data-theme="default"]<code class="nx-border-black nx-border-opacity-[0.04] nx-bg-opacity-[0.03] nx-bg-black nx-break-words nx-rounded-md nx-border nx-py-0.5 nx-px-[.25em] nx-text-[.9em] dark:nx-border-white/10 dark:nx-bg-white/10" dir="ltr" data-language="text" data-theme="default"><span class="line">Q: <Question>?</span><span class="line">A: </span> |
When prompting like the above, it’s also referred to as zero-shot prompting, i.e., you are directly prompting the model for a response without any examples or demonstrations about the task you want it to achieve. Some large language models have the ability to perform zero-shot prompting but it depends on the complexity and knowledge of the task at hand and the tasks the model was trained to perform good on.
A concrete prompt example is as follows:
Prompt
|
1 2 3 |
contrast-more="nx-border" contrast-more="nx-border-primary-900/20" contrast-more="nx-contrast-150" contrast-more="dark:nx-border-primary-100/40" nx-py-4 data-language="text" data-theme="default"]<code class="nx-border-black nx-border-opacity-[0.04] nx-bg-opacity-[0.03] nx-bg-black nx-break-words nx-rounded-md nx-border nx-py-0.5 nx-px-[.25em] nx-text-[.9em] dark:nx-border-white/10 dark:nx-bg-white/10" dir="ltr" data-language="text" data-theme="default"><span class="line">Q: What is prompt engineering?</span> |
With some of the more recent models you can skip the “Q:” part as it is implied and understood by the model as a question answering task based on how the sequence is composed. In other words, the prompt could be simplified as follows:
Prompt
|
1 2 3 |
contrast-more="nx-border" contrast-more="nx-border-primary-900/20" contrast-more="nx-contrast-150" contrast-more="dark:nx-border-primary-100/40" nx-py-4 data-language="text" data-theme="default"]<code class="nx-border-black nx-border-opacity-[0.04] nx-bg-opacity-[0.03] nx-bg-black nx-break-words nx-rounded-md nx-border nx-py-0.5 nx-px-[.25em] nx-text-[.9em] dark:nx-border-white/10 dark:nx-bg-white/10" dir="ltr" data-language="text" data-theme="default"><span class="line">What is prompt engineering?</span> |
Given the standard format above, one popular and effective technique to prompting is referred to as few-shot prompting where you provide exemplars (i.e., demonstrations). You can format few-shot prompts as follows:
|
1 2 3 |
contrast-more="nx-border" contrast-more="nx-border-primary-900/20" contrast-more="nx-contrast-150" contrast-more="dark:nx-border-primary-100/40" nx-py-4 data-language="text" data-theme="default"]<code class="nx-border-black nx-border-opacity-[0.04] nx-bg-opacity-[0.03] nx-bg-black nx-break-words nx-rounded-md nx-border nx-py-0.5 nx-px-[.25em] nx-text-[.9em] dark:nx-border-white/10 dark:nx-bg-white/10" dir="ltr" data-language="text" data-theme="default"><span class="line"><Question>?</span><span class="line"><Answer></span><span class="line"><Question>?</span><span class="line"><Answer></span><span class="line"><Question>?</span><span class="line"><Answer></span><span class="line"><Question>?</span> |
The QA format version would look like this:
|
1 2 3 |
contrast-more="nx-border" contrast-more="nx-border-primary-900/20" contrast-more="nx-contrast-150" contrast-more="dark:nx-border-primary-100/40" nx-py-4 data-language="text" data-theme="default"]<code class="nx-border-black nx-border-opacity-[0.04] nx-bg-opacity-[0.03] nx-bg-black nx-break-words nx-rounded-md nx-border nx-py-0.5 nx-px-[.25em] nx-text-[.9em] dark:nx-border-white/10 dark:nx-bg-white/10" dir="ltr" data-language="text" data-theme="default"><span class="line">Q: <Question>?</span><span class="line">A: <Answer></span><span class="line">Q: <Question>?</span><span class="line">A: <Answer></span><span class="line">Q: <Question>?</span><span class="line">A: <Answer></span><span class="line">Q: <Question>?</span><span class="line">A:</span> |
Keep in mind that it’s not required to use the QA format. The prompt format depends on the task at hand. For instance, you can perform a simple classification task and give exemplars that demonstrate the task as follows:
Prompt:
|
1 2 3 4 |
contrast-more="nx-border" contrast-more="nx-border-primary-900/20" contrast-more="nx-contrast-150" contrast-more="dark:nx-border-primary-100/40" nx-py-4 data-language="text" data-theme="default"]<code class="nx-border-black nx-border-opacity-[0.04] nx-bg-opacity-[0.03] nx-bg-black nx-break-words nx-rounded-md nx-border nx-py-0.5 nx-px-[.25em] nx-text-[.9em] dark:nx-border-white/10 dark:nx-bg-white/10" dir="ltr" data-language="text" data-theme="default"><span class="line">This is awesome! // Positive</span><span class="line">This is bad! // Negative</span><span class="line">Wow that movie was rad! // Positive</span><span class="line">What a horrible show! //</span> |
Output:
|
1 2 3 |
contrast-more="nx-border" contrast-more="nx-border-primary-900/20" contrast-more="nx-contrast-150" contrast-more="dark:nx-border-primary-100/40" nx-py-4 data-language="text" data-theme="default"]<code class="nx-border-black nx-border-opacity-[0.04] nx-bg-opacity-[0.03] nx-bg-black nx-break-words nx-rounded-md nx-border nx-py-0.5 nx-px-[.25em] nx-text-[.9em] dark:nx-border-white/10 dark:nx-bg-white/10" dir="ltr" data-language="text" data-theme="default"><span class="line">Negative</span> |
Few-shot prompts enable in-context learning, which is the ability of language models to learn tasks given a few demonstrations. We discuss zero-shot prompting and few-shot prompting more extensively in upcoming sections.
Elements of a Prompt
As we cover more and more examples and applications with prompt engineering, you will notice that certain elements make up a prompt.
A prompt contains any of the following elements:
Instruction – a specific task or instruction you want the model to perform
Context – external information or additional context that can steer the model to better responses
Input Data – the input or question that we are interested to find a response for
Output Indicator – the type or format of the output.
To demonstrate the prompt elements better, here is a simple prompt that aims to perform a text classification task:
Prompt
|
1 2 3 |
contrast-more="nx-border" contrast-more="nx-border-primary-900/20" contrast-more="nx-contrast-150" contrast-more="dark:nx-border-primary-100/40" nx-py-4 data-language="text" data-theme="default"]<code class="nx-border-black nx-border-opacity-[0.04] nx-bg-opacity-[0.03] nx-bg-black nx-break-words nx-rounded-md nx-border nx-py-0.5 nx-px-[.25em] nx-text-[.9em] dark:nx-border-white/10 dark:nx-bg-white/10" dir="ltr" data-language="text" data-theme="default"><span class="line">Classify the text into neutral, negative, or positive</span><span class="line">Text: I think the food was okay.</span><span class="line">Sentiment:</span> |
In the prompt example above, the instruction correspond to the classification task, “Classify the text into neutral, negative, or positive”. The input data corresponds to the “I think the food was okay.’ part, and the output indicator used is “Sentiment:”. Note that this basic example doesn’t use context but this can also be provided as part of the prompt. For instance, the context for this text classification prompt can be additional examples provided as part of the prompt to help the model better understand the task and steer the type of outputs that you expect.
You do not need all the four elements for a prompt and the format depends on the task at hand. We will touch on more concrete examples in upcoming guides.
Here are some tips to keep in mind while you are designing your prompts:
Start Simple
As you get started with designing prompts, you should keep in mind that it is really an iterative process that requires a lot of experimentation to get optimal results. Using a simple playground from OpenAI or Cohere is a good starting point.
You can start with simple prompts and keep adding more elements and context as you aim for better results. Iterating your prompt along the way is vital for this reason. As you read the guide, you will see many examples where specificity, simplicity, and conciseness will often give you better results.
When you have a big task that involves many different subtasks, you can try to break down the task into simpler subtasks and keep building up as you get better results. This avoids adding too much complexity to the prompt design process at the beginning.
The Instruction
You can design effective prompts for various simple tasks by using commands to instruct the model what you want to achieve, such as “Write”, “Classify”, “Summarize”, “Translate”, “Order”, etc.
Keep in mind that you also need to experiment a lot to see what works best. Try different instructions with different keywords, contexts, and data and see what works best for your particular use case and task. Usually, the more specific and relevant the context is to the task you are trying to perform, the better. We will touch on the importance of sampling and adding more context in the upcoming guides.
Others recommend that you place instructions at the beginning of the prompt. Another recommendation is to use some clear separator like “###” to separate the instruction and context.
For instance:
Prompt:
|
1 2 3 |
contrast-more="nx-border" contrast-more="nx-border-primary-900/20" contrast-more="nx-contrast-150" contrast-more="dark:nx-border-primary-100/40" nx-py-4 data-language="text" data-theme="default"]<code class="nx-border-black nx-border-opacity-[0.04] nx-bg-opacity-[0.03] nx-bg-black nx-break-words nx-rounded-md nx-border nx-py-0.5 nx-px-[.25em] nx-text-[.9em] dark:nx-border-white/10 dark:nx-bg-white/10" dir="ltr" data-language="text" data-theme="default"><span class="line">### Instruction ###</span><span class="line">Translate the text below to Spanish:</span><span class="line">Text: "hello!"</span> |
Output:
|
1 2 3 |
contrast-more="nx-border" contrast-more="nx-border-primary-900/20" contrast-more="nx-contrast-150" contrast-more="dark:nx-border-primary-100/40" nx-py-4 data-language="text" data-theme="default"]<code class="nx-border-black nx-border-opacity-[0.04] nx-bg-opacity-[0.03] nx-bg-black nx-break-words nx-rounded-md nx-border nx-py-0.5 nx-px-[.25em] nx-text-[.9em] dark:nx-border-white/10 dark:nx-bg-white/10" dir="ltr" data-language="text" data-theme="default"><span class="line">¡Hola!</span> |
Specificity
Be very specific about the instruction and task you want the model to perform. The more descriptive and detailed the prompt is, the better the results. This is particularly important when you have a desired outcome or style of generation you are seeking. There aren’t specific tokens or keywords that lead to better results. It’s more important to have a good format and descriptive prompt. In fact, providing examples in the prompt is very effective to get desired output in specific formats.
When designing prompts, you should also keep in mind the length of the prompt as there are limitations regarding how long the prompt can be. Thinking about how specific and detailed you should be. Including too many unnecessary details is not necessarily a good approach. The details should be relevant and contribute to the task at hand. This is something you will need to experiment with a lot. We encourage a lot of experimentation and iteration to optimize prompts for your applications.
As an example, let’s try a simple prompt to extract specific information from a piece of text.
Prompt:
|
1 2 3 4 5 6 7 8 |
contrast-more="nx-border" contrast-more="nx-border-primary-900/20" contrast-more="nx-contrast-150" contrast-more="dark:nx-border-primary-100/40" nx-py-4 data-language="text" data-theme="default"]<code class="nx-border-black nx-border-opacity-[0.04] nx-bg-opacity-[0.03] nx-bg-black nx-break-words nx-rounded-md nx-border nx-py-0.5 nx-px-[.25em] nx-text-[.9em] dark:nx-border-white/10 dark:nx-bg-white/10" dir="ltr" data-language="text" data-theme="default"><span class="line">Extract the name of places in the following text. </span><span class="line">Desired format:</span><span class="line">Place: <comma_separated_list_of_places></span><span class="line">Input: "Although these developments are encouraging to researchers, much is still a mystery. “We often have a black box between the brain and the effect we see in the periphery,” says Henrique Veiga-Fernandes, a neuroimmunologist at the Champalimaud Centre for the Unknown in Lisbon. “If we want to use it in the therapeutic context, we actually need to understand the mechanism.“"</span> |
Output:
|
1 2 3 |
contrast-more="nx-border" contrast-more="nx-border-primary-900/20" contrast-more="nx-contrast-150" contrast-more="dark:nx-border-primary-100/40" nx-py-4 data-language="text" data-theme="default"]<code class="nx-border-black nx-border-opacity-[0.04] nx-bg-opacity-[0.03] nx-bg-black nx-break-words nx-rounded-md nx-border nx-py-0.5 nx-px-[.25em] nx-text-[.9em] dark:nx-border-white/10 dark:nx-bg-white/10" dir="ltr" data-language="text" data-theme="default"><span class="line">Place: Champalimaud Centre for the Unknown, Lisbon</span> |
Avoid Impreciseness
Given the tips above about being detailed and improving format, it’s easy to fall into the trap of wanting to be too clever about prompts and potentially creating imprecise descriptions. It’s often better to be specific and direct. The analogy here is very similar to effective communication — the more direct, the more effective the message gets across.
For example, you might be interested in learning the concept of prompt engineering. You might try something like:
|
1 2 3 4 |
contrast-more="nx-border" contrast-more="nx-border-primary-900/20" contrast-more="nx-contrast-150" contrast-more="dark:nx-border-primary-100/40" nx-py-4 data-language="text" data-theme="default"]<code class="nx-border-black nx-border-opacity-[0.04] nx-bg-opacity-[0.03] nx-bg-black nx-break-words nx-rounded-md nx-border nx-py-0.5 nx-px-[.25em] nx-text-[.9em] dark:nx-border-white/10 dark:nx-bg-white/10" dir="ltr" data-language="text" data-theme="default"><span class="line">Explain the concept prompt engineering. Keep the explanation short, only a few sentences, and don't be too descriptive.</span> |
It’s not clear from the prompt above how many sentences to use and what style. You might still somewhat get good responses with the above prompts but the better prompt would be one that is very specific, concise, and to the point. Something like:
|
1 2 3 |
contrast-more="nx-border" contrast-more="nx-border-primary-900/20" contrast-more="nx-contrast-150" contrast-more="dark:nx-border-primary-100/40" nx-py-4 data-language="text" data-theme="default"]<code class="nx-border-black nx-border-opacity-[0.04] nx-bg-opacity-[0.03] nx-bg-black nx-break-words nx-rounded-md nx-border nx-py-0.5 nx-px-[.25em] nx-text-[.9em] dark:nx-border-white/10 dark:nx-bg-white/10" dir="ltr" data-language="text" data-theme="default"><span class="line">Use 2-3 sentences to explain the concept of prompt engineering to a high school student.</span> |
To do or not to do?
Another common tip when designing prompts is to avoid saying what not to do but say what to do instead. This encourages more specificity and focuses on the details that lead to good responses from the model.
Here is an example of a movie recommendation chatbot failing at exactly what I don’t want it to do because of how I wrote the instruction — focusing on what not to do.
Prompt:
|
1 2 3 4 5 |
contrast-more="nx-border" contrast-more="nx-border-primary-900/20" contrast-more="nx-contrast-150" contrast-more="dark:nx-border-primary-100/40" nx-py-4 data-language="text" data-theme="default"]<code class="nx-border-black nx-border-opacity-[0.04] nx-bg-opacity-[0.03] nx-bg-black nx-break-words nx-rounded-md nx-border nx-py-0.5 nx-px-[.25em] nx-text-[.9em] dark:nx-border-white/10 dark:nx-bg-white/10" dir="ltr" data-language="text" data-theme="default"><span class="line">The following is an agent that recommends movies to a customer. DO NOT ASK FOR INTERESTS. DO NOT ASK FOR PERSONAL INFORMATION.</span><span class="line">Customer: Please recommend a movie based on my interests.</span><span class="line">Agent: </span> |
Output:
|
1 2 3 4 |
contrast-more="nx-border" contrast-more="nx-border-primary-900/20" contrast-more="nx-contrast-150" contrast-more="dark:nx-border-primary-100/40" nx-py-4 data-language="text" data-theme="default"]<code class="nx-border-black nx-border-opacity-[0.04] nx-bg-opacity-[0.03] nx-bg-black nx-break-words nx-rounded-md nx-border nx-py-0.5 nx-px-[.25em] nx-text-[.9em] dark:nx-border-white/10 dark:nx-bg-white/10" dir="ltr" data-language="text" data-theme="default"><span class="line">Sure, I can recommend a movie based on your interests. What kind of movie would you like to watch? Do you prefer action, comedy, romance, or something else?</span> |
Here is a better prompt:
Prompt:
|
1 2 3 4 5 6 7 8 |
contrast-more="nx-border" contrast-more="nx-border-primary-900/20" contrast-more="nx-contrast-150" contrast-more="dark:nx-border-primary-100/40" nx-py-4 data-language="text" data-theme="default"]<code class="nx-border-black nx-border-opacity-[0.04] nx-bg-opacity-[0.03] nx-bg-black nx-break-words nx-rounded-md nx-border nx-py-0.5 nx-px-[.25em] nx-text-[.9em] dark:nx-border-white/10 dark:nx-bg-white/10" dir="ltr" data-language="text" data-theme="default"><span class="line">The following is an agent that recommends movies to a customer. The agent is responsible to recommend a movie from the top global trending movies. It should refrain from asking users for their preferences and avoid asking for personal information. If the agent doesn't have a movie to recommend, it should respond "Sorry, couldn't find a movie to recommend today.".</span><span class="line">Customer: Please recommend a movie based on my interests.</span><span class="line">Agent:</span> |
Output:
|
1 2 3 4 5 |
contrast-more="nx-border" contrast-more="nx-border-primary-900/20" contrast-more="nx-contrast-150" contrast-more="dark:nx-border-primary-100/40" nx-py-4 data-language="text" data-theme="default"]<code class="nx-border-black nx-border-opacity-[0.04] nx-bg-opacity-[0.03] nx-bg-black nx-break-words nx-rounded-md nx-border nx-py-0.5 nx-px-[.25em] nx-text-[.9em] dark:nx-border-white/10 dark:nx-bg-white/10" dir="ltr" data-language="text" data-theme="default"><span class="line">Sorry, I don't have any information about your interests. However, here's a list of the top global trending movies right now: [list of movies]. I hope you find something you like!</span> |
Examples of Prompts
The previous section introduced a basic example of how to prompt LLMs.
This section will provide more examples of how to use prompts to achieve different tasks and introduce key concepts along the way. Often, the best way to learn concepts is by going through examples. The few examples below illustrate how you can use well-crafted prompts to perform different types of tasks.
Text Summarization
One of the standard tasks in natural language generation is text summarization. Text summarization can include many different flavors and domains. In fact, one of the most promising applications of language models is the ability to summarize articles and concepts into quick and easy-to-read summaries. Let’s try a basic summarization task using prompts.
Let’s say you are interested to learn about antibiotics, you could try a prompt like this:
Prompt:
|
1 2 3 |
contrast-more="nx-border" contrast-more="nx-border-primary-900/20" contrast-more="nx-contrast-150" contrast-more="dark:nx-border-primary-100/40" nx-py-4 data-language="text" data-theme="default"]<code class="nx-border-black nx-border-opacity-[0.04] nx-bg-opacity-[0.03] nx-bg-black nx-break-words nx-rounded-md nx-border nx-py-0.5 nx-px-[.25em] nx-text-[.9em] dark:nx-border-white/10 dark:nx-bg-white/10" dir="ltr" data-language="text" data-theme="default"><span class="line">Explain antibiotics</span><span class="line">A:</span> |
Output:
|
1 2 3 4 5 6 7 8 9 |
contrast-more="nx-border" contrast-more="nx-border-primary-900/20" contrast-more="nx-contrast-150" contrast-more="dark:nx-border-primary-100/40" nx-py-4 data-language="text" data-theme="default"]<code class="nx-border-black nx-border-opacity-[0.04] nx-bg-opacity-[0.03] nx-bg-black nx-break-words nx-rounded-md nx-border nx-py-0.5 nx-px-[.25em] nx-text-[.9em] dark:nx-border-white/10 dark:nx-bg-white/10" dir="ltr" data-language="text" data-theme="default"><span class="line">Antibiotics are a type of medication used to treat bacterial infections. They work by either killing the bacteria or preventing them from reproducing, allowing the body’s immune system to fight off the infection. Antibiotics are usually taken orally in the form of pills, capsules, or liquid solutions, or sometimes administered intravenously. They are not effective against viral infections, and using them inappropriately can lead to antibiotic resistance.</span> |
The “A:” is an explicit prompt format that you use in question answering. You used it here to tell the model that there is an answer expected further. In this example, it’s not clear how this is useful vs not using it but we will leave it that for later examples. Let’s just assume that this is too much information and you want to summarize it further. In fact, you can instruct the model to summarize into one sentence like so:
Prompt:
|
1 2 3 4 5 6 7 8 |
contrast-more="nx-border" contrast-more="nx-border-primary-900/20" contrast-more="nx-contrast-150" contrast-more="dark:nx-border-primary-100/40" nx-py-4 data-language="text" data-theme="default"]<code class="nx-border-black nx-border-opacity-[0.04] nx-bg-opacity-[0.03] nx-bg-black nx-break-words nx-rounded-md nx-border nx-py-0.5 nx-px-[.25em] nx-text-[.9em] dark:nx-border-white/10 dark:nx-bg-white/10" dir="ltr" data-language="text" data-theme="default"><span class="line">Antibiotics are a type of medication used to treat bacterial infections. They work by either killing the bacteria or preventing them from reproducing, allowing the body’s immune system to fight off the infection. Antibiotics are usually taken orally in the form of pills, capsules, or liquid solutions, or sometimes administered intravenously. They are not effective against viral infections, and using them inappropriately can lead to antibiotic resistance.</span><span class="line">Explain the above in one sentence:</span> |
Output:
|
1 2 3 4 5 |
contrast-more="nx-border" contrast-more="nx-border-primary-900/20" contrast-more="nx-contrast-150" contrast-more="dark:nx-border-primary-100/40" nx-py-4 data-language="text" data-theme="default"]<code class="nx-border-black nx-border-opacity-[0.04] nx-bg-opacity-[0.03] nx-bg-black nx-break-words nx-rounded-md nx-border nx-py-0.5 nx-px-[.25em] nx-text-[.9em] dark:nx-border-white/10 dark:nx-bg-white/10" dir="ltr" data-language="text" data-theme="default"><span class="line">Antibiotics are medications used to treat bacterial infections by either killing the bacteria or stopping them from reproducing, but they are not effective against viruses and overuse can lead to antibiotic resistance.</span> |
Without paying too much attention to the accuracy of the output above, which is something we will touch on in a later guide, the model tried to summarize the paragraph in one sentence. You can get clever with the instructions but we will leave that for a later chapter. Feel free to pause here and experiment to see if you get better results.
Information Extraction
While language models are trained to perform natural language generation and related tasks, it’s also very capable of performing classification and a range of other natural language processing (NLP) tasks.
Here is an example of a prompt that extracts information from a given paragraph.
Prompt:
|
1 2 3 4 5 6 7 8 9 10 11 |
contrast-more="nx-border" contrast-more="nx-border-primary-900/20" contrast-more="nx-contrast-150" contrast-more="dark:nx-border-primary-100/40" nx-py-4 data-language="text" data-theme="default"]<code class="nx-border-black nx-border-opacity-[0.04] nx-bg-opacity-[0.03] nx-bg-black nx-break-words nx-rounded-md nx-border nx-py-0.5 nx-px-[.25em] nx-text-[.9em] dark:nx-border-white/10 dark:nx-bg-white/10" dir="ltr" data-language="text" data-theme="default"><span class="line">Author-contribution statements and acknowledgements in research papers should state clearly and specifically whether, and to what extent, the authors used AI technologies such as ChatGPT in the preparation of their manuscript and analysis. They should also indicate which LLMs were used. This will alert editors and reviewers to scrutinize manuscripts more carefully for potential biases, inaccuracies and improper source crediting. Likewise, scientific journals should be transparent about their use of LLMs, for example when selecting submitted manuscripts.</span><span class="line">Mention the large language model based product mentioned in the paragraph above:</span> |
Output:
|
1 2 3 |
contrast-more="nx-border" contrast-more="nx-border-primary-900/20" contrast-more="nx-contrast-150" contrast-more="dark:nx-border-primary-100/40" nx-py-4 data-language="text" data-theme="default"]<code class="nx-border-black nx-border-opacity-[0.04] nx-bg-opacity-[0.03] nx-bg-black nx-break-words nx-rounded-md nx-border nx-py-0.5 nx-px-[.25em] nx-text-[.9em] dark:nx-border-white/10 dark:nx-bg-white/10" dir="ltr" data-language="text" data-theme="default"><span class="line">The large language model based product mentioned in the paragraph above is ChatGPT.</span> |
There are many ways you can improve the results above, but this is already very useful.
By now it should be obvious that you can ask the model to perform different tasks by simply instructing it what to do. That’s a powerful capability that AI product developers are already using to build powerful products and experiences.
Paragraph source: ChatGPT: five priorities for research(opens in a new tab)
Question Answering
One of the best ways to get the model to respond with specific answers is to improve the format of the prompt. As covered before, a prompt could combine instructions, context, input, and output indicators to get improved results. While these components are not required, it becomes a good practice as the more specific you are with instruction, the better results you will get. Below is an example of how this would look following a more structured prompt.
Prompt:
|
1 2 3 4 5 6 7 8 9 10 11 |
contrast-more="nx-border" contrast-more="nx-border-primary-900/20" contrast-more="nx-contrast-150" contrast-more="dark:nx-border-primary-100/40" nx-py-4 data-language="text" data-theme="default"]<code class="nx-border-black nx-border-opacity-[0.04] nx-bg-opacity-[0.03] nx-bg-black nx-break-words nx-rounded-md nx-border nx-py-0.5 nx-px-[.25em] nx-text-[.9em] dark:nx-border-white/10 dark:nx-bg-white/10" dir="ltr" data-language="text" data-theme="default"><span class="line">Answer the question based on the context below. Keep the answer short and concise. Respond "Unsure about answer" if not sure about the answer. </span><span class="line">Context: Teplizumab traces its roots to a New Jersey drug company called Ortho Pharmaceutical. There, scientists generated an early version of the antibody, dubbed OKT3. Originally sourced from mice, the molecule was able to bind to the surface of T cells and limit their cell-killing potential. In 1986, it was approved to help prevent organ rejection after kidney transplants, making it the first therapeutic antibody allowed for human use.</span><span class="line">Question: What was OKT3 originally sourced from?</span><span class="line">Answer:</span> |
Output:
|
1 2 3 |
contrast-more="nx-border" contrast-more="nx-border-primary-900/20" contrast-more="nx-contrast-150" contrast-more="dark:nx-border-primary-100/40" nx-py-4 data-language="text" data-theme="default"]<code class="nx-border-black nx-border-opacity-[0.04] nx-bg-opacity-[0.03] nx-bg-black nx-break-words nx-rounded-md nx-border nx-py-0.5 nx-px-[.25em] nx-text-[.9em] dark:nx-border-white/10 dark:nx-bg-white/10" dir="ltr" data-language="text" data-theme="default"><span class="line">Mice.</span> |
Context obtained from Nature(opens in a new tab).
Text Classification
So far, you have used simple instructions to perform a task. As a prompt engineer, you need to get better at providing better instructions. But that’s not all! You will also find that for harder use cases, just providing instructions won’t be enough. This is where you need to think more about the context and the different elements you can use in a prompt. Other elements you can provide are input data or examples.
Let’s try to demonstrate this by providing an example of text classification.
Prompt:
|
1 2 3 |
contrast-more="nx-border" contrast-more="nx-border-primary-900/20" contrast-more="nx-contrast-150" contrast-more="dark:nx-border-primary-100/40" nx-py-4 data-language="text" data-theme="default"]<code class="nx-border-black nx-border-opacity-[0.04] nx-bg-opacity-[0.03] nx-bg-black nx-break-words nx-rounded-md nx-border nx-py-0.5 nx-px-[.25em] nx-text-[.9em] dark:nx-border-white/10 dark:nx-bg-white/10" dir="ltr" data-language="text" data-theme="default"><span class="line">Classify the text into neutral, negative or positive. </span><span class="line">Text: I think the food was okay. </span><span class="line">Sentiment:</span> |
Output:
|
1 2 3 |
contrast-more="nx-border" contrast-more="nx-border-primary-900/20" contrast-more="nx-contrast-150" contrast-more="dark:nx-border-primary-100/40" nx-py-4 data-language="text" data-theme="default"]<code class="nx-border-black nx-border-opacity-[0.04] nx-bg-opacity-[0.03] nx-bg-black nx-break-words nx-rounded-md nx-border nx-py-0.5 nx-px-[.25em] nx-text-[.9em] dark:nx-border-white/10 dark:nx-bg-white/10" dir="ltr" data-language="text" data-theme="default"><span class="line">Neutral</span> |
You gave the instruction to classify the text and the model responded with 'Neutral', which is correct. Nothing is wrong with this but let’s say that what you really need is for the model to give the label in the exact format you want. So instead of Neutral, you want it to return neutral. How do you achieve this? There are different ways to do this. You care about specificity here, so the more information you can provide the prompt, the better results. You can try providing examples to specify the correct behavior. Let’s try again:
Prompt:
|
1 2 3 4 |
contrast-more="nx-border" contrast-more="nx-border-primary-900/20" contrast-more="nx-contrast-150" contrast-more="dark:nx-border-primary-100/40" nx-py-4 data-language="text" data-theme="default"]<code class="nx-border-black nx-border-opacity-[0.04] nx-bg-opacity-[0.03] nx-bg-black nx-break-words nx-rounded-md nx-border nx-py-0.5 nx-px-[.25em] nx-text-[.9em] dark:nx-border-white/10 dark:nx-bg-white/10" dir="ltr" data-language="text" data-theme="default"><span class="line">Classify the text into neutral, negative or positive. </span><span class="line">Text: I think the vacation is okay.</span><span class="line">Sentiment: neutral </span><span class="line">Text: I think the food was okay. </span><span class="line">Sentiment:</span> |
Output:
|
1 2 3 |
contrast-more="nx-border" contrast-more="nx-border-primary-900/20" contrast-more="nx-contrast-150" contrast-more="dark:nx-border-primary-100/40" nx-py-4 data-language="text" data-theme="default"]<code class="nx-border-black nx-border-opacity-[0.04] nx-bg-opacity-[0.03] nx-bg-black nx-break-words nx-rounded-md nx-border nx-py-0.5 nx-px-[.25em] nx-text-[.9em] dark:nx-border-white/10 dark:nx-bg-white/10" dir="ltr" data-language="text" data-theme="default"><span class="line">neutral</span> |
Perfect! This time the model returned neutral which is the specific label you were looking for. It seems that the example provided in the prompt helped the model to be specific in its output.
To highlight why sometimes being specific is important, check out the example below and spot the problem:
Prompt:
|
1 2 3 |
contrast-more="nx-border" contrast-more="nx-border-primary-900/20" contrast-more="nx-contrast-150" contrast-more="dark:nx-border-primary-100/40" nx-py-4 data-language="text" data-theme="default"]<code class="nx-border-black nx-border-opacity-[0.04] nx-bg-opacity-[0.03] nx-bg-black nx-break-words nx-rounded-md nx-border nx-py-0.5 nx-px-[.25em] nx-text-[.9em] dark:nx-border-white/10 dark:nx-bg-white/10" dir="ltr" data-language="text" data-theme="default"><span class="line">Classify the text into nutral, negative or positive. </span><span class="line">Text: I think the vacation is okay.</span><span class="line">Sentiment:</span> |
Output:
|
1 2 3 |
contrast-more="nx-border" contrast-more="nx-border-primary-900/20" contrast-more="nx-contrast-150" contrast-more="dark:nx-border-primary-100/40" nx-py-4 data-language="text" data-theme="default"]<code class="nx-border-black nx-border-opacity-[0.04] nx-bg-opacity-[0.03] nx-bg-black nx-break-words nx-rounded-md nx-border nx-py-0.5 nx-px-[.25em] nx-text-[.9em] dark:nx-border-white/10 dark:nx-bg-white/10" dir="ltr" data-language="text" data-theme="default"><span class="line">Neutral</span> |
What is the problem here? As a hint, the made-up nutral label is completely ignored by the model. Instead, the model outputs Neutral as it has some bias towards that label. But let’s assume that what you really want is nutral. How would you fix this? Maybe you can try adding descriptions to the labels or add more examples to the prompt? If you are not sure, we will discuss a few ideas in the upcoming sections.
Conversation
Perhaps one of the more interesting things you can achieve with prompt engineering is instructing the LLM system on how to behave, its intent, and its identity. This is particularly useful when you are building conversational systems like customer service chatbots.
For instance, let’s create a conversational system that’s able to generate more technical and scientific responses to questions. Note how you are explicitly telling it how to behave through the instruction. This is sometimes referred to as role prompting.
Prompt:
|
1 2 3 4 5 6 |
contrast-more="nx-border" contrast-more="nx-border-primary-900/20" contrast-more="nx-contrast-150" contrast-more="dark:nx-border-primary-100/40" nx-py-4 data-language="text" data-theme="default"]<code class="nx-border-black nx-border-opacity-[0.04] nx-bg-opacity-[0.03] nx-bg-black nx-break-words nx-rounded-md nx-border nx-py-0.5 nx-px-[.25em] nx-text-[.9em] dark:nx-border-white/10 dark:nx-bg-white/10" dir="ltr" data-language="text" data-theme="default"><span class="line">The following is a conversation with an AI research assistant. The assistant tone is technical and scientific.</span><span class="line">Human: Hello, who are you?</span><span class="line">AI: Greeting! I am an AI research assistant. How can I help you today?</span><span class="line">Human: Can you tell me about the creation of blackholes?</span><span class="line">AI:</span> |
Output:
|
1 2 3 4 5 6 7 8 |
contrast-more="nx-border" contrast-more="nx-border-primary-900/20" contrast-more="nx-contrast-150" contrast-more="dark:nx-border-primary-100/40" nx-py-4 data-language="text" data-theme="default"]<code class="nx-border-black nx-border-opacity-[0.04] nx-bg-opacity-[0.03] nx-bg-black nx-break-words nx-rounded-md nx-border nx-py-0.5 nx-px-[.25em] nx-text-[.9em] dark:nx-border-white/10 dark:nx-bg-white/10" dir="ltr" data-language="text" data-theme="default"><span class="line">Sure! Black holes are regions of spacetime where the gravitational force is so strong that nothing, not even light, can escape from it. They are created when a very massive star dies and its core collapses in on itself, forming a singularity of infinite density. The intense gravity of the singularity pulls in all the matter and radiation around it, creating the black hole.</span> |
Our AI research assistant sounds a bit too technical, right? Okay, let’s change this behavior and instruct the system to give more accessible answers.
Prompt:
|
1 2 3 4 5 6 |
contrast-more="nx-border" contrast-more="nx-border-primary-900/20" contrast-more="nx-contrast-150" contrast-more="dark:nx-border-primary-100/40" nx-py-4 data-language="text" data-theme="default"]<code class="nx-border-black nx-border-opacity-[0.04] nx-bg-opacity-[0.03] nx-bg-black nx-break-words nx-rounded-md nx-border nx-py-0.5 nx-px-[.25em] nx-text-[.9em] dark:nx-border-white/10 dark:nx-bg-white/10" dir="ltr" data-language="text" data-theme="default"><span class="line">The following is a conversation with an AI research assistant. The assistant answers should be easy to understand even by primary school students.</span><span class="line">Human: Hello, who are you?</span><span class="line">AI: Greeting! I am an AI research assistant. How can I help you today?</span><span class="line">Human: Can you tell me about the creation of black holes?</span><span class="line">AI: </span> |
Output:
|
1 2 3 4 5 |
contrast-more="nx-border" contrast-more="nx-border-primary-900/20" contrast-more="nx-contrast-150" contrast-more="dark:nx-border-primary-100/40" nx-py-4 data-language="text" data-theme="default"]<code class="nx-border-black nx-border-opacity-[0.04] nx-bg-opacity-[0.03] nx-bg-black nx-break-words nx-rounded-md nx-border nx-py-0.5 nx-px-[.25em] nx-text-[.9em] dark:nx-border-white/10 dark:nx-bg-white/10" dir="ltr" data-language="text" data-theme="default"><span class="line">Sure! Black holes are created when a very massive star runs out of fuel and collapses in on itself. The gravity of the star is so strong that nothing, not even light, can escape its pull. This creates a point in space-time with an intense gravitational force called a black hole.</span> |
You made some progress. You can continue improving it. If you add more examples, you might get even better results.
Code Generation
One application where LLMs are quite effective is code generation. Copilot is a great example of this. There are a vast number of code-generation tasks you can perform with clever prompts. Let’s look at a few examples below.
First, let’s try a simple program that greets the user.
Prompt:
|
1 2 3 |
contrast-more="nx-border" contrast-more="nx-border-primary-900/20" contrast-more="nx-contrast-150" contrast-more="dark:nx-border-primary-100/40" nx-py-4 data-language="text" data-theme="default"]<code class="nx-border-black nx-border-opacity-[0.04] nx-bg-opacity-[0.03] nx-bg-black nx-break-words nx-rounded-md nx-border nx-py-0.5 nx-px-[.25em] nx-text-[.9em] dark:nx-border-white/10 dark:nx-bg-white/10" dir="ltr" data-language="text" data-theme="default"><span class="line">/*</span><span class="line">Ask the user for their name and say "Hello"</span><span class="line">*/</span> |
Output:
|
1 2 3 |
contrast-more="nx-border" contrast-more="nx-border-primary-900/20" contrast-more="nx-contrast-150" contrast-more="dark:nx-border-primary-100/40" nx-py-4 data-language="text" data-theme="default"]<code class="nx-border-black nx-border-opacity-[0.04] nx-bg-opacity-[0.03] nx-bg-black nx-break-words nx-rounded-md nx-border nx-py-0.5 nx-px-[.25em] nx-text-[.9em] dark:nx-border-white/10 dark:nx-bg-white/10" dir="ltr" data-language="text" data-theme="default"><span class="line">let name = prompt("What is your name?");</span><span class="line">console.log(`Hello, ${name}!`);</span> |
Notice that you didn’t even need to specify the language to use.
Let’s switch levels a bit. The example below shows how powerful LLMs can be with a little more effort in designing the prompts.
Prompt:
|
1 2 3 4 5 |
contrast-more="nx-border" contrast-more="nx-border-primary-900/20" contrast-more="nx-contrast-150" contrast-more="dark:nx-border-primary-100/40" nx-py-4 data-language="text" data-theme="default"]<code class="nx-border-black nx-border-opacity-[0.04] nx-bg-opacity-[0.03] nx-bg-black nx-break-words nx-rounded-md nx-border nx-py-0.5 nx-px-[.25em] nx-text-[.9em] dark:nx-border-white/10 dark:nx-bg-white/10" dir="ltr" data-language="text" data-theme="default"><span class="line">"""</span><span class="line">Table departments, columns = [DepartmentId, DepartmentName]</span><span class="line">Table students, columns = [DepartmentId, StudentId, StudentName] </span><span class="line">Create a MySQL query for all students in the Computer Science Department</span><span class="line">"""</span> |
Output:
|
1 2 3 4 |
contrast-more="nx-border" contrast-more="nx-border-primary-900/20" contrast-more="nx-contrast-150" contrast-more="dark:nx-border-primary-100/40" nx-py-4 data-language="text" data-theme="default"]<code class="nx-border-black nx-border-opacity-[0.04] nx-bg-opacity-[0.03] nx-bg-black nx-break-words nx-rounded-md nx-border nx-py-0.5 nx-px-[.25em] nx-text-[.9em] dark:nx-border-white/10 dark:nx-bg-white/10" dir="ltr" data-language="text" data-theme="default"><span class="line">SELECT StudentId, StudentName </span><span class="line">FROM students </span><span class="line">WHERE DepartmentId IN (SELECT DepartmentId FROM departments WHERE DepartmentName = 'Computer Science');</span> |
This is very impressive. In this case, you provided data about the database schema and asked it to generate a valid MySQL query.
Reasoning
Perhaps one of the most difficult tasks for an LLM today is one that requires some form of reasoning. Reasoning is one of most interesting areas due to the types of complex applications that can emerge from LLMs.
There have been some improvements in tasks involving mathematical capabilities. That said, it’s important to note that current LLMs struggle to perform reasoning tasks so this requires even more advanced prompt engineering techniques. We will cover these advanced techniques in the next guide. For now, we will cover a few basic examples to show arithmetic capabilities.
Prompt:
|
1 2 3 |
contrast-more="nx-border" contrast-more="nx-border-primary-900/20" contrast-more="nx-contrast-150" contrast-more="dark:nx-border-primary-100/40" nx-py-4 data-language="text" data-theme="default"]<code class="nx-border-black nx-border-opacity-[0.04] nx-bg-opacity-[0.03] nx-bg-black nx-break-words nx-rounded-md nx-border nx-py-0.5 nx-px-[.25em] nx-text-[.9em] dark:nx-border-white/10 dark:nx-bg-white/10" dir="ltr" data-language="text" data-theme="default"><span class="line">What is 9,000 * 9,000?</span> |
Output:
|
1 2 3 |
contrast-more="nx-border" contrast-more="nx-border-primary-900/20" contrast-more="nx-contrast-150" contrast-more="dark:nx-border-primary-100/40" nx-py-4 data-language="text" data-theme="default"]<code class="nx-border-black nx-border-opacity-[0.04] nx-bg-opacity-[0.03] nx-bg-black nx-break-words nx-rounded-md nx-border nx-py-0.5 nx-px-[.25em] nx-text-[.9em] dark:nx-border-white/10 dark:nx-bg-white/10" dir="ltr" data-language="text" data-theme="default"><span class="line">81,000,000</span> |
Let’s try something more difficult.
Prompt:
|
1 2 3 |
contrast-more="nx-border" contrast-more="nx-border-primary-900/20" contrast-more="nx-contrast-150" contrast-more="dark:nx-border-primary-100/40" nx-py-4 data-language="text" data-theme="default"]<code class="nx-border-black nx-border-opacity-[0.04] nx-bg-opacity-[0.03] nx-bg-black nx-break-words nx-rounded-md nx-border nx-py-0.5 nx-px-[.25em] nx-text-[.9em] dark:nx-border-white/10 dark:nx-bg-white/10" dir="ltr" data-language="text" data-theme="default"><span class="line">The odd numbers in this group add up to an even number: 15, 32, 5, 13, 82, 7, 1. </span><span class="line">A: </span> |
Output
|
1 2 3 |
contrast-more="nx-border" contrast-more="nx-border-primary-900/20" contrast-more="nx-contrast-150" contrast-more="dark:nx-border-primary-100/40" nx-py-4 data-language="text" data-theme="default"]<code class="nx-border-black nx-border-opacity-[0.04] nx-bg-opacity-[0.03] nx-bg-black nx-break-words nx-rounded-md nx-border nx-py-0.5 nx-px-[.25em] nx-text-[.9em] dark:nx-border-white/10 dark:nx-bg-white/10" dir="ltr" data-language="text" data-theme="default"><span class="line">No, the odd numbers in this group add up to an odd number: 119.</span> |
That’s incorrect! Let’s try to improve this by improving the prompt.
Prompt:
|
1 2 3 4 5 |
contrast-more="nx-border" contrast-more="nx-border-primary-900/20" contrast-more="nx-contrast-150" contrast-more="dark:nx-border-primary-100/40" nx-py-4 data-language="text" data-theme="default"]<code class="nx-border-black nx-border-opacity-[0.04] nx-bg-opacity-[0.03] nx-bg-black nx-break-words nx-rounded-md nx-border nx-py-0.5 nx-px-[.25em] nx-text-[.9em] dark:nx-border-white/10 dark:nx-bg-white/10" dir="ltr" data-language="text" data-theme="default"><span class="line">The odd numbers in this group add up to an even number: 15, 32, 5, 13, 82, 7, 1. </span><span class="line">Solve by breaking the problem into steps. First, identify the odd numbers, add them, and indicate whether the result is odd or even. </span> |
Output:
|
1 2 3 |
contrast-more="nx-border" contrast-more="nx-border-primary-900/20" contrast-more="nx-contrast-150" contrast-more="dark:nx-border-primary-100/40" nx-py-4 data-language="text" data-theme="default"]<code class="nx-border-black nx-border-opacity-[0.04] nx-bg-opacity-[0.03] nx-bg-black nx-break-words nx-rounded-md nx-border nx-py-0.5 nx-px-[.25em] nx-text-[.9em] dark:nx-border-white/10 dark:nx-bg-white/10" dir="ltr" data-language="text" data-theme="default"><span class="line">Odd numbers: 15, 5, 13, 7, 1</span><span class="line">Sum: 41 </span><span class="line">41 is an odd number.</span> |
Much better, right? By the way, we tried this task a couple of times and the model sometimes fails. If you provide better instructions combined with examples, it might help get more accurate results.
In the upcoming section, we will cover even more advanced prompt engineering concepts and techniques for improving performance on all these and more difficult tasks.
Zero-Shot Prompting
Large language models (LLMs) today, such as GPT-3.5 Turbo, GPT-4, and Claude 3, are tuned to follow instructions and are trained on large amounts of data. Large-scale training makes these models capable of performing some tasks in a “zero-shot” manner. Zero-shot prompting means that the prompt used to interact with the model won’t contain examples or demonstrations. The zero-shot prompt directly instructs the model to perform a task without any additional examples to steer it.
We tried a few zero-shot examples in the previous section. Here is one of the examples (ie., text classification) we used:
Prompt:
|
1 2 3 |
contrast-more="nx-border" contrast-more="nx-border-primary-900/20" contrast-more="nx-contrast-150" contrast-more="dark:nx-border-primary-100/40" nx-py-4 data-language="text" data-theme="default"]<code class="nx-border-black nx-border-opacity-[0.04] nx-bg-opacity-[0.03] nx-bg-black nx-break-words nx-rounded-md nx-border nx-py-0.5 nx-px-[.25em] nx-text-[.9em] dark:nx-border-white/10 dark:nx-bg-white/10" dir="ltr" data-language="text" data-theme="default"><span class="line">Classify the text into neutral, negative or positive. </span><span class="line">Text: I think the vacation is okay.</span><span class="line">Sentiment:</span> |
Output:
|
1 2 3 |
contrast-more="nx-border" contrast-more="nx-border-primary-900/20" contrast-more="nx-contrast-150" contrast-more="dark:nx-border-primary-100/40" nx-py-4 data-language="text" data-theme="default"]<code class="nx-border-black nx-border-opacity-[0.04] nx-bg-opacity-[0.03] nx-bg-black nx-break-words nx-rounded-md nx-border nx-py-0.5 nx-px-[.25em] nx-text-[.9em] dark:nx-border-white/10 dark:nx-bg-white/10" dir="ltr" data-language="text" data-theme="default"><span class="line">Neutral</span> |
Note that in the prompt above we didn’t provide the model with any examples of text alongside their classifications, the LLM already understands “sentiment” — that’s the zero-shot capabilities at work.
Instruction tuning has been shown to improve zero-shot learning Wei et al. (2022)(opens in a new tab). Instruction tuning is essentially the concept of finetuning models on datasets described via instructions. Furthermore, RLHF(opens in a new tab) (reinforcement learning from human feedback) has been adopted to scale instruction tuning wherein the model is aligned to better fit human preferences. This recent development powers models like ChatGPT. We will discuss all these approaches and methods in upcoming sections.
When zero-shot doesn’t work, it’s recommended to provide demonstrations or examples in the prompt which leads to few-shot prompting. In the next section, we demonstrate few-shot prompting.
Few-Shot Prompting
While large-language models demonstrate remarkable zero-shot capabilities, they still fall short on more complex tasks when using the zero-shot setting. Few-shot prompting can be used as a technique to enable in-context learning where we provide demonstrations in the prompt to steer the model to better performance. The demonstrations serve as conditioning for subsequent examples where we would like the model to generate a response.
According to Touvron et al. 2023(opens in a new tab) few shot properties first appeared when models were scaled to a sufficient size (Kaplan et al., 2020)(opens in a new tab).
Let’s demonstrate few-shot prompting via an example that was presented in Brown et al. 2020(opens in a new tab). In the example, the task is to correctly use a new word in a sentence.
Prompt:
|
1 2 3 4 5 6 |
contrast-more="nx-border" contrast-more="nx-border-primary-900/20" contrast-more="nx-contrast-150" contrast-more="dark:nx-border-primary-100/40" nx-py-4 data-language="markdown" data-theme="default"]<code class="nx-border-black nx-border-opacity-[0.04] nx-bg-opacity-[0.03] nx-bg-black nx-break-words nx-rounded-md nx-border nx-py-0.5 nx-px-[.25em] nx-text-[.9em] dark:nx-border-white/10 dark:nx-bg-white/10" dir="ltr" data-language="markdown" data-theme="default"><span class="line">A "whatpu" is a small, furry animal native to Tanzania. An example of a sentence that uses the word whatpu is:</span><span class="line">We were traveling in Africa and we saw these very cute whatpus.</span> <span class="line">To do a "farduddle" means to jump up and down really fast. An example of a sentence that uses the word farduddle is:</span> |
Output:
|
1 2 3 |
contrast-more="nx-border" contrast-more="nx-border-primary-900/20" contrast-more="nx-contrast-150" contrast-more="dark:nx-border-primary-100/40" nx-py-4 data-language="text" data-theme="default"]<code class="nx-border-black nx-border-opacity-[0.04] nx-bg-opacity-[0.03] nx-bg-black nx-break-words nx-rounded-md nx-border nx-py-0.5 nx-px-[.25em] nx-text-[.9em] dark:nx-border-white/10 dark:nx-bg-white/10" dir="ltr" data-language="text" data-theme="default"><span class="line">When we won the game, we all started to farduddle in celebration.</span> |
We can observe that the model has somehow learned how to perform the task by providing it with just one example (i.e., 1-shot). For more difficult tasks, we can experiment with increasing the demonstrations (e.g., 3-shot, 5-shot, 10-shot, etc.).
Following the findings from Min et al. (2022)(opens in a new tab), here are a few more tips about demonstrations/exemplars when doing few-shot:
- “the label space and the distribution of the input text specified by the demonstrations are both important (regardless of whether the labels are correct for individual inputs)”
- the format you use also plays a key role in performance, even if you just use random labels, this is much better than no labels at all.
- additional results show that selecting random labels from a true distribution of labels (instead of a uniform distribution) also helps.
Let’s try out a few examples. Let’s first try an example with random labels (meaning the labels Negative and Positive are randomly assigned to the inputs):
Prompt:
|
1 2 3 4 |
contrast-more="nx-border" contrast-more="nx-border-primary-900/20" contrast-more="nx-contrast-150" contrast-more="dark:nx-border-primary-100/40" nx-py-4 data-language="text" data-theme="default"]<code class="nx-border-black nx-border-opacity-[0.04] nx-bg-opacity-[0.03] nx-bg-black nx-break-words nx-rounded-md nx-border nx-py-0.5 nx-px-[.25em] nx-text-[.9em] dark:nx-border-white/10 dark:nx-bg-white/10" dir="ltr" data-language="text" data-theme="default"><span class="line">This is awesome! // Negative</span><span class="line">This is bad! // Positive</span><span class="line">Wow that movie was rad! // Positive</span><span class="line">What a horrible show! //</span> |
Output:
|
1 2 3 |
contrast-more="nx-border" contrast-more="nx-border-primary-900/20" contrast-more="nx-contrast-150" contrast-more="dark:nx-border-primary-100/40" nx-py-4 data-language="text" data-theme="default"]<code class="nx-border-black nx-border-opacity-[0.04] nx-bg-opacity-[0.03] nx-bg-black nx-break-words nx-rounded-md nx-border nx-py-0.5 nx-px-[.25em] nx-text-[.9em] dark:nx-border-white/10 dark:nx-bg-white/10" dir="ltr" data-language="text" data-theme="default"><span class="line">Negative</span> |
We still get the correct answer, even though the labels have been randomized. Note that we also kept the format, which helps too. In fact, with further experimentation, it seems the newer GPT models we are experimenting with are becoming more robust to even random formats. Example:
Prompt:
|
1 2 3 |
contrast-more="nx-border" contrast-more="nx-border-primary-900/20" contrast-more="nx-contrast-150" contrast-more="dark:nx-border-primary-100/40" nx-py-4 data-language="text" data-theme="default"]<code class="nx-border-black nx-border-opacity-[0.04] nx-bg-opacity-[0.03] nx-bg-black nx-break-words nx-rounded-md nx-border nx-py-0.5 nx-px-[.25em] nx-text-[.9em] dark:nx-border-white/10 dark:nx-bg-white/10" dir="ltr" data-language="text" data-theme="default"><span class="line">Positive This is awesome! </span><span class="line">This is bad! Negative</span><span class="line">Wow that movie was rad!</span><span class="line">Positive</span><span class="line">What a horrible show! --</span> |
Output:
|
1 2 3 |
contrast-more="nx-border" contrast-more="nx-border-primary-900/20" contrast-more="nx-contrast-150" contrast-more="dark:nx-border-primary-100/40" nx-py-4 data-language="text" data-theme="default"]<code class="nx-border-black nx-border-opacity-[0.04] nx-bg-opacity-[0.03] nx-bg-black nx-break-words nx-rounded-md nx-border nx-py-0.5 nx-px-[.25em] nx-text-[.9em] dark:nx-border-white/10 dark:nx-bg-white/10" dir="ltr" data-language="text" data-theme="default"><span class="line">Negative</span> |
There is no consistency in the format above but the model still predicted the correct label. We have to conduct a more thorough analysis to confirm if this holds for different and more complex tasks, including different variations of prompts.
Limitations of Few-shot Prompting
Standard few-shot prompting works well for many tasks but is still not a perfect technique, especially when dealing with more complex reasoning tasks. Let’s demonstrate why this is the case. Do you recall the previous example where we provided the following task:
|
1 2 3 |
contrast-more="nx-border" contrast-more="nx-border-primary-900/20" contrast-more="nx-contrast-150" contrast-more="dark:nx-border-primary-100/40" nx-py-4 data-language="text" data-theme="default"]<code class="nx-border-black nx-border-opacity-[0.04] nx-bg-opacity-[0.03] nx-bg-black nx-break-words nx-rounded-md nx-border nx-py-0.5 nx-px-[.25em] nx-text-[.9em] dark:nx-border-white/10 dark:nx-bg-white/10" dir="ltr" data-language="text" data-theme="default"><span class="line">The odd numbers in this group add up to an even number: 15, 32, 5, 13, 82, 7, 1. </span><span class="line">A: </span> |
If we try this again, the model outputs the following:
|
1 2 3 |
contrast-more="nx-border" contrast-more="nx-border-primary-900/20" contrast-more="nx-contrast-150" contrast-more="dark:nx-border-primary-100/40" nx-py-4 data-language="text" data-theme="default"]<code class="nx-border-black nx-border-opacity-[0.04] nx-bg-opacity-[0.03] nx-bg-black nx-break-words nx-rounded-md nx-border nx-py-0.5 nx-px-[.25em] nx-text-[.9em] dark:nx-border-white/10 dark:nx-bg-white/10" dir="ltr" data-language="text" data-theme="default"><span class="line">Yes, the odd numbers in this group add up to 107, which is an even number.</span> |
This is not the correct response, which not only highlights the limitations of these systems but that there is a need for more advanced prompt engineering.
Let’s try to add some examples to see if few-shot prompting improves the results.
Prompt:
|
1 2 3 4 5 6 7 |
contrast-more="nx-border" contrast-more="nx-border-primary-900/20" contrast-more="nx-contrast-150" contrast-more="dark:nx-border-primary-100/40" nx-py-4 data-language="text" data-theme="default"]<code class="nx-border-black nx-border-opacity-[0.04] nx-bg-opacity-[0.03] nx-bg-black nx-break-words nx-rounded-md nx-border nx-py-0.5 nx-px-[.25em] nx-text-[.9em] dark:nx-border-white/10 dark:nx-bg-white/10" dir="ltr" data-language="text" data-theme="default"><span class="line">The odd numbers in this group add up to an even number: 4, 8, 9, 15, 12, 2, 1.</span><span class="line">A: The answer is False.</span><span class="line">The odd numbers in this group add up to an even number: 17, 10, 19, 4, 8, 12, 24.</span><span class="line">A: The answer is True.</span><span class="line">The odd numbers in this group add up to an even number: 16, 11, 14, 4, 8, 13, 24.</span><span class="line">A: The answer is True.</span><span class="line">The odd numbers in this group add up to an even number: 17, 9, 10, 12, 13, 4, 2.</span><span class="line">A: The answer is False.</span><span class="line">The odd numbers in this group add up to an even number: 15, 32, 5, 13, 82, 7, 1. </span><span class="line">A: </span> |
Output:
|
1 2 3 |
contrast-more="nx-border" contrast-more="nx-border-primary-900/20" contrast-more="nx-contrast-150" contrast-more="dark:nx-border-primary-100/40" nx-py-4 data-language="text" data-theme="default"]<code class="nx-border-black nx-border-opacity-[0.04] nx-bg-opacity-[0.03] nx-bg-black nx-break-words nx-rounded-md nx-border nx-py-0.5 nx-px-[.25em] nx-text-[.9em] dark:nx-border-white/10 dark:nx-bg-white/10" dir="ltr" data-language="text" data-theme="default"><span class="line">The answer is True.</span> |
That didn’t work. It seems like few-shot prompting is not enough to get reliable responses for this type of reasoning problem. The example above provides basic information on the task. If you take a closer look, the type of task we have introduced involves a few more reasoning steps. In other words, it might help if we break the problem down into steps and demonstrate that to the model. More recently, chain-of-thought (CoT) prompting(opens in a new tab) has been popularized to address more complex arithmetic, commonsense, and symbolic reasoning tasks.
Overall, it seems that providing examples is useful for solving some tasks. When zero-shot prompting and few-shot prompting are not sufficient, it might mean that whatever was learned by the model isn’t enough to do well at the task. From here it is recommended to start thinking about fine-tuning your models or experimenting with more advanced prompting techniques. Up next we talk about one of the popular prompting techniques called chain-of-thought prompting which has gained a lot of popularity.
Chain-of-Thought (CoT) Prompting
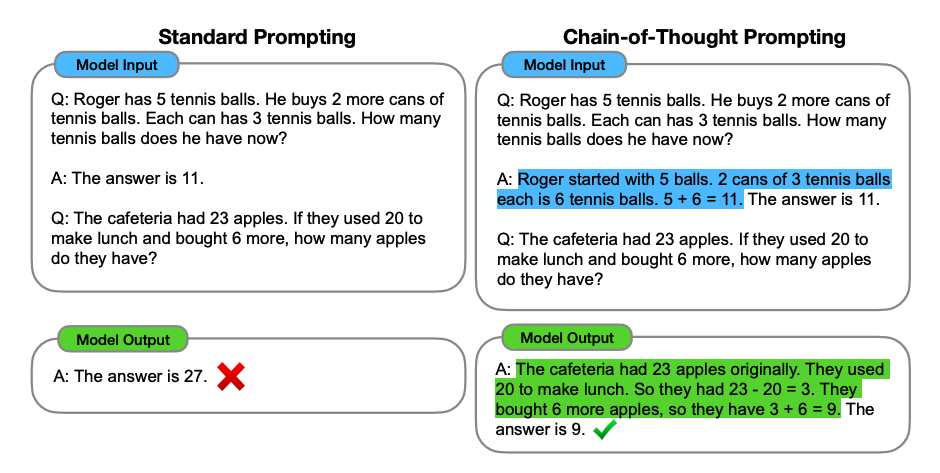
Image Source: Wei et al. (2022)(opens in a new tab)
Introduced in Wei et al. (2022)(opens in a new tab), chain-of-thought (CoT) prompting enables complex reasoning capabilities through intermediate reasoning steps. You can combine it with few-shot prompting to get better results on more complex tasks that require reasoning before responding.
Prompt:
|
1 2 3 4 5 6 7 8 9 10 11 |
contrast-more="nx-border" contrast-more="nx-border-primary-900/20" contrast-more="nx-contrast-150" contrast-more="dark:nx-border-primary-100/40" nx-py-4 data-language="text" data-theme="default"]<code class="nx-border-black nx-border-opacity-[0.04] nx-bg-opacity-[0.03] nx-bg-black nx-break-words nx-rounded-md nx-border nx-py-0.5 nx-px-[.25em] nx-text-[.9em] dark:nx-border-white/10 dark:nx-bg-white/10" dir="ltr" data-language="text" data-theme="default"><span class="line">The odd numbers in this group add up to an even number: 4, 8, 9, 15, 12, 2, 1.</span><span class="line">A: Adding all the odd numbers (9, 15, 1) gives 25. The answer is False. </span><span class="line">The odd numbers in this group add up to an even number: 17, 10, 19, 4, 8, 12, 24.</span><span class="line">A: Adding all the odd numbers (17, 19) gives 36. The answer is True. </span><span class="line">The odd numbers in this group add up to an even number: 16, 11, 14, 4, 8, 13, 24.</span><span class="line">A: Adding all the odd numbers (11, 13) gives 24. The answer is True. </span><span class="line">The odd numbers in this group add up to an even number: 17, 9, 10, 12, 13, 4, 2.</span><span class="line">A: Adding all the odd numbers (17, 9, 13) gives 39. The answer is False. </span><span class="line">The odd numbers in this group add up to an even number: 15, 32, 5, 13, 82, 7, 1. </span><span class="line">A:</span> |
Output:
|
1 2 3 |
contrast-more="nx-border" contrast-more="nx-border-primary-900/20" contrast-more="nx-contrast-150" contrast-more="dark:nx-border-primary-100/40" nx-py-4 data-language="text" data-theme="default"]<code class="nx-border-black nx-border-opacity-[0.04] nx-bg-opacity-[0.03] nx-bg-black nx-break-words nx-rounded-md nx-border nx-py-0.5 nx-px-[.25em] nx-text-[.9em] dark:nx-border-white/10 dark:nx-bg-white/10" dir="ltr" data-language="text" data-theme="default"><span class="line">Adding all the odd numbers (15, 5, 13, 7, 1) gives 41. The answer is False.</span> |
Wow! We can see a perfect result when we provided the reasoning step. In fact, we can solve this task by providing even fewer examples, i.e., just one example seems enough:
Prompt:
|
1 2 3 4 5 |
contrast-more="nx-border" contrast-more="nx-border-primary-900/20" contrast-more="nx-contrast-150" contrast-more="dark:nx-border-primary-100/40" nx-py-4 data-language="text" data-theme="default"]<code class="nx-border-black nx-border-opacity-[0.04] nx-bg-opacity-[0.03] nx-bg-black nx-break-words nx-rounded-md nx-border nx-py-0.5 nx-px-[.25em] nx-text-[.9em] dark:nx-border-white/10 dark:nx-bg-white/10" dir="ltr" data-language="text" data-theme="default"><span class="line">The odd numbers in this group add up to an even number: 4, 8, 9, 15, 12, 2, 1.</span><span class="line">A: Adding all the odd numbers (9, 15, 1) gives 25. The answer is False. </span><span class="line">The odd numbers in this group add up to an even number: 15, 32, 5, 13, 82, 7, 1. </span><span class="line">A:</span> |
Output:
|
1 2 3 |
contrast-more="nx-border" contrast-more="nx-border-primary-900/20" contrast-more="nx-contrast-150" contrast-more="dark:nx-border-primary-100/40" nx-py-4 data-language="text" data-theme="default"]<code class="nx-border-black nx-border-opacity-[0.04] nx-bg-opacity-[0.03] nx-bg-black nx-break-words nx-rounded-md nx-border nx-py-0.5 nx-px-[.25em] nx-text-[.9em] dark:nx-border-white/10 dark:nx-bg-white/10" dir="ltr" data-language="text" data-theme="default"><span class="line">Adding all the odd numbers (15, 5, 13, 7, 1) gives 41. The answer is False.</span> |
Keep in mind that the authors claim that this is an emergent ability that arises with sufficiently large language models.
Zero-shot COT Prompting
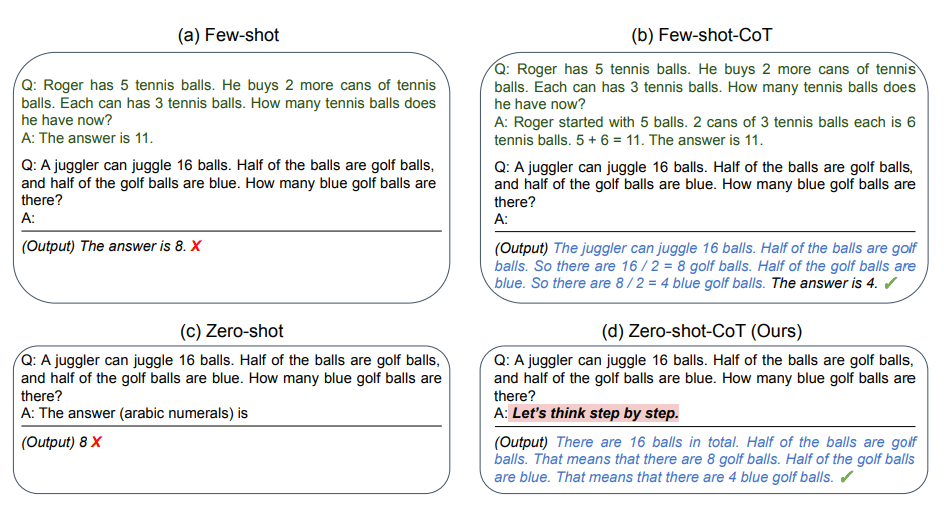
Image Source: Kojima et al. (2022)(opens in a new tab)
One recent idea that came out more recently is the idea of zero-shot CoT(opens in a new tab) (Kojima et al. 2022) that essentially involves adding “Let’s think step by step” to the original prompt. Let’s try a simple problem and see how the model performs:
Prompt:
|
1 2 3 4 |
contrast-more="nx-border" contrast-more="nx-border-primary-900/20" contrast-more="nx-contrast-150" contrast-more="dark:nx-border-primary-100/40" nx-py-4 data-language="text" data-theme="default"]<code class="nx-border-black nx-border-opacity-[0.04] nx-bg-opacity-[0.03] nx-bg-black nx-break-words nx-rounded-md nx-border nx-py-0.5 nx-px-[.25em] nx-text-[.9em] dark:nx-border-white/10 dark:nx-bg-white/10" dir="ltr" data-language="text" data-theme="default"><span class="line">I went to the market and bought 10 apples. I gave 2 apples to the neighbor and 2 to the repairman. I then went and bought 5 more apples and ate 1. How many apples did I remain with?</span> |
Output:
|
1 2 3 |
contrast-more="nx-border" contrast-more="nx-border-primary-900/20" contrast-more="nx-contrast-150" contrast-more="dark:nx-border-primary-100/40" nx-py-4 data-language="text" data-theme="default"]<code class="nx-border-black nx-border-opacity-[0.04] nx-bg-opacity-[0.03] nx-bg-black nx-break-words nx-rounded-md nx-border nx-py-0.5 nx-px-[.25em] nx-text-[.9em] dark:nx-border-white/10 dark:nx-bg-white/10" dir="ltr" data-language="text" data-theme="default"><span class="line">11 apples</span> |
The answer is incorrect! Now Let’s try with the special prompt.
Prompt:
|
1 2 3 4 |
contrast-more="nx-border" contrast-more="nx-border-primary-900/20" contrast-more="nx-contrast-150" contrast-more="dark:nx-border-primary-100/40" nx-py-4 data-language="text" data-theme="default"]<code class="nx-border-black nx-border-opacity-[0.04] nx-bg-opacity-[0.03] nx-bg-black nx-break-words nx-rounded-md nx-border nx-py-0.5 nx-px-[.25em] nx-text-[.9em] dark:nx-border-white/10 dark:nx-bg-white/10" dir="ltr" data-language="text" data-theme="default"><span class="line">I went to the market and bought 10 apples. I gave 2 apples to the neighbor and 2 to the repairman. I then went and bought 5 more apples and ate 1. How many apples did I remain with?</span><span class="line">Let's think step by step.</span> |
Output:
|
1 2 3 4 5 |
contrast-more="nx-border" contrast-more="nx-border-primary-900/20" contrast-more="nx-contrast-150" contrast-more="dark:nx-border-primary-100/40" nx-py-4 data-language="text" data-theme="default"]<code class="nx-border-black nx-border-opacity-[0.04] nx-bg-opacity-[0.03] nx-bg-black nx-break-words nx-rounded-md nx-border nx-py-0.5 nx-px-[.25em] nx-text-[.9em] dark:nx-border-white/10 dark:nx-bg-white/10" dir="ltr" data-language="text" data-theme="default"><span class="line">First, you started with 10 apples.</span><span class="line">You gave away 2 apples to the neighbor and 2 to the repairman, so you had 6 apples left.</span><span class="line">Then you bought 5 more apples, so now you had 11 apples.</span><span class="line">Finally, you ate 1 apple, so you would remain with 10 apples.</span> |
It’s impressive that this simple prompt is effective at this task. This is particularly useful where you don’t have too many examples to use in the prompt.
Automatic Chain-of-Thought (Auto-CoT)
When applying chain-of-thought prompting with demonstrations, the process involves hand-crafting effective and diverse examples. This manual effort could lead to suboptimal solutions. Zhang et al. (2022)(opens in a new tab) propose an approach to eliminate manual efforts by leveraging LLMs with “Let’s think step by step” prompt to generate reasoning chains for demonstrations one by one. This automatic process can still end up with mistakes in generated chains. To mitigate the effects of the mistakes, the diversity of demonstrations matter. This work proposes Auto-CoT, which samples questions with diversity and generates reasoning chains to construct the demonstrations.
Auto-CoT consists of two main stages:
- Stage 1): question clustering: partition questions of a given dataset into a few clusters
- Stage 2): demonstration sampling: select a representative question from each cluster and generate its reasoning chain using Zero-Shot-CoT with simple heuristics
The simple heuristics could be length of questions (e.g., 60 tokens) and number of steps in rationale (e.g., 5 reasoning steps). This encourages the model to use simple and accurate demonstrations.
The process is illustrated below:
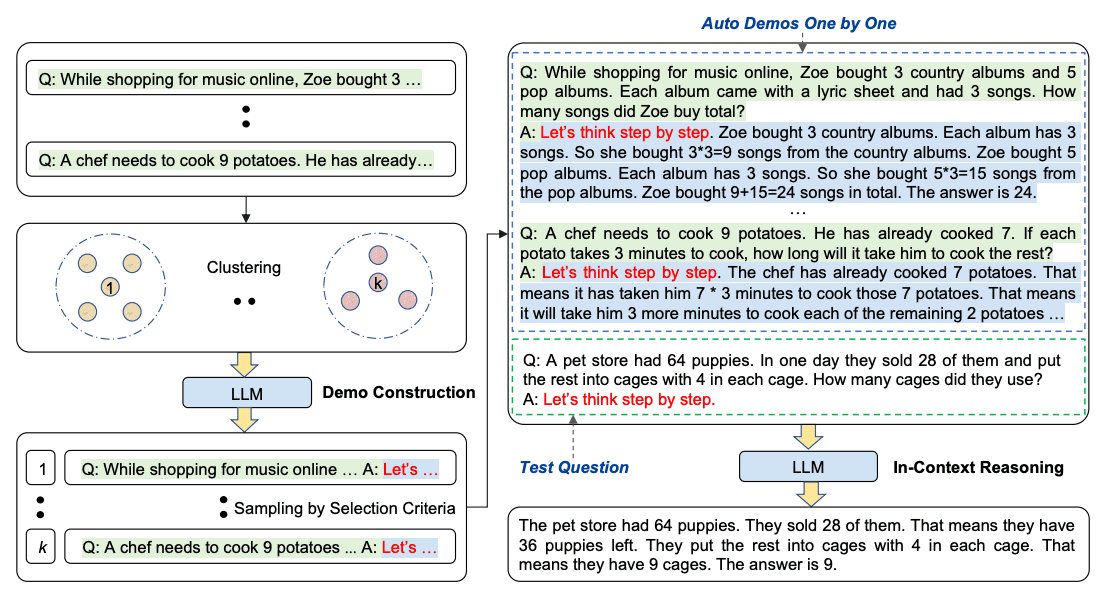
Image Source: Zhang et al. (2022)(opens in a new tab)
Code for Auto-CoT is available here(opens in a new tab).
Meta Prompting
Introduction
Meta Prompting is an advanced prompting technique that focuses on the structural and syntactical aspects of tasks and problems rather than their specific content details. This goal with meta prompting is to construct a more abstract, structured way of interacting with large language models (LLMs), emphasizing the form and pattern of information over traditional content-centric methods.
Key Characteristics
According to Zhang et al. (2024)(opens in a new tab), the key characteristics of meta prompting can be summarized as follows:
1. Structure-oriented: Prioritizes the format and pattern of problems and solutions over specific content.
2. Syntax-focused: Uses syntax as a guiding template for the expected response or solution.
3. Abstract examples: Employs abstracted examples as frameworks, illustrating the structure of problems and solutions without focusing on specific details.
4. Versatile: Applicable across various domains, capable of providing structured responses to a wide range of problems.
5. Categorical approach: Draws from type theory to emphasize the categorization and logical arrangement of components in a prompt.
Advantages over Few-Shot Prompting
Zhang et al., 2024(opens in a new tab) report that meta prompting and few-shot prompting are different in that it meta prompting focuses on a more structure-oriented approach as opposed to a content-driven approach which few-shot prompting emphasizes.
The following example obtained from Zhang et al. (2024)(opens in a new tab) demonstrates the difference between a structured meta prompt and a few-shot prompt for solving problems from the MATH benchmark:

The advantages of Meta Prompting over few-shot promoting include:
1. Token efficiency: Reduces the number of tokens required by focusing on structure rather than detailed content.
2. Fair comparison: Provides a more fair approach for comparing different problem-solving models by minimizing the influence of specific examples.
3. Zero-shot efficacy: Can be viewed as a form of zero-shot prompting, where the influence of specific examples is minimized.
Applications
By focusing on the structural patterns of problem-solving, Meta Prompting offers a clear roadmap for navigating complex topics, enhancing the reasoning capabilities of LLMs across various domains.
It’s important to note that meta prompting also assumes that the LLM has innate knowledge about the specific task or problem being addressed. As LLMs can generalize to a unseen tasks, it is possible that they can be leveraged with meta prompting but performance might deteriorate with more unique and novel tasks as is the case with zero-shot prompting.
Applications where meta prompting can be beneficial include but not limited to complex reasoning tasks, mathematical problem-solving, coding challenges, theoretical queries.
Self-Consistency
Perhaps one of the more advanced techniques out there for prompt engineering is self-consistency. Proposed by Wang et al. (2022)(opens in a new tab), self-consistency aims “to replace the naive greedy decoding used in chain-of-thought prompting”. The idea is to sample multiple, diverse reasoning paths through few-shot CoT, and use the generations to select the most consistent answer. This helps to boost the performance of CoT prompting on tasks involving arithmetic and commonsense reasoning.
Let’s try the following example for arithmetic reasoning:
Prompt:
|
1 2 3 |
contrast-more="nx-border" contrast-more="nx-border-primary-900/20" contrast-more="nx-contrast-150" contrast-more="dark:nx-border-primary-100/40" nx-py-4 data-language="text" data-theme="default"]<code class="nx-border-black nx-border-opacity-[0.04] nx-bg-opacity-[0.03] nx-bg-black nx-break-words nx-rounded-md nx-border nx-py-0.5 nx-px-[.25em] nx-text-[.9em] dark:nx-border-white/10 dark:nx-bg-white/10" dir="ltr" data-language="text" data-theme="default"><span class="line">When I was 6 my sister was half my age. Now</span><span class="line">I’m 70 how old is my sister?</span> |
Output:
|
1 2 3 |
contrast-more="nx-border" contrast-more="nx-border-primary-900/20" contrast-more="nx-contrast-150" contrast-more="dark:nx-border-primary-100/40" nx-py-4 data-language="text" data-theme="default"]<code class="nx-border-black nx-border-opacity-[0.04] nx-bg-opacity-[0.03] nx-bg-black nx-break-words nx-rounded-md nx-border nx-py-0.5 nx-px-[.25em] nx-text-[.9em] dark:nx-border-white/10 dark:nx-bg-white/10" dir="ltr" data-language="text" data-theme="default"><span class="line">35</span> |
The output is wrong! How may we improve this with self-consistency? Let’s try it out. We will use the few-shot exemplars from Wang et al. 2022 (Table 17):
Prompt:
|
1 2 3 4 5 6 7 8 9 10 11 12 13 14 15 16 17 18 19 20 21 22 23 24 25 26 27 28 29 30 31 |
contrast-more="nx-border" contrast-more="nx-border-primary-900/20" contrast-more="nx-contrast-150" contrast-more="dark:nx-border-primary-100/40" nx-py-4 data-language="text" data-theme="default"]<code class="nx-border-black nx-border-opacity-[0.04] nx-bg-opacity-[0.03] nx-bg-black nx-break-words nx-rounded-md nx-border nx-py-0.5 nx-px-[.25em] nx-text-[.9em] dark:nx-border-white/10 dark:nx-bg-white/10" dir="ltr" data-language="text" data-theme="default"><span class="line">Q: There are 15 trees in the grove. Grove workers will plant trees in the grove today. After they are done,</span><span class="line">there will be 21 trees. How many trees did the grove workers plant today?</span><span class="line">A: We start with 15 trees. Later we have 21 trees. The difference must be the number of trees they planted.</span><span class="line">So, they must have planted 21 - 15 = 6 trees. The answer is 6.</span><span class="line">Q: If there are 3 cars in the parking lot and 2 more cars arrive, how many cars are in the parking lot?</span><span class="line">A: There are 3 cars in the parking lot already. 2 more arrive. Now there are 3 + 2 = 5 cars. The answer is 5.</span><span class="line">Q: Leah had 32 chocolates and her sister had 42. If they ate 35, how many pieces do they have left in total?</span><span class="line">A: Leah had 32 chocolates and Leah’s sister had 42. That means there were originally 32 + 42 = 74</span><span class="line">chocolates. 35 have been eaten. So in total they still have 74 - 35 = 39 chocolates. The answer is 39.</span><span class="line">Q: Jason had 20 lollipops. He gave Denny some lollipops. Now Jason has 12 lollipops. How many lollipops</span><span class="line">did Jason give to Denny?</span><span class="line">A: Jason had 20 lollipops. Since he only has 12 now, he must have given the rest to Denny. The number of</span><span class="line">lollipops he has given to Denny must have been 20 - 12 = 8 lollipops. The answer is 8.</span><span class="line">Q: Shawn has five toys. For Christmas, he got two toys each from his mom and dad. How many toys does</span><span class="line">he have now?</span><span class="line">A: He has 5 toys. He got 2 from mom, so after that he has 5 + 2 = 7 toys. Then he got 2 more from dad, so</span><span class="line">in total he has 7 + 2 = 9 toys. The answer is 9.</span><span class="line">Q: There were nine computers in the server room. Five more computers were installed each day, from</span><span class="line">monday to thursday. How many computers are now in the server room?</span><span class="line">A: There are 4 days from monday to thursday. 5 computers were added each day. That means in total 4 * 5 =</span><span class="line">20 computers were added. There were 9 computers in the beginning, so now there are 9 + 20 = 29 computers. </span><span class="line">The answer is 29.</span><span class="line">Q: Michael had 58 golf balls. On tuesday, he lost 23 golf balls. On wednesday, he lost 2 more. How many</span><span class="line">golf balls did he have at the end of wednesday?</span><span class="line">A: Michael initially had 58 balls. He lost 23 on Tuesday, so after that he has 58 - 23 = 35 balls. On</span><span class="line">Wednesday he lost 2 more so now he has 35 - 2 = 33 balls. The answer is 33.</span><span class="line">Q: Olivia has $23. She bought five bagels for $3 each. How much money does she have left?</span><span class="line">A: She bought 5 bagels for $3 each. This means she spent $15. She has $8 left.</span><span class="line">Q: When I was 6 my sister was half my age. Now I’m 70 how old is my sister?</span><span class="line">A:</span> |
Output 1:
|
1 2 3 |
contrast-more="nx-border" contrast-more="nx-border-primary-900/20" contrast-more="nx-contrast-150" contrast-more="dark:nx-border-primary-100/40" nx-py-4 data-language="text" data-theme="default"]<code class="nx-border-black nx-border-opacity-[0.04] nx-bg-opacity-[0.03] nx-bg-black nx-break-words nx-rounded-md nx-border nx-py-0.5 nx-px-[.25em] nx-text-[.9em] dark:nx-border-white/10 dark:nx-bg-white/10" dir="ltr" data-language="text" data-theme="default"><span class="line">When I was 6 my sister was half my age, so she was 3. Now I am 70, so she is 70 - 3 = 67. The answer is 67.</span> |
Output 2:
|
1 2 3 4 |
contrast-more="nx-border" contrast-more="nx-border-primary-900/20" contrast-more="nx-contrast-150" contrast-more="dark:nx-border-primary-100/40" nx-py-4 data-language="text" data-theme="default"]<code class="nx-border-black nx-border-opacity-[0.04] nx-bg-opacity-[0.03] nx-bg-black nx-break-words nx-rounded-md nx-border nx-py-0.5 nx-px-[.25em] nx-text-[.9em] dark:nx-border-white/10 dark:nx-bg-white/10" dir="ltr" data-language="text" data-theme="default"><span class="line">When the narrator was 6, his sister was half his age, which is 3. Now that the narrator is 70, his sister would be 70 - 3 = 67 years old. The answer is 67.</span> |
Output 3:
|
1 2 3 |
contrast-more="nx-border" contrast-more="nx-border-primary-900/20" contrast-more="nx-contrast-150" contrast-more="dark:nx-border-primary-100/40" nx-py-4 data-language="text" data-theme="default"]<code class="nx-border-black nx-border-opacity-[0.04] nx-bg-opacity-[0.03] nx-bg-black nx-break-words nx-rounded-md nx-border nx-py-0.5 nx-px-[.25em] nx-text-[.9em] dark:nx-border-white/10 dark:nx-bg-white/10" dir="ltr" data-language="text" data-theme="default"><span class="line">When I was 6 my sister was half my age, so she was 3. Now I am 70, so she is 70/2 = 35. The answer is 35.</span> |
Computing for the final answer involves a few steps (check out the paper for the details) but for the sake of simplicity, we can see that there is already a majority answer emerging so that would essentially become the final answer.
Generated Knowledge Prompting
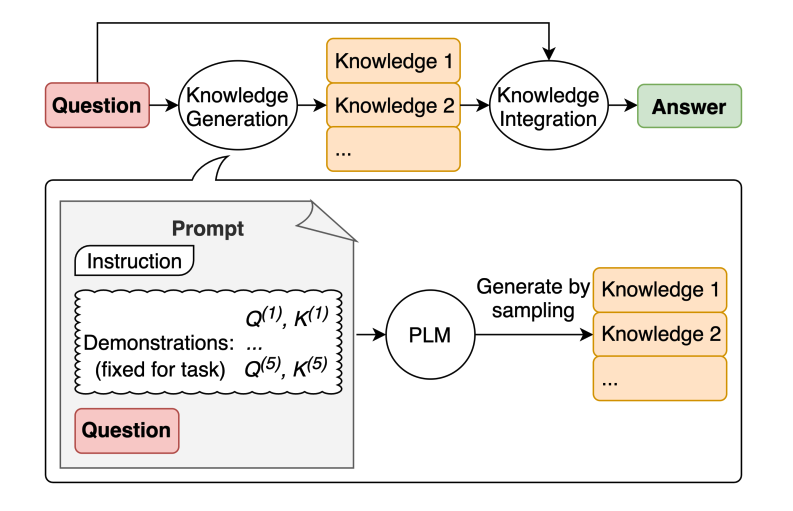
Image Source: Liu et al. 2022(opens in a new tab)
LLMs continue to be improved and one popular technique includes the ability to incorporate knowledge or information to help the model make more accurate predictions.
Using a similar idea, can the model also be used to generate knowledge before making a prediction? That’s what is attempted in the paper by Liu et al. 2022(opens in a new tab) — generate knowledge to be used as part of the prompt. In particular, how helpful is this for tasks such as commonsense reasoning?
Let’s try a simple prompt:
Prompt:
|
1 2 3 |
contrast-more="nx-border" contrast-more="nx-border-primary-900/20" contrast-more="nx-contrast-150" contrast-more="dark:nx-border-primary-100/40" nx-py-4 data-language="text" data-theme="default"]<code class="nx-border-black nx-border-opacity-[0.04] nx-bg-opacity-[0.03] nx-bg-black nx-break-words nx-rounded-md nx-border nx-py-0.5 nx-px-[.25em] nx-text-[.9em] dark:nx-border-white/10 dark:nx-bg-white/10" dir="ltr" data-language="text" data-theme="default"><span class="line">Part of golf is trying to get a higher point total than others. Yes or No?</span> |
Output:
|
1 2 3 |
contrast-more="nx-border" contrast-more="nx-border-primary-900/20" contrast-more="nx-contrast-150" contrast-more="dark:nx-border-primary-100/40" nx-py-4 data-language="text" data-theme="default"]<code class="nx-border-black nx-border-opacity-[0.04] nx-bg-opacity-[0.03] nx-bg-black nx-break-words nx-rounded-md nx-border nx-py-0.5 nx-px-[.25em] nx-text-[.9em] dark:nx-border-white/10 dark:nx-bg-white/10" dir="ltr" data-language="text" data-theme="default"><span class="line">Yes.</span> |
This type of mistake reveals the limitations of LLMs to perform tasks that require more knowledge about the world. How do we improve this with knowledge generation?
First, we generate a few “knowledges”:
Prompt:
|
1 2 3 4 5 6 7 8 9 10 11 12 13 14 15 16 17 18 19 20 21 22 |
contrast-more="nx-border" contrast-more="nx-border-primary-900/20" contrast-more="nx-contrast-150" contrast-more="dark:nx-border-primary-100/40" nx-py-4 data-language="text" data-theme="default"]<code class="nx-border-black nx-border-opacity-[0.04] nx-bg-opacity-[0.03] nx-bg-black nx-break-words nx-rounded-md nx-border nx-py-0.5 nx-px-[.25em] nx-text-[.9em] dark:nx-border-white/10 dark:nx-bg-white/10" dir="ltr" data-language="text" data-theme="default"><span class="line">Input: Greece is larger than mexico.</span><span class="line">Knowledge: Greece is approximately 131,957 sq km, while Mexico is approximately 1,964,375 sq km, making Mexico 1,389% larger than Greece. </span><span class="line">Input: Glasses always fog up.</span><span class="line">Knowledge: Condensation occurs on eyeglass lenses when water vapor from your sweat, breath, and ambient humidity lands on a cold surface, cools, and then changes into tiny drops of liquid, forming a film that you see as fog. Your lenses will be relatively cool compared to your breath, especially when the outside air is cold.</span><span class="line">Input: A fish is capable of thinking.</span><span class="line">Knowledge: Fish are more intelligent than they appear. In many areas, such as memory, their cognitive powers match or exceed those of ’higher’ vertebrates including non-human primates. Fish’s long-term memories help them keep track of complex social relationships.</span><span class="line">Input: A common effect of smoking lots of cigarettes in one’s lifetime is a higher than normal chance of getting lung cancer.</span><span class="line">Knowledge: Those who consistently averaged less than one cigarette per day over their lifetime had nine times the risk of dying from lung cancer than never smokers. Among people who smoked between one and 10 cigarettes per day, the risk of dying from lung cancer was nearly 12 times higher than that of never smokers.</span><span class="line">Input: A rock is the same size as a pebble.</span><span class="line">Knowledge: A pebble is a clast of rock with a particle size of 4 to 64 millimetres based on the Udden-Wentworth scale of sedimentology. Pebbles are generally considered larger than granules (2 to 4 millimetres diameter) and smaller than cobbles (64 to 256 millimetres diameter).</span><span class="line">Input: Part of golf is trying to get a higher point total than others.</span><span class="line">Knowledge:</span> |
Knowledge 1:
|
1 2 3 4 5 6 |
contrast-more="nx-border" contrast-more="nx-border-primary-900/20" contrast-more="nx-contrast-150" contrast-more="dark:nx-border-primary-100/40" nx-py-4 data-language="text" data-theme="default"]<code class="nx-border-black nx-border-opacity-[0.04] nx-bg-opacity-[0.03] nx-bg-black nx-break-words nx-rounded-md nx-border nx-py-0.5 nx-px-[.25em] nx-text-[.9em] dark:nx-border-white/10 dark:nx-bg-white/10" dir="ltr" data-language="text" data-theme="default"><span class="line">The objective of golf is to play a set of holes in the least number of strokes. A round of golf typically consists of 18 holes. Each hole is played once in the round on a standard golf course. Each stroke is counted as one point, and the total number of strokes is used to determine the winner of the game.</span> |
Knowledge 2:
|
1 2 3 4 5 6 7 |
contrast-more="nx-border" contrast-more="nx-border-primary-900/20" contrast-more="nx-contrast-150" contrast-more="dark:nx-border-primary-100/40" nx-py-4 data-language="text" data-theme="default"]<code class="nx-border-black nx-border-opacity-[0.04] nx-bg-opacity-[0.03] nx-bg-black nx-break-words nx-rounded-md nx-border nx-py-0.5 nx-px-[.25em] nx-text-[.9em] dark:nx-border-white/10 dark:nx-bg-white/10" dir="ltr" data-language="text" data-theme="default"><span class="line">Golf is a precision club-and-ball sport in which competing players (or golfers) use many types of clubs to hit balls into a series of holes on a course using the fewest number of strokes. The goal is to complete the course with the lowest score, which is calculated by adding up the total number of strokes taken on each hole. The player with the lowest score wins the game.</span> |
We are using the prompt provided in the paper by Liu et al. 2022(opens in a new tab).
The next step is to integrate the knowledge and get a prediction. I reformatted the question into QA format to guide the answer format.
Prompt:
|
1 2 3 4 5 6 7 8 |
contrast-more="nx-border" contrast-more="nx-border-primary-900/20" contrast-more="nx-contrast-150" contrast-more="dark:nx-border-primary-100/40" nx-py-4 data-language="text" data-theme="default"]<code class="nx-border-black nx-border-opacity-[0.04] nx-bg-opacity-[0.03] nx-bg-black nx-break-words nx-rounded-md nx-border nx-py-0.5 nx-px-[.25em] nx-text-[.9em] dark:nx-border-white/10 dark:nx-bg-white/10" dir="ltr" data-language="text" data-theme="default"><span class="line">Question: Part of golf is trying to get a higher point total than others. Yes or No?</span><span class="line">Knowledge: The objective of golf is to play a set of holes in the least number of strokes. A round of golf typically consists of 18 holes. Each hole is played once in the round on a standard golf course. Each stroke is counted as one point, and the total number of strokes is used to determine the winner of the game.</span><span class="line">Explain and Answer: </span> |
Answer 1 (confidence very high):
|
1 2 3 4 5 |
contrast-more="nx-border" contrast-more="nx-border-primary-900/20" contrast-more="nx-contrast-150" contrast-more="dark:nx-border-primary-100/40" nx-py-4 data-language="text" data-theme="default"]<code class="nx-border-black nx-border-opacity-[0.04] nx-bg-opacity-[0.03] nx-bg-black nx-break-words nx-rounded-md nx-border nx-py-0.5 nx-px-[.25em] nx-text-[.9em] dark:nx-border-white/10 dark:nx-bg-white/10" dir="ltr" data-language="text" data-theme="default"><span class="line">No, the objective of golf is not to get a higher point total than others. Rather, the objective is to play a set of holes in the least number of strokes. The total number of strokes is used to determine the winner of the game, not the total number of points.</span> |
|
1 2 3 4 5 6 7 8 |
contrast-more="nx-border" contrast-more="nx-border-primary-900/20" contrast-more="nx-contrast-150" contrast-more="dark:nx-border-primary-100/40" nx-py-4 data-language="text" data-theme="default"]<code class="nx-border-black nx-border-opacity-[0.04] nx-bg-opacity-[0.03] nx-bg-black nx-break-words nx-rounded-md nx-border nx-py-0.5 nx-px-[.25em] nx-text-[.9em] dark:nx-border-white/10 dark:nx-bg-white/10" dir="ltr" data-language="text" data-theme="default"><span class="line">Question: Part of golf is trying to get a higher point total than others. Yes or No?</span><span class="line">Knowledge: Golf is a precision club-and-ball sport in which competing players (or golfers) use many types of clubs to hit balls into a series of holes on a course using the fewest number of strokes. The goal is to complete the course with the lowest score, which is calculated by adding up the total number of strokes taken on each hole. The player with the lowest score wins the game.</span><span class="line">Explain and Answer:</span> |
Answer 2 (confidence is a lot lower):
|
1 2 3 4 5 6 |
contrast-more="nx-border" contrast-more="nx-border-primary-900/20" contrast-more="nx-contrast-150" contrast-more="dark:nx-border-primary-100/40" nx-py-4 data-language="text" data-theme="default"]<code class="nx-border-black nx-border-opacity-[0.04] nx-bg-opacity-[0.03] nx-bg-black nx-break-words nx-rounded-md nx-border nx-py-0.5 nx-px-[.25em] nx-text-[.9em] dark:nx-border-white/10 dark:nx-bg-white/10" dir="ltr" data-language="text" data-theme="default"><span class="line">Yes, part of golf is trying to get a higher point total than others. Each player tries to complete the course with the lowest score, which is calculated by adding up the total number of strokes taken on each hole. The player with the lowest score wins the game.</span> |
Some really interesting things happened with this example. In the first answer, the model was very confident but in the second not so much. I simplified the process for demonstration purposes but there are a few more details to consider when arriving at the final answer. Check out the paper for more.