


 and How Data Passes Through Them")


, and Neural Networks in a structured way")
")
 That You’ll Want to Buy for yourself")


Course Title: Mastering Android Development with Kotlin & Android Studio
Course Overview:
This course is designed for beginners and intermediate developers interested in learning how to build Android applications using Kotlin and Android Studio. By the end of the course, you’ll have hands-on experience with Android Studio, Kotlin programming, and essential Android development tools and techniques.
Module 1: Introduction to Android Development
1.1 Welcome to the World of Android
- Overview of Android and its ecosystem
- Why Kotlin for Android development?
- Understanding Android Studio
- Installing Android Studio and setting up your first project
1.2 Basic Concepts in Android Development
- Activities and Views
- UI Components: Buttons, TextFields, and more
- Layouts: LinearLayout, ConstraintLayout, RelativeLayout
- Resources in Android
1.3 First App: “Hello, Android!”
- Setting up your first Android app project in Android Studio
- Building a simple interface using XML
- Running the app on an emulator or physical device
Module 2: Kotlin Fundamentals
2.1 Kotlin Basics
- Introduction to Kotlin syntax
- Variables and Data Types
- Functions, Conditions, and Loops
2.2 Object-Oriented Programming in Kotlin
- Classes and Objects
- Properties and Methods
- Constructors and Inheritance
- Interfaces and Abstract Classes
2.3 Collections & Lambda Expressions
- Lists, Maps, and Sets
- Understanding Lambda functions
- Functional programming basics in Kotlin
Module 3: Advanced Android UI Components
3.1 Advanced Layouts and Views
- Deep dive into ConstraintLayout
- Custom Views and Drawables
- Handling events and gestures
3.2 Material Design Principles
- Understanding Material Design guidelines
- Implementing Material Components: Buttons, TextFields, Dialogs
- Working with Navigation Components
3.3 RecyclerView & Adapters
- Introduction to RecyclerView
- Creating and customizing RecyclerView Adapters
- Using ViewHolders for efficient performance
Module 4: Managing Data and Persistence
4.1 Introduction to Android Databases
- Working with SQLite in Android
- CRUD Operations (Create, Read, Update, Delete)
- Introduction to Room Database
4.2 Shared Preferences & Internal Storage
- Storing simple data using SharedPreferences
- Storing files in Internal and External Storage
- Working with JSON and Parsing
Module 5: Networking & APIs
5.1 Introduction to Networking in Android
- Making HTTP Requests with Retrofit
- Parsing JSON Responses
- Error handling and debugging network requests
5.2 Using Firebase in Your App
- Introduction to Firebase services (Authentication, Firestore, Firebase Storage)
- Implementing Firebase Authentication for Sign-In
- Storing and retrieving data using Firestore
Module 6: App Architecture & Best Practices
6.1 Introduction to MVVM Architecture
- What is MVVM (Model-View-ViewModel)?
- Setting up an MVVM architecture in Android
- ViewModel, LiveData, and Data Binding
6.2 Dependency Injection with Hilt
- Introduction to Dependency Injection
- Setting up Hilt for Dependency Injection in Android
- Benefits of Dependency Injection in Android development
Module 7: Debugging and Testing
7.1 Debugging Techniques in Android Studio
- Using Android Studio’s Debugger
- Inspecting UI with Layout Inspector
- Using Logcat effectively
7.2 Writing Unit Tests & UI Tests
- Introduction to Unit Testing in Android with JUnit
- Writing Espresso UI tests
- Test-Driven Development (TDD) in Android
Module 8: Publishing Your App
8.1 Preparing Your App for Release
- Signing your app for release
- Optimizing the app for performance and size
- Handling app permissions
8.2 Publishing on the Google Play Store
- Setting up a Google Play Developer account
- Uploading and publishing your app on the Play Store
- Managing app updates and user feedback
Final Project: Build a Complete Android App
- Integrating all the concepts learned in the course
- Building a fully functional app with Kotlin, Android Studio, and Firebase
- Code review and presentation of the app
Course Features:
- Hands-on coding exercises and challenges after each module
- Quizzes and assessments to test your knowledge
- Detailed video lessons and demos
- Downloadable resources, code samples, and references
- Discussion forum to ask questions and collaborate with peers
- Certificate of completion upon finishing the course
Prerequisites:
- Basic understanding of programming concepts (any language)
- A computer with Android Studio installed (Windows/Mac/Linux)
Additional Resources:
- Kotlin Documentation: https://kotlinlang.org/docs/home.html
- Android Developer Documentation: https://developer.android.com/docs
Module 1.1: Welcome to the World of Android
Introduction:
Android is the world’s most popular mobile operating system, powering billions of devices across the globe. From smartphones and tablets to wearables, smart TVs, and even cars, Android has become an integral part of our daily lives. If you’re interested in mobile development, understanding how to build Android apps is a key skill. In this section, we’ll introduce you to the core concepts of Android development, explain why you should use Android Studio, and provide a brief history of both Android and Android Studio.
1. What is Android?
Android is an open-source, Linux-based operating system primarily used in mobile devices such as smartphones, tablets, and wearables. It was developed by Android Inc., which was later acquired by Google in 2005. Android is known for its flexibility, customization options, and vast ecosystem, making it the preferred platform for developers and device manufacturers.
Key Android Terms:
- APK (Android Package): The file format used to distribute and install Android applications. It’s essentially the Android equivalent of an executable file on a computer.
- Activity: A single screen in an app, often representing a user interface or interaction.
- Intent: A messaging object used to request actions from other components, like starting a new Activity or sending data.
- Service: A component that runs in the background and does long-running tasks, such as fetching data from a server.
- Content Provider: A component that manages access to shared data, like a database or file system.
- Broadcast Receiver: A component that listens for system-wide or app-specific broadcasts, like receiving a notification.
2. Why Use Android Studio?
Android Studio is the official Integrated Development Environment (IDE) for Android app development, provided by Google. It is built specifically for Android development, offering a comprehensive suite of tools to design, code, test, and debug Android applications.
Why Android Studio?
- Complete Development Environment: It offers everything from code editing, visual design tools, emulators, to project management in one package.
- Performance & Speed: Optimized for building and testing Android apps, it includes tools for faster builds and real-time debugging.
- Official Google Support: Being the official IDE for Android development, it integrates seamlessly with the Android SDK (Software Development Kit), ensuring the best support for the latest Android APIs and tools.
- Code Assistance: It features auto-completion, linting (code analysis), and refactoring tools to improve the developer’s productivity.
- Emulator and Device Support: You can test your apps on multiple device configurations without needing actual hardware, saving time and resources.
3. Requirements for Android Development
To develop Android applications, there are a few key tools and requirements you need to be aware of:
Hardware Requirements:
- CPU: Intel or AMD processor with 64-bit support.
- RAM: At least 8 GB of RAM (16 GB recommended for better performance).
- Storage: Around 4 GB of free disk space, but at least 8 GB of free space is recommended for Android Studio and SDKs.
- Display: A monitor with at least 1280 x 800 resolution.
Software Requirements:
- Operating System: Windows 7 or later, macOS 10.10 or later, or a recent version of Linux.
- Android Studio: The latest version of Android Studio, which comes with all the necessary tools (like the Android Emulator, SDK Manager, and more).
- Java Development Kit (JDK): JDK 11 or later, as Android Studio is built with Java in mind and may require some Java knowledge.
4. History of Android
Early Years (2003-2007):
- 2003: Android Inc. was founded by Andy Rubin, Rich Miner, Nick Sears, and Chris White. Their goal was to create an operating system for digital cameras, but soon pivoted to smartphones.
- 2005: Google acquired Android Inc., and Andy Rubin became the leader of the Android project.
- 2007: Google announced the formation of the Open Handset Alliance, a consortium of technology companies aimed at developing a mobile OS based on Android.
- 2008: The first Android device, the T-Mobile G1 (also known as the HTC Dream), was released, marking the birth of the Android operating system.
Android Evolution:
- 2010: Android 2.2 FroYo introduced features like Flash support and app storage on the SD card.
- 2011-2013: Ice Cream Sandwich (4.0) and Jelly Bean (4.1) brought new user interfaces and performance improvements.
- 2014-2015: Lollipop (5.0) introduced Material Design, while Android 6.0 Marshmallow brought features like runtime permissions.
- 2017-2020: Oreo, Pie, and Android 10 focused on performance improvements, security updates, and privacy controls.
- 2021-Present: Android 12 introduced a new UI design (Material You) with greater customization and a focus on user privacy.
5. History of Android Studio
Android Studio was officially introduced by Google in 2013 as the official IDE for Android development, replacing Eclipse as the preferred development tool for Android. It was built from the ground up, leveraging IntelliJ IDEA (a popular Java IDE) as its base. Android Studio provided many benefits over previous development environments, including better performance, better integration with Android SDK tools, and faster builds.
Key Milestones in Android Studio History:
- 2013: Android Studio was officially launched, and the first version included essential features like a code editor, emulator, and the Android SDK tools.
- 2014: Android Studio 1.0 was released, improving stability, performance, and debugging capabilities.
- 2017: Android Studio introduced support for Kotlin, the language that would become the preferred choice for Android development.
- 2020-Present: Android Studio continued to improve with features like enhanced Kotlin support, Live Preview, Emulator improvements, and UI/UX tools like Jetpack Compose for modern Android development.
6. Key Features of Android Studio
- Code Editing: Android Studio has a rich code editor with features like code completion, error checking, and automatic refactoring.
- Layout Editor: A powerful drag-and-drop editor to design UI components. It supports both XML and Jetpack Compose-based layouts.
- Emulator: Android Studio provides a built-in emulator for testing apps on various device configurations without needing physical hardware.
- Debugging Tools: Android Studio includes comprehensive debugging features like breakpoints, the Logcat window, and real-time performance monitoring.
- Gradle Integration: Android Studio uses Gradle, a build automation tool, to manage app dependencies, automate tasks, and manage build variants for different environments.
- Support for Kotlin: Android Studio fully supports Kotlin, making it the preferred language for new Android projects.
7. Summary:
By now, you should have a basic understanding of what Android is, why Android Studio is the preferred IDE for Android development, and the history behind both Android and Android Studio. Android has evolved into a powerful and versatile platform, and Android Studio has become an essential tool for developers to create robust, user-friendly apps.
In the next section, we’ll dive deeper into setting up Android Studio and starting your first project!
8. Uses of Android
Android is one of the most versatile and widely-used operating systems in the world, powering billions of devices. While Android was initially designed for smartphones, its use cases have expanded significantly over the years. Let’s explore some of the common and exciting uses of Android:
8.1 Mobile Phones & Tablets
- Smartphones: Android powers the vast majority of smartphones on the market today, from budget devices to premium models.
- Tablets: Android is also used in a variety of tablets, offering flexibility for users who need larger screens while still enjoying the portability of mobile computing.
8.2 Wearables
- Smartwatches: Android Wear (now called Wear OS) is a version of Android designed specifically for smartwatches, allowing users to track health, receive notifications, and interact with apps on their wrists.
8.3 Smart TVs and Set-Top Boxes
- Android TV is used by several manufacturers to run their smart TV platforms, allowing users to access streaming services, play games, and use apps on their televisions.
8.4 Automotive
- Android Auto: Android Auto is an interface for cars that allows drivers to connect their smartphones to their car’s infotainment system, providing navigation, communication, and entertainment features.
8.5 IoT Devices
- Android is also being used in Internet of Things (IoT) devices like smart refrigerators, home automation systems, and connected appliances.
8.6 Augmented Reality (AR) & Virtual Reality (VR)
- Android powers AR and VR applications, particularly through Google’s ARCore and VR platforms, enabling immersive experiences in gaming, education, and real-world simulations.
9. Installation Procedure for Android Studio (Windows)
9.1 System Requirements for Windows:
Before installing Android Studio on your Windows PC, ensure that your system meets the following requirements:
- OS: Windows 7/8/10 (64-bit version)
- RAM: 8 GB RAM minimum (16 GB recommended)
- Disk Space: 4 GB of free space for Android Studio and SDK (additional space required for Android Virtual Devices and app development files)
- Screen Resolution: 1280 x 800 or higher
9.2 Step-by-Step Installation:
- Download Android Studio:
- Go to the official Android Developer website: https://developer.android.com/studio
- Download the latest stable version of Android Studio for Windows.
- Install Android Studio:
- Once the
.exefile is downloaded, open it to begin the installation. - Follow the installation instructions:
- Choose the installation path (the default path is recommended).
- Select the components you want to install. By default, the necessary components (Android Studio, Android SDK, Android Virtual Device) will be selected.
- Once the
- Set Up Android SDK:
- During installation, Android Studio will install the Android Software Development Kit (SDK), which contains the necessary tools for building and running Android apps.
- The SDK Manager will be launched automatically to download additional SDK packages.
- Complete the Setup:
- Once the installation is complete, open Android Studio.
- The first time you open Android Studio, you will be prompted to install any additional components or updates. Allow this to complete.
- Set up the Android Virtual Device (AVD) if you want to run an emulator on your PC. You can choose from different device configurations and Android versions for testing your app.
- Verify Installation:
- After installation, you can verify that everything is working correctly by opening Android Studio and starting a new project.
- Create a simple “Hello, World!” project and run it on the Android Emulator to make sure everything is functioning as expected.
10. Using Third-Party Services (e.g., Firebase Authentication)
10.1 What is Firebase?
Firebase is a platform developed by Google that provides backend services for mobile and web applications. Firebase includes a wide range of tools and services to help developers build, test, and improve their apps. It offers real-time databases, authentication, cloud storage, hosting, and more.
In this course, we will focus on Firebase Authentication, which simplifies the process of adding user authentication to your Android apps. Firebase Authentication supports sign-in methods like email/password, Google, Facebook, and even anonymous authentication.
10.2 Setting Up Firebase Authentication in Your Android App
Here’s how you can integrate Firebase Authentication into your Android app:
- Create a Firebase Project:
- Go to Firebase Console and create a new project.
- Follow the instructions to add your Android app to the Firebase project. You’ll need your app’s package name.
- Add Firebase SDK to Your App:
- In Android Studio, open your project and navigate to the Gradle Scripts section.
- Add the necessary dependencies for Firebase Authentication in the
build.gradle(app level) file: - Sync your project with Gradle to ensure that Firebase SDK is added.
- Enable Authentication Methods in Firebase Console:
- In the Firebase Console, go to the Authentication section and enable the desired sign-in methods (e.g., Email/Password, Google Sign-In).
- Add Firebase Authentication Code in Your App:
- For example, to implement email/password authentication:
- Test Authentication:
- Run your app and test the login and sign-up functionality to ensure it works with Firebase Authentication.
11. Career Opportunities and Expected Job Pay
11.1 Android Developer Career Path
As an Android developer, you can pursue various career paths. The demand for Android developers is high due to the global use of Android devices, making it a promising field. Here are a few career options:
- Junior Android Developer: Entry-level position focusing on assisting with Android app development, bug fixes, and working with senior developers.
- Senior Android Developer: More experienced developers responsible for leading Android projects, architectural decisions, and mentoring junior developers.
- Android Architect: A highly specialized role focused on designing the overall architecture of Android applications and setting best practices for the development team.
- Mobile App Developer (Full-Stack): A developer who works on both the front-end (Android) and back-end (server-side) of mobile applications.
11.2 Expected Job Pay (Salary Range)
Salaries for Android developers can vary based on location, experience, and company. Here’s a general breakdown of expected salaries:
- Entry-Level (0-2 years of experience): $50,000 – $75,000 per year
- Mid-Level (2-5 years of experience): $75,000 – $100,000 per year
- Senior-Level (5+ years of experience): $100,000 – $130,000+ per year
- Android Architect: $130,000 – $160,000+ per year
These salaries can vary greatly depending on the region and company. For example, developers in major tech hubs like San Francisco or New York may earn higher salaries than those in smaller cities.
Additionally, remote work opportunities and freelance Android development also offer flexibility, with competitive rates on platforms like Upwork, Toptal, and Freelancer.

This image is a screenshot of Android Studio, specifically showing its Welcome Screen. Below are the key components visible in the image:
- Header Area:
- The top bar shows that the application is Android Studio, with the version mentioned as Meerkat | 2024.3.1 Nightly 2024.
- There are options on the top-right for:
- New Project – To start a new project.
- Open – To open an existing project.
- Clone Repository – To clone a project from a remote repository.
- Left Sidebar (Projects Section):
- Projects Tab – This is where your existing projects are listed. The projects visible in the image are:
- KRA MRI TAX CALCULATOR APP – Likely an Android app project related to tax calculations.
- My Application – A basic or placeholder application.
- Data Science – A project related to data science (potentially non-Android programming).
- Python Programming – A project related to Python programming.
- kncampmeditation – Possibly an app related to meditation or a similar concept.
- These projects are located within different directories on your system, with paths listed beneath their names.
- Projects Tab – This is where your existing projects are listed. The projects visible in the image are:
- Main Section:
- Search Projects – A search bar that allows you to quickly locate a project.
- Bottom Section:
- A system tray is visible with various apps, including:
- Web browser (e.g., Microsoft Edge).
- Messaging/chat app (possibly Discord or Teams).
- Battery and network icons.
- The current time (11:26 PM) and the date (January 24, 2025).
- A system tray is visible with various apps, including:
- Footer:
- Start Menu/Windows Taskbar – At the bottom of the screen, showing open apps and system tools like the start menu, task view, and quick access to Android Studio.
In Android Studio, the main screen consists of various components that help you manage your project, customize your environment, add plugins, and access learning resources. Here’s an overview of the sections you mentioned:

1. PROJECTS
- Purpose: This section allows you to manage and navigate through your current Android project(s).
- Key Features:
- Project View: This is where you can view your project files, such as Java/Kotlin code, XML files, assets, etc.
- You can switch between different views like “Android”, “Project”, “Packages”, etc., depending on how you prefer to see your project structure.
- File Navigation: Allows you to open and organize files and folders in your project.
2. CUSTOMIZE

- Purpose: The “Customize” section lets you tweak and configure the look and feel of your Android Studio environment.
- Key Features:
- Themes and Appearance: Change the theme (like Dark Mode or Light Mode), font size, and other appearance settings to personalize your workspace.
- Editor Settings: Modify the editor’s behavior, such as enabling or disabling code completion, syntax highlighting, and auto-formatting.
- Keymaps: Customize keyboard shortcuts and mappings based on your preferences, which can make navigation more efficient.
3. PLUGINS

- Purpose: Plugins extend the functionality of Android Studio by adding new features, tools, or integrations.
- Key Features:
- Plugin Management: You can install, uninstall, or update plugins from the Plugin Marketplace.
- Useful Plugins: For instance, Firebase, Kotlin, Git integration, or database tools.
- Search for Plugins: You can search for specific plugins you want to install for improving your development workflow.
4. LEARN

- Purpose: The “Learn” section is a resource hub that offers educational material and tutorials to help you learn Android development.
- Key Features:
- Sample Projects: You can access various sample projects and explore Android codebases to learn from examples.
- Documentation: Direct links to Android documentation, APIs, and best practices.
- Interactive Tutorials: Guided lessons that help you build basic to advanced Android apps.
These components help you manage your project, adjust Android Studio to your needs, expand functionality with plugins, and make learning Android development easier.
SECOND STEP:

Choose empty activity click on Next.

Here’s what you need to do:
1. Add the Name of Your App:
- When creating a new Android app project, you’ll be prompted to enter your app’s name.
- In Android Studio, this is usually done when creating a new project through a wizard.
- You’ll see a field labeled “Name” or “Application Name”. This is where you’ll enter the name that will be displayed for your app.
- Example: Enter “My Unique App” (or whatever you want to call your app).
2. Change the Package Name to Be Unique:
- The package name is a unique identifier for your app, and it must be different from any other app already uploaded to the Google Play Store.
- When setting up a new project in Android Studio, you’ll also be asked to enter the “Package Name”.
- By default, it might be something like com.example.myapp, but this must be unique.
- Change it to something specific and related to your app. For example:
123com.mycompany.myuniqueapp
or
123com.yourname.appname - Keep in mind that package names are case-sensitive and should follow the reverse domain naming convention (e.g.,
123com.example.myapp
).
3. Click on Finish:
- After you’ve entered the app name and updated the package name to a unique one, click on Finish (or the equivalent button).
- This will create the project structure, and Android Studio will generate the necessary files for your app based on the name and package you provided.
After Clicking Finish:
- Your project will be ready, and you can begin developing your app.
- You can start editing the app’s resources (like layouts, strings, and other assets) and implement its functionality.
To Summarize:
- App Name: Enter the name that will appear in the Play Store and on the device.
- Package Name: Make sure it’s unique. This is what distinguishes your app from others.
- Click Finish, and your project will be created.
Once the project is ready, you can proceed with further development, testing, and then ultimately prepare it for uploading to the Play Store.

Next We shall wait for the app to finish building.

This the next screen we shall be discussing about the menus

Let’s go through Android Studio’s layout and its components in even more detail, covering submenus, icons, and the top bar menus like Device, Emulator, and more.
1. Top Menu Bar
File Menu (Submenus and Icons)
- New (Icon: Blank sheet icon)
- New Project: Starts a new Android project.
- New Module: Adds a new module to your project (library, etc.).
- New Activity: Adds a new Activity (screen) to your app.
- New File: Creates a new file (Java, Kotlin, XML, etc.).
- Open… (Icon: Open folder)
- Open Project: Opens an existing project.
- Profile or Debug APK (Icon: Bug and wrench icon)
- Used to profile or debug APK files.
- Recent Projects (Icon: Clock or Recent icon)
- Displays a list of recently opened projects for easy access.
- Close Project (Icon: “X” icon)
- Closes the current project, returning you to the welcome screen.
- Settings (Icon: Gear icon)
- Opens the IDE settings for Android Studio configuration.
- Project Structure (Icon: Building blocks)
- Lets you manage project dependencies, SDK versions, and other structure-related configurations.
- Sync Project with Gradle Files (Icon: Circular arrows)
- Syncs the project with Gradle to update dependencies and configurations.
- Refresh Linked C++ Projects (Icon: Refresh icon)
- Used if the project includes C++ code.
- Reload All from Disk (Icon: File reload icon)
- Reloads the project files from disk in case there are discrepancies.
- Invalidate Caches / Restart (Icon: A trash bin icon)
- Clears the IDE cache to resolve potential errors.
- Exit (Icon: Red “X” icon)
- Closes Android Studio.
Edit Menu (Submenus and Icons)
- Undo (Icon: Left arrow)
- Undoes the most recent change in the editor.
- Redo (Icon: Right arrow)
- Redoes the last undone change.
- Cut, Copy, Paste (Icons: Scissors, Copy icon, Clipboard icon)
- Standard editing options for cutting, copying, and pasting code.
- Find (Icon: Magnifying glass)
- Allows you to search for code snippets, classes, or files in the project.
- Replace (Icon: Magnifying glass with pencil)
- Replaces a found text with new content.
View Menu (Submenus and Icons)
- Tool Windows (Icon: Window-like icon)
- Project: Displays the project’s file structure.
- Logcat: Opens the Logcat window to display logs and debug output.
- Terminal: Integrated terminal for running commands.
- Gradle: Shows the Gradle panel for dependency management.
- Appearance (Icon: Palette icon)
- Change the theme (Light/Dark), adjust fonts, and configure editor appearance.
Navigate Menu (Submenus and Icons)
- Go to File/Class/Symbol (Icon: Magnifying glass with file)
- Directly jumps to a specific file, class, or symbol in your project.
- Show Context Menu (Icon: Three dots or right-click menu)
- Provides additional navigation options, like going to the previous or next method.
Code Menu (Submenus and Icons)
- Reformat Code (Icon: Paint roller)
- Automatically formats the code in the editor according to the defined style.
- Generate (Icon: Grid or gear)
- Automatically generates code snippets like getters, setters, or constructors.
Build Menu (Submenus and Icons)
- Make Project (Icon: Hammer)
- Builds the app’s compiled files (compiling resources and source code).
- Build APK/App Bundle (Icon: Box icon)
- Generates the APK or App Bundle for distribution.
Run Menu (Submenus and Icons)
- Run (Icon: Green triangle “Play” button)
- Runs the app on an emulator or connected device.
- Debug (Icon: Bug icon)
- Starts the app in debugging mode to step through code and inspect variables.
Tools Menu (Submenus and Icons)
- SDK Manager (Icon: Android robot with a gear)
- Lets you manage SDK components like tools, SDK versions, and updates.
- AVD Manager (Icon: Smartphone with gear)
- Launches the Android Virtual Device (AVD) manager to create, configure, and manage Android emulators.
VCS Menu (Submenus and Icons)
- Git (Icon: Git icon)
- Integrates Git for version control, allowing you to commit, push, pull, and manage branches.
- Subversion (SVN) (Icon: SVN icon)
- Manage SVN version control for the project.
Window Menu (Submenus and Icons)
- Editor Tabs (Icon: Multiple window icons)
- Lets you manage open files and editor window layout.
Help Menu (Submenus and Icons)
- Find Action (Icon: Magnifying glass)
- Search for specific commands or actions in Android Studio.
2. Main Editor Window (Center)
- File Path Display (Located at the top of the editor window)
- Shows the full path to the current file being edited (e.g.,
MainActivity.kt).
- Shows the full path to the current file being edited (e.g.,
- Editor Window (This is where you write your code)
- Features syntax highlighting, code suggestions, and error checking in real-time.
- Editor Tabs (Located at the top of the editor)
- You can have multiple files open simultaneously, each represented by a tab for quick switching.
3. Gradle Sync in Progress (Bottom Right Corner)
- Gradle Sync Icon (Icon: Circular arrows)
- Indicates the project is syncing with Gradle to update dependencies and configurations.
- Task Progress Bar (Icon: Spinning wheel)
- Shows the progress of the Gradle task (e.g., importing project, scanning files).
4. Bottom Menu Bar
- Battery Icon (Icon: Battery symbol)
- Displays your computer’s current battery status.
- Network Status Icon (Icon: Wi-Fi or Ethernet icon)
- Indicates whether your computer is connected to the internet.
- Language/Keyboard Layout (Icon: Language or keyboard icon)
- Shows the current language and input method for the system.
- Clock Icon (Icon: Time or clock symbol)
- Displays the system time.
Android Studio Toolbar Icons (on the left side)
- Sync Project with Gradle (Icon: Circular arrows)
- Syncs your project with Gradle to ensure dependencies are correctly set up.
- Build Project (Icon: Hammer)
- Compiles the project into an APK/App Bundle.
- Run Project (Icon: Green triangle “Play” button)
- Launches the app on the emulator or a connected physical device.
- Version Control (Icon: Git icon)
- Manage version control (commit, push, pull) directly from Android Studio.
- Terminal (Icon: Terminal window)
- Integrated terminal for running shell commands and interacting with the system.
- Logcat (Icon: Terminal/Logcat icon)
- Displays log output from Android devices, useful for debugging and checking runtime logs.
5. Background Tasks Section (Right Side)
- Background Task Progress (Icon: Progress bar or spinning wheel)
- Displays the current progress of background tasks like Gradle sync or file scanning.
- Task Indicator (Icon: Task list or spinner)
- Displays the name of the current task being executed (e.g., “Importing Gradle Project”).
6. Editor Toolbar
- Undo/Redo (Icons: Left and right arrows)
- Undo or redo the last code change.
- Run/Debug Configuration (Icon: Drop-down menu)
- Selects which configuration (device/emulator) to run or debug the project.
- Error Indicators (Icons: Red cross or yellow triangle)
- Indicates issues in the code. A red cross indicates errors, while a yellow triangle indicates warnings.
Additional Key Icons and Menus
- Device Selector (Icon: Device icon, often in the top bar)
- Physical Device: Select a physical Android device for running the app.
- Emulator: Choose an Android Virtual Device (AVD) to run the app on an emulator.
- Logcat Filter (Icon: Funnel or filter icon)
- Allows you to filter the Logcat window to view specific logs (e.g., only errors, warnings, etc.).
Conclusion
Android Studio’s menus, submenus, and icons are designed to optimize the workflow for Android development. You have direct access to everything from project configuration to device management and debugging tools. The top menu bar, tool windows, and editor toolbar are all integrated seamlessly to help you stay productive throughout the development process.
NEXT UPGRADE THE AGP (OPTIONAL)

What is the Android Gradle Plugin (AGP)?
The Android Gradle Plugin (AGP) is a crucial component of Android app development, as it connects Android Studio with Gradle, the build system used in Android projects. It defines how Gradle should build and package your Android app. The AGP contains a collection of tools, plugins, and settings that manage various aspects of the build process, such as:
- Compiling your code (Java/Kotlin).
- Processing resources (XML layouts, images, etc.).
- Packaging the app (APK or App Bundle).
- Creating signing configurations (to ensure the app is ready for release).
- Optimizing performance (via build types, build variants, etc.).
In simpler terms, AGP defines how the Android project should be built and customized.
Why Upgrade AGP?
Upgrading AGP ensures you are using the latest features, performance optimizations, and bug fixes. Here are the main reasons to keep AGP updated:
- Compatibility with New Gradle Versions:
- AGP is tightly coupled with specific Gradle versions. New versions of Gradle may introduce optimizations or features that are only supported by a newer AGP version.
- New Android Features:
- New AGP releases often include support for the latest Android SDK tools and features, such as new build options, Android app bundle optimizations, or new Gradle plugin functionality. Keeping AGP up to date ensures you can take full advantage of the latest improvements in Android development.
- Bug Fixes:
- Each AGP release usually includes fixes for bugs found in previous versions, whether related to build failures, performance issues, or compatibility with libraries.
- Performance Improvements:
- Upgrading AGP can bring various performance improvements to the build system, reducing build times and making the development process more efficient.
- Security Updates:
- Like any tool, older versions of AGP might have security vulnerabilities that have been addressed in newer releases.
- New Gradle Features:
- Gradle itself is constantly evolving. A newer AGP version ensures better integration with the latest Gradle features, like dependency management enhancements and performance optimizations.
How to Upgrade the Android Gradle Plugin (AGP)
Step 1: Check the Current Version
To check the current AGP version in your project, open the build.gradle file at the project level (not the app/module level). Look for the classpath that includes the AGP version, like this:
In this example, the AGP version is 7.1.2.
Step 2: Find the Latest AGP Version
Visit the official Android developer site or Gradle plugin portal to check for the latest AGP version. Here’s the link to find the latest AGP version:
Android Gradle Plugin Releases.
Step 3: Modify the AGP Version
In the build.gradle file (project level), update the AGP version to the latest version. For example:
|
1 2 3 |
<strong>Step 4: Update Gradle Wrapper Version</strong> |
In addition to updating the AGP, you also need to make sure that the Gradle version is compatible with the new AGP version. You can find the Gradle version required for your AGP version in the Android Gradle Plugin release notes.
To update Gradle, modify the gradle-wrapper.properties file (located in the gradle/wrapper/ directory):
Step 5: Sync the Project
After making the changes to both the build.gradle and gradle-wrapper.properties files, click on Sync Now in Android Studio (you’ll see a prompt at the top of the file editor) to sync your project with the updated Gradle and AGP versions.
Additional Considerations
- Check for Deprecated Features:
- When upgrading AGP, make sure that any deprecated features or APIs are replaced with the recommended alternatives. You may receive warnings in the Build Output or Logcat if you’re using deprecated features.
- Test Your Build:
- After upgrading, run a clean build (
Build > Clean Projectand thenBuild > Rebuild Project) to ensure that everything works as expected. Sometimes, upgrading AGP can cause build-related issues, which may require you to resolve dependency conflicts or make adjustments in your code.
- After upgrading, run a clean build (
- Update Dependencies:
- Some libraries or dependencies may also require updates to remain compatible with the newer version of AGP. It’s a good idea to check for the latest versions of libraries in your project when upgrading AGP.
- Gradle Daemon:
- You might see warnings or errors if the Gradle Daemon process is not properly stopped or is cached with old settings. In some cases, it’s helpful to run
./gradlew --stopfrom the terminal to stop any running Gradle Daemons before re-syncing.
- You might see warnings or errors if the Gradle Daemon process is not properly stopped or is cached with old settings. In some cases, it’s helpful to run
Conclusion
Upgrading the Android Gradle Plugin (AGP) is essential for maintaining compatibility with the latest Android features, improving build performance, fixing bugs, and enhancing the development process. By keeping both AGP and Gradle up to date, you ensure that your project takes advantage of the latest optimizations and features available for Android development.

Let’s dive into a detailed explanation of the Android app folder structure, adding any missing files and folders, and explaining the purpose of each one within an Android project.
- Project Root Directory
At the top level of your Android project, you’ll find the root directory containing several important files related to the entire project configuration.
Files in the Root Directory:
- build.gradle.kts (Project-level):
- This Gradle script configures settings that apply to the whole project. It contains repositories, dependencies, and classpath declarations needed for all modules in the project.
- settings.gradle.kts:
- This file defines the structure of your project and specifies which modules are included. It includes paths to submodules (if any) and is used by Gradle to set up the project.
- gradle-wrapper.properties:
- Contains the configuration for the Gradle wrapper, including the version of Gradle to be used. The wrapper ensures that the correct Gradle version is used in different environments.
- gradle.properties:
- This file contains project-level properties, such as build settings, and may include Gradle properties for performance tuning, like enabling parallel execution or configuring Android-specific settings.
- local.properties:
- Contains the SDK location and is specific to your local machine. It’s typically not checked into version control (i.e., git) because it’s machine-specific.
- libs.versions.toml (optional):
- This file is used when using version catalogs in Gradle. It manages versioning for dependencies in a central location, making it easier to maintain and update libraries used in the project.
- app Directory (Module: app)
The app folder is where the actual Android application resides. This module contains all the files related to your app’s functionality.
Subfolders in the app directory:
- manifests:
- Contains the AndroidManifest.xml file that defines essential information about your app, including its components (activities, services, etc.), permissions, and required features. It also contains metadata such as package names, app theme, and launch configurations.
- AndroidManifest.xml:
- This file is crucial because it declares app components and configurations, such as the main Activity, app permissions, and Android app configurations (e.g., version code, API levels, etc.).
- kotlin+java (or src):
- This folder contains all the source code files for your app. It follows the package structure and contains subdirectories for Java/Kotlin classes that handle the app’s logic, UI, and other functionalities.
- com.kncmaptechnologies.helloworld:
- This is the default package name in the example you provided. It will contain Java/Kotlin files, such as MainActivity.kt (the main entry point of the app). Each subdirectory represents different classes or components of the application.
- ui.theme:
- The ui.theme folder contains theme-related files, such as colors, typography, and other design attributes for the app’s User Interface (UI).
- MainActivity.kt:
- This is the MainActivity class that is usually the entry point of the Android app. It’s the first screen that appears when the app is launched.
- res (Resources):
- This directory contains various resources that are bundled with the app. These resources include layouts, drawables, values, and more.
- drawable/:
- Contains image files (e.g., .png, .jpg) used by the app, such as icons, buttons, etc.
- mipmap/:
- Similar to drawable, but specifically for app icons. The mipmap folder is optimized for different screen resolutions.
- values/:
- Contains XML files for storing various types of resources, such as strings (e.g., strings.xml), colors (e.g., colors.xml), dimensions (e.g., dimens.xml), styles (e.g., styles.xml), and themes. It helps maintain different values and settings that can be reused throughout the app.
- xml/:
- Contains XML files for app-specific configuration or settings, such as layout XML files, preferences, or custom configurations for app components.
- androidTest (Test Folder)
- This folder contains UI tests or tests that involve interaction with the app’s UI. These tests run on an Android device or emulator to simulate real user interactions.
- UI Tests: Written with tools like Espresso or UI Automator.
- test (Unit Tests Folder)
- This folder contains unit tests for testing the business logic of your app. These tests are not dependent on the Android framework and run on the local JVM (Java Virtual Machine) instead of an actual Android device or emulator.
- Unit tests: Written with JUnit or Mockito for testing methods and business logic.
- Gradle Scripts Directory
This folder contains several important files related to building the project.
- build.gradle.kts (Project-level):
- As explained before, this file defines dependencies, repositories, and settings used across all modules in the project. It also contains configurations like the classpaths for AGP and Gradle.
- build.gradle.kts (Module-level):
- This is the module-specific Gradle file. In the case of the app module, this file contains settings related to dependencies, build types, flavors, and plugins used specifically for building the app.
- It may include dependencies for libraries such as Retrofit, Room, Jetpack libraries, and more.
- proguard-rules.pro:
- This file defines ProGuard (or R8) rules for minifying and obfuscating the code when the app is being built for release. ProGuard helps to reduce the size of the APK, remove unused code, and obfuscate the app’s code to make it harder for someone to reverse-engineer.
- gradle.properties:
- This file is used to define properties that are shared between Gradle and Android. For example, enabling or disabling parallel builds, setting the Android SDK path, or enabling/disable certain optimizations.
- gradle-wrapper.properties:
- Configures the version of Gradle being used in the project and makes the project Gradle wrapper executable without needing a specific version of Gradle installed locally.
- libs.versions.toml:
- When used with version catalogs, this file manages dependencies and versions in a centralized manner. It makes dependency updates and version management more organized.
Additional Folder and Files You Might Find in an Android Project
- build/:
- This is a build output directory. It is automatically generated when you build your project. It contains compiled files, APKs, logs, and other temporary files. You generally don’t need to manually edit or check these files, and it’s usually added to .gitignore.
- assets/:
- This folder holds raw files (e.g., text files, fonts, videos, or other assets) that need to be included in the app but not compiled into resources. Files in the assets directory can be accessed through the AssetManager API in the app.
- jniLibs/:
- Contains native libraries (e.g., .so files) used for apps with native C/C++ code. These libraries are loaded into the app at runtime.
Summary of Android App Folder Structure:
- Root folder: Contains gradle.properties, settings.gradle.kts, gradle-wrapper.properties, and other project-wide configuration files.
- app/: Main app module with code, resources (layouts, drawables, values), and the AndroidManifest.xml.
- kotlin+java/: Contains Java/Kotlin code for the app’s logic, usually organized in packages like com.yourappname.
- res/: Stores all the resources like images, layouts, colors, strings, etc.
- androidTest/: Holds UI tests that run on a physical device or emulator.
- test/: Contains unit tests that run on the JVM (not requiring a device).
- Gradle Scripts/: Holds all Gradle build files that handle dependencies, project configurations, ProGuard rules, etc.
MAINACTIVITY.KT
|
1 2 3 4 5 6 7 8 9 10 11 12 13 14 15 16 17 18 19 20 21 22 23 24 25 26 27 28 29 30 31 32 33 34 35 36 37 38 39 40 41 42 43 44 45 46 47 48 49 |
package com.kncmaptechnologies.helloworld import android.os.Bundle import androidx.activity.ComponentActivity import androidx.activity.compose.setContent import androidx.activity.enableEdgeToEdge import androidx.compose.foundation.layout.fillMaxSize import androidx.compose.foundation.layout.padding import androidx.compose.material3.Scaffold import androidx.compose.material3.Text import androidx.compose.runtime.Composable import androidx.compose.ui.Modifier import androidx.compose.ui.tooling.preview.Preview import com.kncmaptechnologies.helloworld.ui.theme.HelloWorldTheme class MainActivity : ComponentActivity() { override fun onCreate(savedInstanceState: Bundle?) { super.onCreate(savedInstanceState) enableEdgeToEdge() setContent { HelloWorldTheme { Scaffold(modifier = Modifier.fillMaxSize()) { innerPadding -> Greeting( name = "Android", modifier = Modifier.padding(innerPadding) ) } } } } } @Composable fun Greeting(name: String, modifier: Modifier = Modifier) { Text( text = "Hello $name!", modifier = modifier ) } @Preview(showBackground = true) @Composable fun GreetingPreview() { HelloWorldTheme { Greeting("Android") } } |
-
-
-
- This specifies that MainActivity is the entry point (launcher activity) of the app.
- res/layout/activity_main.xml (if using XML layouts, though not in this case since you’re using Jetpack Compose):
- This is the traditional way of defining UI in Android apps. If you were not using Jetpack Compose, you would define the UI elements in an XML layout file and reference that file in your MainActivity using methods like setContentView(). However, in this case, Jetpack Compose replaces the need for XML layouts.
- HelloWorldTheme.kt (in ui.theme):
- The HelloWorldTheme is likely a custom composable function or a Kotlin file that sets up the theme for your app. Themes in Android define the visual appearance of the app, such as colors, typography, and shapes, and are applied using the MaterialTheme composable in Jetpack Compose.
- In the code, HelloWorldTheme is wrapping the content of the app, meaning it’s defining how the UI looks visually.
- build.gradle Files (Project-level and Module-level):
- The build.gradle files manage project dependencies and configuration. For instance, MainActivity.kt would rely on certain libraries (like androidx.compose for Jetpack Compose). These dependencies are defined in the build.gradle file. When you include libraries like androidx.compose.material3, these dependencies are declared in these Gradle files.
- gradle.properties and local.properties:
- These files contain configuration settings for the Gradle build system. gradle.properties includes general configuration options, while local.properties usually contains machine-specific settings like the Android SDK location.
- strings.xml (in res/values/):
- If you wanted to make the greeting text (“Hello $name!”) dynamic or internationalized, you might store the string in a resource file like strings.xml. This would make it easier to update the text or support multiple languages. For example, the string “Hello
-
-
-
Then in
MainActivity.kt, you could reference it like this: proguard-rules.pro(optional, if obfuscation is enabled):- If you use ProGuard or R8 (for code minification or obfuscation), this file will contain rules to prevent important classes (like
MainActivity) from being obfuscated or removed during the build process.
- If you use ProGuard or R8 (for code minification or obfuscation), this file will contain rules to prevent important classes (like
How These Files Work Together:
- Manifest File: Registers MainActivity as the launcher activity for the app.
- kt: Contains the logic for creating the UI using Jetpack Compose. It is the entry point of the app’s UI.
- Theme Files (kt): Provides visual styling for the app, making it look consistent according to Material Design guidelines.
- Gradle Files: Handle the configuration of dependencies (like Jetpack Compose) and build settings.
- Resources (xml): Store reusable strings and other resources like colors, dimensions, etc.
- Preview: @Preview annotations allow you to see how Greeting will appear in Android Studio without running the app.
Summary:
- MainActivity.kt is the starting point of your app’s UI, where you set up the interface using Jetpack Compose.
- Key components like Scaffold, Composable functions, and the theme are used to build the UI.
- It works in conjunction with other files like the AndroidManifest, gradle files, and resource files to define the app’s functionality, layout, dependencies, and theme.
ANDROIDMANIFEST.XML
|
1 2 3 4 5 6 7 8 9 10 11 12 13 14 15 16 17 18 19 20 21 22 23 24 25 26 27 28 29 30 |
<?xml version="1.0" encoding="utf-8"?> <manifest xmlns:android="http://schemas.android.com/apk/res/android" xmlns:tools="http://schemas.android.com/tools"> <application android:allowBackup="true" android:dataExtractionRules="@xml/data_extraction_rules" android:fullBackupContent="@xml/backup_rules" android:icon="@mipmap/ic_launcher" android:label="@string/app_name" android:roundIcon="@mipmap/ic_launcher_round" android:supportsRtl="true" android:theme="@style/Theme.HelloWorld" tools:targetApi="31"> <activity android:name=".MainActivity" android:exported="true" android:label="@string/app_name" android:theme="@style/Theme.HelloWorld"> <intent-filter> <action android:name="android.intent.action.MAIN" /> <category android:name="android.intent.category.LAUNCHER" /> </intent-filter> </activity> </application> </manifest> |
Explaining the Android AndroidManifest.xml File
The AndroidManifest.xml file is a crucial part of every Android app, and it serves as the central configuration file for the app. It provides essential information about the app to the Android system, such as its components, permissions, themes, and other configurations. This file is located in the root directory of your app, typically found in:
Let’s break down the provided AndroidManifest.xml file line by line to understand its structure, purpose, and functionalities.
1. XML Declaration and Manifest Tag
<?xml version="1.0" encoding="utf-8"?>: This is the XML declaration indicating the version of XML being used and the character encoding. In this case, it specifies that the document uses UTF-8 encoding.<manifest>: The root tag for theAndroidManifest.xmlfile. It defines the XML namespace for the Android system, which is necessary for the Android system to correctly interpret the file.xmlns:android="http://schemas.android.com/apk/res/android": This specifies the XML namespace used by Android.xmlns:tools="http://schemas.android.com/tools": This is a namespace used by Android Studio and other tools for additional properties (such as for testing, or linting tools).
2. Application Tag
The <application> tag contains settings related to the entire app, defining how it behaves, looks, and interacts with the system. Let’s explain each attribute:
- android:allowBackup=”true”: Allows the app data to be backed up, meaning the system can back up user data (such as settings and preferences) to cloud services like Google Drive.
- android:dataExtractionRules=”@xml/data_extraction_rules”: This attribute refers to an XML file that defines rules for extracting app data. These rules are used when the system performs backup and restoration of data.
- android:fullBackupContent=”@xml/backup_rules”: Specifies a file containing rules for backing up specific app data. If the file is not provided, the system backs up all user data by default.
- android:icon=”@mipmap/ic_launcher”: Specifies the default icon for the app (the app’s launcher icon). The icon is usually stored in the mipmap folder.
- android:label=”@string/app_name”: Sets the label for the app (the app name that appears on the home screen and in the app settings). The string value is stored in res/values/strings.xml.
- android:roundIcon=”@mipmap/ic_launcher_round”: Defines the round version of the app icon, used by devices that support round icons (e.g., some Android wearables).
- android:supportsRtl=”true”: Indicates that the app supports right-to-left (RTL) layouts, making it suitable for languages like Arabic or Hebrew.
- android:theme=”@style/Theme.HelloWorld”: Sets the app’s theme. The theme is defined in res/values/styles.xml, and it affects the overall appearance of the app (e.g., colors, fonts, and other UI attributes).
- tools:targetApi=”31″: Specifies the target API level for the app, allowing tools like Android Studio to provide more accurate feedback based on the API level you are targeting.
3. Activity Tag
The <activity> tag defines a single screen of the app. Here’s a breakdown of its attributes:
android:name=".MainActivity": Specifies the name of the activity class for the app. This is the entry point of the app, and in this case, it’s theMainActivityclass. The.before the class name means it is in the default package for the app.android:exported="true": This indicates whether the activity is available to other apps or components outside of this app. Since the app uses an explicitintent-filterbelow, setting this totruemakes it available for external interactions.android:label="@string/app_name": Sets the label for the activity (which typically matches the app’s name).android:theme="@style/Theme.HelloWorld": Applies the app’s theme to this specific activity.
4. Intent-Filter Tag
- The
<intent-filter>is used to declare how the activity can be launched or triggered by the system or other apps. Here, it contains two components:<action android:name="android.intent.action.MAIN" />: This specifies that this activity is the main entry point for the app. The system uses this action to start the activity when the user opens the app.<category android:name="android.intent.category.LAUNCHER" />: This category marks the activity as the launcher activity, meaning it will be displayed on the app launcher screen (the home screen).
This combination of <action> and <category> is what tells Android that this activity is the main entry point and should be shown when the user opens the app from the launcher.
5. Closing the Application Tag
This tag closes the <application> tag and indicates the end of the app configuration.
6. Closing the Manifest Tag
This tag closes the root <manifest> tag, marking the end of the manifest file.
App Permissions
Permissions are not included in the manifest file provided, but in an Android app, the AndroidManifest.xml file also specifies the permissions the app needs. These permissions are declared in the <manifest> section. For example:
These permissions are requested from the user during app installation or at runtime (depending on the permission type).
Other Files That Use the Manifest
The AndroidManifest.xml file is used by the Android build tools, the Android system, and Android Studio. Other parts of the app may refer to the manifest indirectly:
- Activities: Every activity in the app must be declared in the manifest.
- Services & Broadcast Receivers: If your app uses services or broadcast receivers, they must also be declared in the manifest.
- Permissions: The permissions the app requires must be declared here, as mentioned above.
Summary
The AndroidManifest.xml file serves as the configuration center for your Android app. It defines key elements such as the app’s components (activities, services), permissions, themes, app icon, and much more. Every Android app needs this file, and its contents directly influence how the app behaves and interacts with the Android system.
BUILD.GRADLE.KTS
|
1 2 3 4 5 6 7 8 9 10 11 12 13 14 15 16 17 18 19 20 21 22 23 24 25 26 27 28 29 30 31 32 33 34 35 36 37 38 39 40 41 42 43 44 45 46 47 48 49 50 51 52 53 54 55 56 57 58 59 60 61 |
plugins { alias(libs.plugins.android.application) alias(libs.plugins.kotlin.android) alias(libs.plugins.kotlin.compose) } android { namespace = "com.kncmaptechnologies.helloworld" compileSdk = 35 defaultConfig { applicationId = "com.kncmaptechnologies.helloworld" minSdk = 24 targetSdk = 35 versionCode = 1 versionName = "1.0" testInstrumentationRunner = "androidx.test.runner.AndroidJUnitRunner" } buildTypes { release { isMinifyEnabled = false proguardFiles( getDefaultProguardFile("proguard-android-optimize.txt"), "proguard-rules.pro" ) } } compileOptions { sourceCompatibility = JavaVersion.VERSION_11 targetCompatibility = JavaVersion.VERSION_11 } kotlinOptions { jvmTarget = "11" } buildFeatures { compose = true } } dependencies { implementation(libs.androidx.core.ktx) implementation(libs.androidx.lifecycle.runtime.ktx) implementation(libs.androidx.activity.compose) implementation(platform(libs.androidx.compose.bom)) implementation(libs.androidx.ui) implementation(libs.androidx.ui.graphics) implementation(libs.androidx.ui.tooling.preview) implementation(libs.androidx.material3) testImplementation(libs.junit) androidTestImplementation(libs.androidx.junit) androidTestImplementation(libs.androidx.espresso.core) androidTestImplementation(platform(libs.androidx.compose.bom)) androidTestImplementation(libs.androidx.ui.test.junit4) debugImplementation(libs.androidx.ui.tooling) debugImplementation(libs.androidx.ui.test.manifest) } |
build.gradle.kts file for an Android project, written using Kotlin DSL. This file is responsible for configuring the build process for the app, including defining the necessary dependencies, specifying SDK versions, setting up the app’s build features (like Jetpack Compose), and defining other properties related to the project.
Let’s break it down and explain each part:
Plugins Block:
pluginsblock: This section applies the necessary plugins for the project.android.application: This plugin is for Android application projects. It helps configure Android-specific build settings like the application ID, SDK versions, and other parameters.kotlin.android: This plugin adds support for Kotlin in Android projects.kotlin.compose: This plugin enables Jetpack Compose for the project, allowing you to use Compose to build UIs.
Android Block:
- namespace: This defines the namespace of your app (typically corresponds to the package name). It’s used for organizing your app and ensuring that identifiers (like classes and resources) don’t conflict with others.
- compileSdk: This defines the version of Android that your project is compiled against. Here, it’s set to version 35.
- defaultConfig: This section defines the default configuration for your app:
- applicationId: The unique identifier for your app in the Play Store (used as the package name).
- minSdk: The minimum version of Android that your app supports. Here, it’s set to API level 24 (Android 7.0 Nougat).
- targetSdk: The version of Android that the app is optimized for. This should be set to the latest version that your app supports. Here, it’s set to API level 35.
- versionCode: An integer value that is incremented for every release you push to the Play Store. This is used to track versions.
- versionName: The version name string that’s displayed to users.
- testInstrumentationRunner: Specifies the runner class for Android instrumentation tests.
- buildTypes:
- release: Configures the build settings for release builds.
- isMinifyEnabled: Whether or not to enable code shrinking (minification) for release builds. Set to false here.
- proguardFiles: Specifies the ProGuard configuration files for code obfuscation. proguard-android-optimize.txt is a default optimization file, and proguard-rules.pro contains custom rules.
- release: Configures the build settings for release builds.
- compileOptions:
- sourceCompatibility and targetCompatibility: These specify the Java version used in the project. Here, it’s set to Java 11.
- kotlinOptions:
- jvmTarget: Specifies the version of JVM to be used. Here, it’s set to 11, which corresponds to Java 11.
- buildFeatures:
- This enables or disables specific features for the app. Here, the compose = true line enables Jetpack Compose in the project.
Dependencies Block:
- implementation: These are the dependencies used by the app.
- libs.androidx.core.ktx: Provides Kotlin extensions for core Android components.
- libs.androidx.lifecycle.runtime.ktx: Extensions for Android’s lifecycle components.
- libs.androidx.activity.compose: Support for integrating Jetpack Compose with Android activities.
- platform(libs.androidx.compose.bom): Using a Bill of Materials (BoM) for Jetpack Compose ensures that all the dependencies related to Compose are compatible with each other.
- libs.androidx.ui: Core Jetpack Compose UI components.
- libs.androidx.ui.graphics: Jetpack Compose UI graphics for handling graphics and drawings in Compose.
- libs.androidx.ui.tooling.preview: For previewing composables in Android Studio.
- libs.androidx.material3: Jetpack Compose Material3 library for material design components in Compose.
- testImplementation and androidTestImplementation:
- These are dependencies for unit tests and instrumentation tests:
- libs.junit: JUnit for unit testing.
- libs.androidx.junit: JUnit test support for Android.
- libs.androidx.espresso.core: Espresso for UI testing in Android.
- libs.androidx.ui.test.junit4: Jetpack Compose testing libraries for UI testing.
- libs.androidx.ui.tooling: Provides tooling for Compose previews and UI inspection in debug builds.
- These are dependencies for unit tests and instrumentation tests:
- debugImplementation: These dependencies are only used in the debug build type.
- libs.androidx.ui.tooling: For inspecting Compose UI during development.
- libs.androidx.ui.test.manifest: A special manifest for running tests on Jetpack Compose.
Explanation of Key Terms:
- implementation vs testImplementation vs androidTestImplementation:
- implementation: Regular dependencies used in the app’s code (e.g., libraries like Jetpack Compose, Material Design).
- testImplementation: Dependencies needed for local unit tests (for testing logic on the JVM).
- androidTestImplementation: Dependencies for instrumentation tests that run on a real or emulated Android device.
- platform(libs.androidx.compose.bom):
- BoM (Bill of Materials) is a way to ensure that all Compose dependencies are compatible with each other. Instead of manually specifying the version for each Compose library, the BoM defines a version for all libraries, ensuring compatibility.
- debugImplementation:
- Dependencies listed under this block are only included in the debug version of the app. These might include libraries for debugging, like logging or inspection tools.
Conclusion:
This build.gradle.kts file is a key part of the build configuration for your Android app. It defines which plugins to apply (like for Android and Kotlin), specifies SDK versions, configures Jetpack Compose, and includes the necessary dependencies for building and testing the app.
Kotlin DSL stands for Kotlin Domain Specific Language. It’s a special kind of programming language or syntax designed to solve a specific problem within a domain, and in this case, the domain is build configuration.
Here’s a deeper breakdown of what Kotlin DSL means:
- Kotlin (Programming Language):
Kotlin is a modern programming language that runs on the Java Virtual Machine (JVM) and is officially supported for Android development. It’s designed to be concise, expressive, and safer compared to Java, providing many features like null safety and extension functions.
- Domain Specific Language (DSL):
A DSL is a programming language tailored for a specific task or domain, such as HTML for web development or SQL for database queries. Instead of using general-purpose programming languages like Java or Python, a DSL is optimized for a particular area, making it easier for developers to write code in that area.
- Kotlin DSL in the Context of Android (Gradle Files):
In Android development, Kotlin DSL is used to configure build settings for Android apps, like the build.gradle.kts file you’ve shared earlier. The .kts file extension signifies that this is a Kotlin-based Gradle script, which is a more expressive and type-safe alternative to the traditional Groovy DSL used in previous versions (build.gradle).
Instead of writing build configurations using Groovy (the default language for Gradle), you can use Kotlin to configure your builds. This provides several benefits, such as:
- Type Safety: Kotlin DSL offers better support for autocomplete, type-checking, and error handling, making it easier to spot mistakes at compile-time instead of runtime.
- Conciseness: Kotlin has a more concise and readable syntax, making build files easier to understand.
- Interoperability: Since it’s Kotlin, you can leverage all Kotlin features, like extension functions, null-safety, and more, within the build script.
Key Features of Kotlin DSL:
- Type-safe: Provides compile-time checking of build configurations, making sure you don’t encounter typos or errors.
- Concise: More compact and readable syntax compared to Groovy.
- IDE Support: Better support in IDEs like Android Studio, with features like code completion, refactoring, and error highlighting.
- Example of Kotlin DSL (in Gradle files):
This Kotlin DSL file is functionally similar to a Groovy-based build.gradle file, but the syntax is more Kotlin-friendly. You can see that:
- We use Kotlin’s standard library functions like kotlin(“android”) for applying plugins.
- It’s easier to understand and provides code suggestions in Android Studio.
Conclusion:
Kotlin DSL is simply the use of Kotlin language to define domain-specific configurations for build systems like Gradle. In Android development, it’s used for gradle build configuration files (build.gradle.kts) and is generally preferred for its type-safety, expressiveness, and better IDE support. It allows developers to define their Android project’s build settings in a more structured and manageable way.
Here are 60 questions and answers:
General Android Development Concepts
- What is Android Studio?
- Answer: Android Studio is the official Integrated Development Environment (IDE) for Android app development, based on IntelliJ IDEA.
- What is Kotlin?
- Answer: Kotlin is a modern, statically-typed programming language developed by JetBrains, and it’s the recommended language for Android development.
- What is the purpose of the AndroidManifest.xml file?
- Answer: The AndroidManifest.xml file contains essential information about the app, such as its components, permissions, theme, and metadata.
- What is an activity in Android?
- Answer: An activity represents a single screen with a user interface (UI) in an Android app.
- What is an Intent in Android?
- Answer: An intent is a messaging object used to request an action from another component (like starting an activity, sending data, etc.).
Setting Up Android Studio & Project
- How do you start a new project in Android Studio?
- Answer: Open Android Studio, click on “Start a new Android Studio project,” select the template (e.g., Empty Activity), and configure the project settings (name, package, language, etc.).
- What is the Empty Activity template in Android Studio?
- Answer: The Empty Activity template provides a basic setup with a blank screen and default files like MainActivity.kt and activity_main.xml.
- What is a Package Name in Android Studio?
- Answer: The package name is a unique identifier for the app, typically in reverse domain name format (e.g., com.example.myapp).
- Which programming language should you choose for Android development?
- Answer: Kotlin is the recommended programming language for Android development, though Java is still supported.
- Where is the AndroidManifest.xml file located in an Android project?
- Answer: The AndroidManifest.xml file is located in the app > src > main directory.
UI Components & Layouts
- What is a TextView in Android?
- Answer: A TextView is a UI component used to display text on the screen.
- What is ConstraintLayout in Android?
- Answer: ConstraintLayout is a flexible layout manager used for creating responsive UI designs, allowing elements to be positioned relative to each other and the parent.
- What is the difference between LinearLayout and RelativeLayout?
- Answer: LinearLayout arranges child views in a single row or column, while RelativeLayout allows positioning views relative to each other.
- What is XML in Android development?
- Answer: XML (Extensible Markup Language) is used in Android to define the user interface (UI) and resources like layouts, strings, and colors.
- What is the purpose of the android:layout_width and android:layout_height attributes?
- Answer: These attributes define the width and height of a view in the layout. Common values include match_parent and wrap_content.
The AndroidManifest.xml File
- What is the purpose of the <application> tag in the AndroidManifest.xml?
- Answer: The <application> tag contains global properties for the app, such as its theme, icon, permissions, and backup rules.
- What does android:allowBackup=”true” mean in the AndroidManifest.xml?
- Answer: This attribute allows the app’s data to be backed up by the Android system, typically to cloud storage like Google Drive.
- What is the use of android:icon in the AndroidManifest.xml?
- Answer: The android:icon attribute sets the default icon for the app, typically displayed on the launcher and the app info screen.
- What does android:supportsRtl=”true” specify in the AndroidManifest.xml?
- Answer: It indicates that the app supports right-to-left (RTL) layouts, which is necessary for languages like Arabic and Hebrew.
- What is the function of the <activity> tag in the AndroidManifest.xml?
- Answer: The <activity> tag defines the components of the app that can display UI screens and interact with the user.
Permissions & Backup
- What does the android:exported=”true” attribute in the <activity> tag mean?
- Answer: This attribute specifies that the activity can be accessed by components from other apps or external sources.
- What is the purpose of the <intent-filter> tag in the AndroidManifest.xml?
- Answer: The <intent-filter> tag specifies how an activity or other components can be triggered or launched by the system or other apps.
- What is the significance of <action android:name=”android.intent.action.MAIN” /> in the manifest file?
- Answer: This action marks the activity as the main entry point for the app, meaning it will be launched when the app is opened.
- What does <category android:name=”android.intent.category.LAUNCHER” /> do in the manifest?
- Answer: This category designates the activity as the launcher activity, meaning it will appear on the home screen or app drawer.
- What is the use of android:theme=”@style/Theme.HelloWorld” in the AndroidManifest.xml?
- Answer: This attribute specifies the theme for the activity, defining the app’s visual style (colors, fonts, etc.).
Running the App
- How can you run an Android app on an emulator?
- Answer: To run an app on an emulator, you need to create a virtual device in the AVD Manager, then select it and click the “Run” button in Android Studio.
- What is the difference between wrap_content and match_parent in XML layout files?
- Answer: wrap_content makes the view large enough to fit its content, while match_parent makes the view fill the available space in its parent.
- How do you connect a physical Android device for testing?
- Answer: Enable USB debugging on your device, connect it via USB, and select it from the list of available devices in Android Studio.
- What is an AVD in Android Studio?
- Answer: AVD (Android Virtual Device) is an emulator that simulates an Android device for testing apps without needing physical hardware.
- How can you run your app on a physical device?
- Answer: Connect your device via USB, enable USB debugging, and select the device in Android Studio to run the app.
Common Errors and Troubleshooting
- What should you do if the emulator runs slowly?
- Answer: You can allocate more system resources (RAM, CPU) to the emulator or try using a lower API version for better performance.
- Why might your Android app crash when running?
- Answer: Common reasons for crashes include coding errors, missing resources, incorrect API usage, or improper permissions.
- How can you check for errors or crashes in Android Studio?
- Answer: Use Logcat in Android Studio to view logs and debug information related to the app’s performance and errors.
- How do you debug an Android app?
- Answer: You can use breakpoints, the Logcat tool, and the Debug tool in Android Studio to debug your app.
- Why might your physical device not be detected in Android Studio?
- Answer: Ensure that USB debugging is enabled, the correct drivers are installed, and the device is properly connected via USB.
App Resources & Configurations
- What is the purpose of res/values/strings.xml?
- Answer: The strings.xml file stores string resources used in the app, such as text for the app’s UI (e.g., app name, button text).
- What is the @style/Theme.HelloWorld used for in Android?
- Answer: It refers to a custom theme defined in the res/values/styles.xml file, which sets the app’s visual design.
- What is a resource in Android?
- Answer: A resource in Android is any non-code element (such as images, strings, or layouts) that is used to build the app’s UI.
- What is the @mipmap/ic_launcher in Android used for?
- Answer: It refers to the app’s launcher icon stored in the mipmap folder, used by the system for app shortcuts.
- What is the difference between mipmap and drawable folders in Android?
- Answer: mipmap is for app icons, while drawable is used for general images or graphics like backgrounds, buttons, etc.
Manifest Permissions & Configuration
- What permission allows an app to access the internet?
- Answer: The android.permission.INTERNET permission.
- What is the purpose of tools:targetApi=”31″ in the AndroidManifest.xml?
- Answer: It specifies the target API level for the app, allowing Android Studio to provide accurate feedback and features based on the targeted API.
- What does android:roundIcon refer to in the AndroidManifest.xml?
- Answer: It refers to the round icon variant of the app’s icon, used by devices that support round icons (e.g., wearables).
- How do you declare a service in the AndroidManifest.xml?
- Answer: You use the <service> tag to declare a service, similar to how activities are declared.
- What is the <provider> tag used for in the AndroidManifest.xml?
- Answer: The <provider> tag declares a content provider, which is responsible for managing shared app data.
App Backup & Data Extraction
- What is android:fullBackupContent used for in the AndroidManifest.xml?
- Answer: It specifies the XML file that defines which data should be included or excluded from the app’s backup.
- What is the role of tools:targetApi in Android Studio?
- Answer: It provides a way to define a target API level for development tools, helping tools like Android Studio provide better feedback based on the targeted API version.
- What is android:dataExtractionRules used for?
- Answer: It defines rules on how the app’s data should be handled during extraction and backup processes.
- How can you set up backup rules for your Android app?
- Answer: You define backup rules in an XML file and reference it using the android:fullBackupContent attribute in the AndroidManifest.xml.
- What are the common backup strategies for Android apps?
- Answer: Full backup (backing up all app data) and selective backup (backing up specific app data based on rules).
Advanced Concepts and Career Opportunities
- What is Firebase Authentication in Android development?
- Answer: Firebase Authentication is a service provided by Firebase that allows developers to authenticate users via email/password, social logins, and more.
- What are some common job roles for Android developers?
- Answer: Common roles include Android Developer, Mobile Application Developer, Mobile Architect, and Android UI/UX Designer.
- What is the expected salary for an Android developer?
- Answer: The salary can vary based on location, experience, and company, but it ranges from $60,000 to $120,000 annually in many regions.
- What is the role of the tools:targetApi attribute in development?
- Answer: It informs tools like Android Studio about the API level the app targets, helping them provide better development tools.
- How do you update your AndroidManifest.xml for different screen sizes?
- Answer: You use configChanges or define separate layout files under res/layout for different screen sizes.
App Deployment & Publishing
- What is APK?
- Answer: APK (Android Package) is the file format used for distributing Android apps. It contains the compiled app, resources, and configuration.
- How do you prepare your app for release?
- Answer: You generate a signed APK or AAB (Android App Bundle), optimize it, and submit it to the Google Play Store.
- What is Android App Bundles (AAB)?
- Answer: AAB is a new format for packaging Android apps that reduces the size of the app for users by dynamically delivering only the necessary code and resources.
- What should be included in the app description before publishing?
- Answer: It should include the app’s features, functionality, screenshots, and any necessary permissions.
- What is the Google Play Console?
- Answer: The Google Play Console is the platform where developers can manage and publish their Android apps to the Google Play Store.
Module 2: Kotlin Fundamentals
2.1 Kotlin Basics
- Introduction to Kotlin syntax
- Variables and Data Types
- Functions, Conditions, and Loops
What is Kotlin?
Kotlin is a modern, trending programming language that was released in 2016 by JetBrains.
It has become very popular since it is compatible with Java (one of the most popular programming languages out there), which means that Java code (and libraries) can be used in Kotlin programs.
Kotlin is used for:
- Mobile applications (specially Android apps)
- Web development
- Server side applications
- Data science
- And much, much more!
Why Use Kotlin?
- Kotlin is fully compatible with Java
- Kotlin works on different platforms (Windows, Mac, Linux, Raspberry Pi, etc.)
- Kotlin is concise and safe
- Kotlin is easy to learn, especially if you already know Java
- Kotlin is free to use
- Big community/support
Get Started
This tutorial will teach you the very basics of Kotlin.
It is not necessary to have any prior programming experience.
Kotlin IDE
The easiest way to get started with Kotlin, is to use an IDE.
An IDE (Integrated Development Environment) is used to edit and compile code.
In this chapter, we will use IntelliJ (developed by the same people that created Kotlin) which is free to download from https://www.jetbrains.com/idea/download/.
Kotlin Install
Once IntelliJ is downloaded and installed, click on the New Project button to get started with IntelliJ:
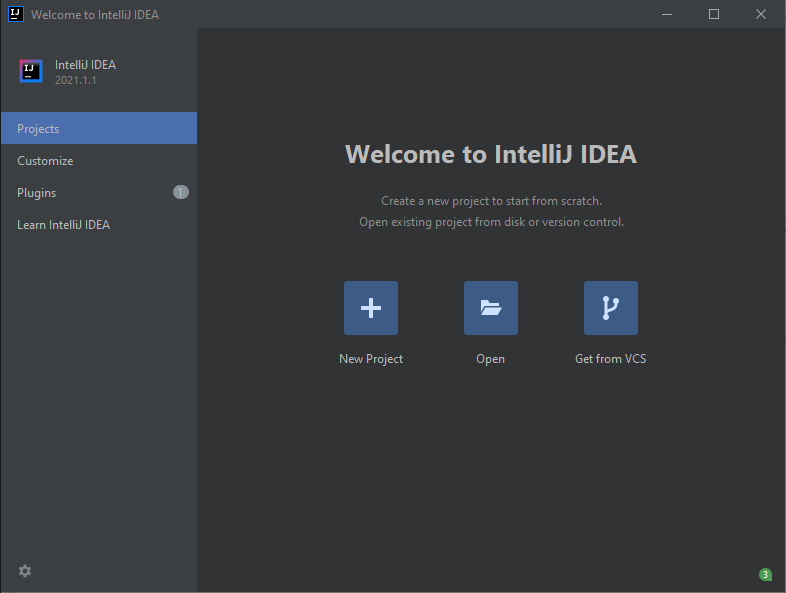
Then click on “Kotlin” in the left side menu, and enter a name for your project:
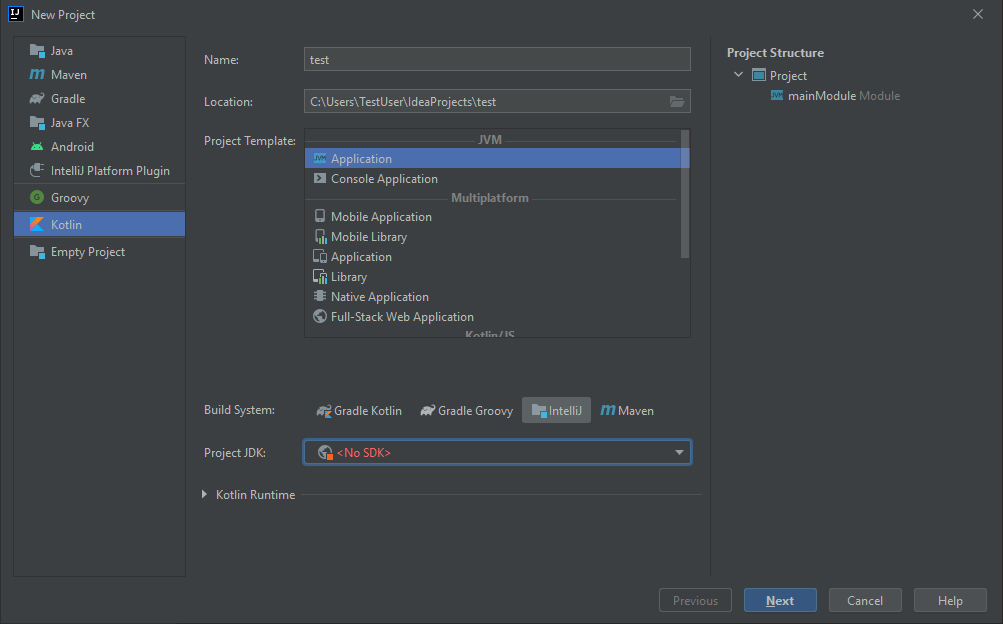
Next, we need to install something called JDK (Java Development Kit) to get our Kotlin project up and going. Click on the “Project JDK” menu, select “Download JDK” and select a version and vendor (e.g. AdoptOpenJDK 11) and click on the “Download” button:

When the JDK is downloaded and installed, choose it from the select menu and then click on the “Next” button and at last “Finish”:
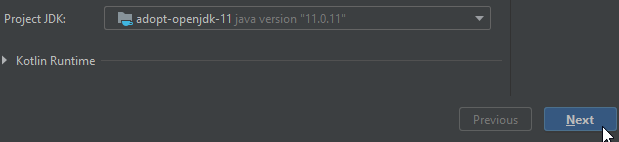
Now we can start working with our Kotlin project. Do not worry about all of the different buttons and functions in IntelliJ. For now, just open the src (source) folder, and follow the same steps as in the image below, to create a kotlin file:
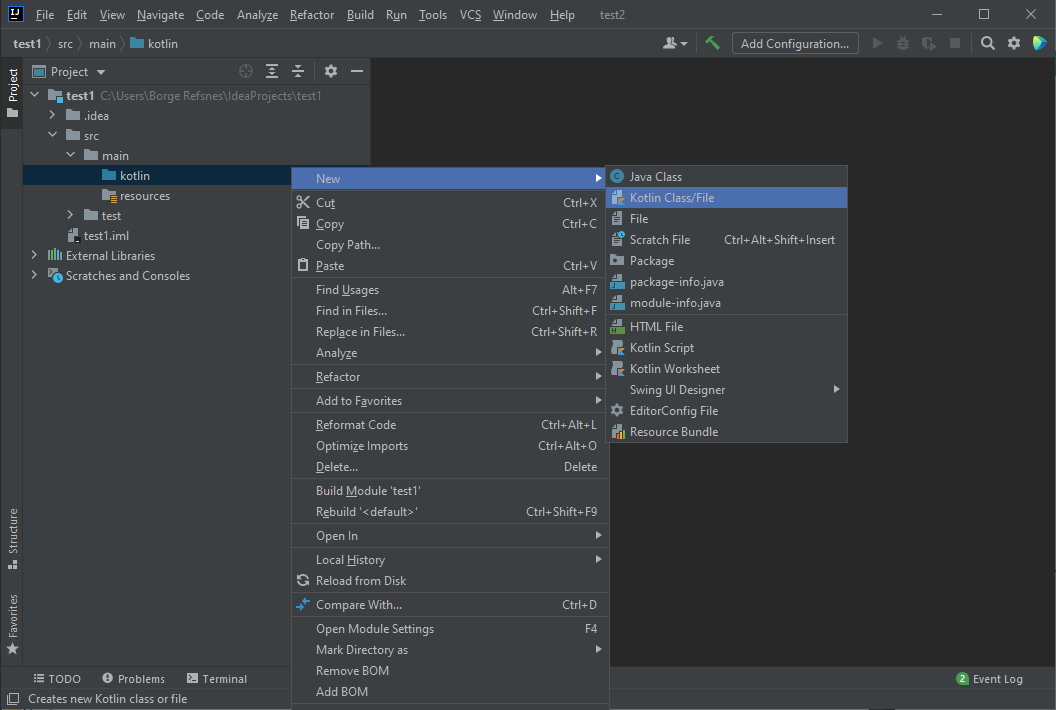
Select the “File” option and add a name to your Kotlin file, for example “Main”:
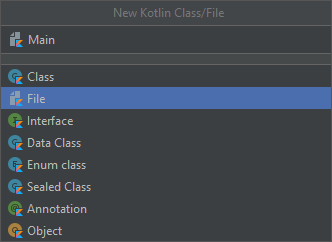
You have now created your first Kotlin file (Main.kt). Let’s add some Kotlin code to it, and run the program to see how it works. Inside the Main.kt file, add the following code:
Main.kt
|
1 2 3 4 5 |
<span class="token keyword keyword-fun">fun</span> <span class="token function">main</span><span class="token punctuation">(</span><span class="token punctuation">)</span> <span class="token punctuation">{</span> <span class="token function">println</span><span class="token punctuation">(</span><span class="token string-literal singleline"><span class="token string">"Hello World"</span></span><span class="token punctuation">)</span> <span class="token punctuation">}</span> |
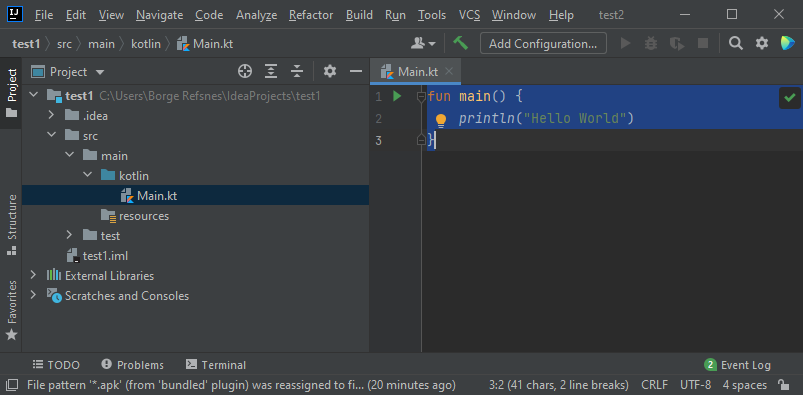
Don’t worry if you don’t understand the code above – we will discuss it in detail in later chapters. For now, lets focus on how to run the code. Click on the Run button at the top navigation bar, then click “Run”, and select “Mainkt”.
Next, IntelliJ will build your project, and run the Kotlin file. The output will look something like this:
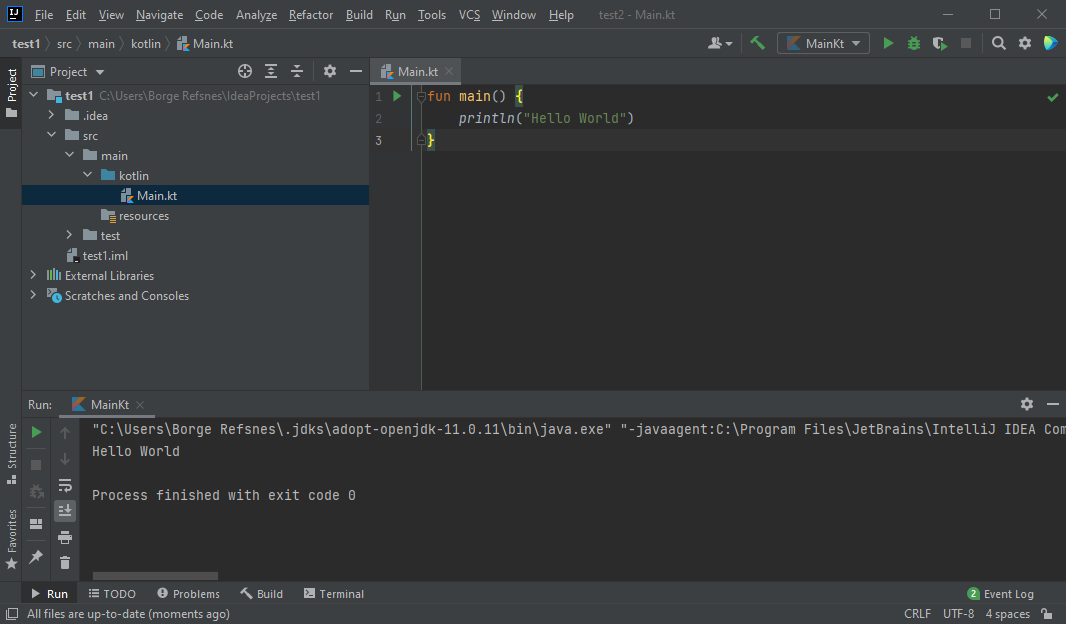
As you can see, the output of the code was “Hello World”, meaning that you have now written and executed your first Kotlin program!
Main.kt
Code:
|
1 2 3 4 5 |
<span class="token keyword keyword-fun">fun</span> <span class="token function">main</span><span class="token punctuation">(</span><span class="token punctuation">)</span> <span class="token punctuation">{</span> <span class="token function">println</span><span class="token punctuation">(</span><span class="token string-literal singleline"><span class="token string">"Hello World"</span></span><span class="token punctuation">)</span> <span class="token punctuation">}</span> |
Result:
Hello WorldKotlin Syntax
In the previous chapter, we created a Kotlin file called Main.kt, and we used the following code to print “Hello World” to the screen:
Example
|
1 2 3 4 5 |
<span class="token keyword keyword-fun">fun</span> <span class="token function">main</span><span class="token punctuation">(</span><span class="token punctuation">)</span> <span class="token punctuation">{</span> <span class="token function">println</span><span class="token punctuation">(</span><span class="token string-literal singleline"><span class="token string">"Hello World"</span></span><span class="token punctuation">)</span> <span class="token punctuation">}</span> |
Example explained
The fun keyword is used to declare a function. A function is a block of code designed to perform a particular task. In the example above, it declares the main() function.
The main() function is something you will see in every Kotlin program. This function is used to execute code. Any code inside the main() function’s curly brackets {} will be executed.
For example, the println() function is inside the main() function, meaning that this will be executed. The println() function is used to output/print text, and in our example it will output “Hello World”.
Good To Know: In Kotlin, code statements do not have to end with a semicolon (;) (which is often required for other programming languages, such as Java, C++, C#, etc.).
Main Parameters
Before Kotlin version 1.3, it was required to use the main() function with parameters, like: fun main(args : Array<String>). The example above had to be written like this to work:
Example
|
1 2 3 4 5 |
<span class="token keyword keyword-fun">fun</span> <span class="token function">main</span><span class="token punctuation">(</span>args <span class="token operator">:</span> Array<span class="token operator"><</span>String<span class="token operator">></span><span class="token punctuation">)</span> <span class="token punctuation">{</span> <span class="token function">println</span><span class="token punctuation">(</span><span class="token string-literal singleline"><span class="token string">"Hello World"</span></span><span class="token punctuation">)</span> <span class="token punctuation">}</span> |
Kotlin Output (Print)
The println() function is used to output values/print text:
Example
|
1 2 3 4 5 |
<span class="token keyword keyword-fun">fun</span> <span class="token function">main</span><span class="token punctuation">(</span><span class="token punctuation">)</span> <span class="token punctuation">{</span> <span class="token function">println</span><span class="token punctuation">(</span><span class="token string-literal singleline"><span class="token string">"Hello World"</span></span><span class="token punctuation">)</span> <span class="token punctuation">}</span> |
You can add as many println() functions as you want. Note that it will add a new line for each function:
Example
|
1 2 3 4 5 6 7 |
<span class="token keyword keyword-fun">fun</span> <span class="token function">main</span><span class="token punctuation">(</span><span class="token punctuation">)</span> <span class="token punctuation">{</span> <span class="token function">println</span><span class="token punctuation">(</span><span class="token string-literal singleline"><span class="token string">"Hello World!"</span></span><span class="token punctuation">)</span> <span class="token function">println</span><span class="token punctuation">(</span><span class="token string-literal singleline"><span class="token string">"I am learning Kotlin."</span></span><span class="token punctuation">)</span> <span class="token function">println</span><span class="token punctuation">(</span><span class="token string-literal singleline"><span class="token string">"It is awesome!"</span></span><span class="token punctuation">)</span> <span class="token punctuation">}</span> |
You can also print numbers, and perform mathematical calculations:
Example
|
1 2 3 4 5 |
<span class="token keyword keyword-fun">fun</span> <span class="token function">main</span><span class="token punctuation">(</span><span class="token punctuation">)</span> <span class="token punctuation">{</span> <span class="token function">println</span><span class="token punctuation">(</span><span class="token number">3</span> <span class="token operator">+</span> <span class="token number">3</span><span class="token punctuation">)</span> <span class="token punctuation">}</span> |
The print() function
There is also a print() function, which is similar to println(). The only difference is that it does not insert a new line at the end of the output:
Example
|
1 2 3 4 5 6 7 |
<span class="token keyword keyword-fun">fun</span> <span class="token function">main</span><span class="token punctuation">(</span><span class="token punctuation">)</span> <span class="token punctuation">{</span> <span class="token function">print</span><span class="token punctuation">(</span><span class="token string-literal singleline"><span class="token string">"Hello World! "</span></span><span class="token punctuation">)</span> <span class="token function">print</span><span class="token punctuation">(</span><span class="token string-literal singleline"><span class="token string">"I am learning Kotlin. "</span></span><span class="token punctuation">)</span> <span class="token function">print</span><span class="token punctuation">(</span><span class="token string-literal singleline"><span class="token string">"It is awesome!"</span></span><span class="token punctuation">)</span> <span class="token punctuation">}</span> |
Kotlin Comments
Comments can be used to explain Kotlin code, and to make it more readable. It can also be used to prevent execution when testing alternative code.
Single-line Comments
Single-line comments starts with two forward slashes (//).
Any text between // and the end of the line is ignored by Kotlin (will not be executed).
This example uses a single-line comment before a line of code:
Example
|
1 2 3 4 |
<span class="token comment">// This is a comment</span> <span class="token function">println</span><span class="token punctuation">(</span><span class="token string-literal singleline"><span class="token string">"Hello World"</span></span><span class="token punctuation">)</span> |
This example uses a single-line comment at the end of a line of code:
Example
|
1 2 3 |
<span class="token function">println</span><span class="token punctuation">(</span><span class="token string-literal singleline"><span class="token string">"Hello World"</span></span><span class="token punctuation">)</span> <span class="token comment">// This is a comment</span> |
Multi-line Comments
Multi-line comments start with /* and ends with */.
Any text between /* and */ will be ignored by Kotlin.
This example uses a multi-line comment (a comment block) to explain the code:
Example
|
1 2 3 4 5 |
<span class="token comment">/* The code below will print the words Hello World to the screen, and it is amazing */</span> <span class="token function">println</span><span class="token punctuation">(</span><span class="token string-literal singleline"><span class="token string">"Hello World"</span></span><span class="token punctuation">)</span> |
Kotlin Variables
Variables are containers for storing data values.
To create a variable, use var or val, and assign a value to it with the equal sign (=):
Syntax
|
1 2 3 4 |
<span class="token keyword keyword-var">var</span> <em>variableName</em> <span class="token operator">=</span> <em>value</em> <span class="token keyword keyword-val">val</span> <em>variableName</em> <span class="token operator">=</span> <em>value</em> |
Example
|
1 2 3 4 5 6 7 |
<span class="token keyword keyword-var">var</span> name <span class="token operator">=</span> <span class="token string-literal singleline"><span class="token string">"John"</span></span> <span class="token keyword keyword-val">val</span> birthyear <span class="token operator">=</span> <span class="token number">1975</span> <span class="token function">println</span><span class="token punctuation">(</span>name<span class="token punctuation">)</span> <span class="token comment">// Print the value of name</span> <span class="token function">println</span><span class="token punctuation">(</span>birthyear<span class="token punctuation">)</span> <span class="token comment">// Print the value of birthyear</span> |
The difference between var and val is that variables declared with the var keyword can be changed/modified, while val variables cannot.
Variable Type
Unlike many other programming languages, variables in Kotlin do not need to be declared with a specified type (like “String” for text or “Int” for numbers, if you are familiar with those).
To create a variable in Kotlin that should store text and another that should store a number, look at the following example:
Example
|
1 2 3 4 5 6 7 |
<span class="token keyword keyword-var">var</span> name <span class="token operator">=</span> <span class="token string-literal singleline"><span class="token string">"John"</span></span> <span class="token comment">// String (text)</span> <span class="token keyword keyword-val">val</span> birthyear <span class="token operator">=</span> <span class="token number">1975</span> <span class="token comment">// Int (number)</span> <span class="token function">println</span><span class="token punctuation">(</span>name<span class="token punctuation">)</span> <span class="token comment">// Print the value of name</span> <span class="token function">println</span><span class="token punctuation">(</span>birthyear<span class="token punctuation">)</span> <span class="token comment">// Print the value of birthyear</span> |
Kotlin is smart enough to understand that “John” is a String (text), and that 1975 is an Int (number) variable.
However, it is possible to specify the type if you insist:
Example
|
1 2 3 4 5 6 7 |
<span class="token keyword keyword-var">var</span> name<span class="token operator">:</span> String <span class="token operator">=</span> <span class="token string-literal singleline"><span class="token string">"John"</span></span> <span class="token comment">// String</span> <span class="token keyword keyword-val">val</span> birthyear<span class="token operator">:</span> Int <span class="token operator">=</span> <span class="token number">1975</span> <span class="token comment">// Int</span> <span class="token function">println</span><span class="token punctuation">(</span>name<span class="token punctuation">)</span> <span class="token function">println</span><span class="token punctuation">(</span>birthyear<span class="token punctuation">)</span> |
You can also declare a variable without assigning the value, and assign the value later. However, this is only possible when you specify the type:
Example
This works fine:
|
1 2 3 4 5 |
<span class="token keyword keyword-var">var</span> name<span class="token operator">:</span> String name <span class="token operator">=</span> <span class="token string-literal singleline"><span class="token string">"John"</span></span> <span class="token function">println</span><span class="token punctuation">(</span>name<span class="token punctuation">)</span> |
Notes on val
When you create a variable with the val keyword, the value cannot be changed/reassigned.
The following example will generate an error:
Example
|
1 2 3 4 5 |
<span class="token keyword keyword-val">val</span> name <span class="token operator">=</span> <span class="token string-literal singleline"><span class="token string">"John"</span></span> name <span class="token operator">=</span> <span class="token string-literal singleline"><span class="token string">"Robert"</span></span> <span class="token comment">// Error (Val cannot be reassigned)</span> <span class="token function">println</span><span class="token punctuation">(</span>name<span class="token punctuation">)</span> |
When using var, you can change the value whenever you want:
Example
|
1 2 3 4 5 |
<span class="token keyword keyword-var">var</span> name <span class="token operator">=</span> <span class="token string-literal singleline"><span class="token string">"John"</span></span> name <span class="token operator">=</span> <span class="token string-literal singleline"><span class="token string">"Robert"</span></span> <span class="token function">println</span><span class="token punctuation">(</span>name<span class="token punctuation">)</span> |
Display Variables
Like you have seen with the examples above, the println() method is often used to display variables.
To combine both text and a variable, use the + character:
Example
|
1 2 3 4 |
<span class="token keyword keyword-val">val</span> name <span class="token operator">=</span> <span class="token string-literal singleline"><span class="token string">"John"</span></span> <span class="token function">println</span><span class="token punctuation">(</span><span class="token string-literal singleline"><span class="token string">"Hello "</span></span> <span class="token operator">+</span> name<span class="token punctuation">)</span> |
You can also use the + character to add a variable to another variable:
Example
|
1 2 3 4 5 6 |
<span class="token keyword keyword-val">val</span> firstName <span class="token operator">=</span> <span class="token string-literal singleline"><span class="token string">"John "</span></span> <span class="token keyword keyword-val">val</span> lastName <span class="token operator">=</span> <span class="token string-literal singleline"><span class="token string">"Doe"</span></span> <span class="token keyword keyword-val">val</span> fullName <span class="token operator">=</span> firstName <span class="token operator">+</span> lastName <span class="token function">println</span><span class="token punctuation">(</span>fullName<span class="token punctuation">)</span> |
For numeric values, the + character works as a mathematical operator:
Example
|
1 2 3 4 5 |
<span class="token keyword keyword-val">val</span> x <span class="token operator">=</span> <span class="token number">5</span> <span class="token keyword keyword-val">val</span> y <span class="token operator">=</span> <span class="token number">6</span> <span class="token function">println</span><span class="token punctuation">(</span>x <span class="token operator">+</span> y<span class="token punctuation">)</span> <span class="token comment">// Print the value of x + y </span> |
From the example above, you can expect:
- x stores the value 5
- y stores the value 6
- Then we use the
println()method to display the value of x + y, which is 11
Variable Names
A variable can have a short name (like x and y) or more descriptive names (age, sum, totalVolume).
The general rule for Kotlin variables are:
- Names can contain letters, digits, underscores, and dollar signs
- Names should start with a letter
- Names can also begin with $ and _ (but we will not use it in this tutorial)
- Names are case sensitive (“myVar” and “myvar” are different variables)
- Names should start with a lowercase letter and it cannot contain whitespace
- Reserved words (like Kotlin keywords, such as
varorString) cannot be used as names
camelCase variables
You might notice that we used firstName and lastName as variable names in the example above, instead of firstname and lastname. This is called “camelCase”, and it is considered as good practice as it makes it easier to read when you have a variable name with different words in it, for example “myFavoriteFood”, “rateActionMovies” etc.
Kotlin Data Types
In Kotlin, the type of a variable is decided by its value:
Example
|
1 2 3 4 5 6 7 |
<span class="token keyword keyword-val">val</span> myNum <span class="token operator">=</span> <span class="token number">5</span> <span class="token comment">// Int</span> <span class="token keyword keyword-val">val</span> myDoubleNum <span class="token operator">=</span> <span class="token number">5.99</span> <span class="token comment">// Double</span> <span class="token keyword keyword-val">val</span> myLetter <span class="token operator">=</span> <span class="token char">'D'</span> <span class="token comment">// Char</span> <span class="token keyword keyword-val">val</span> myBoolean <span class="token operator">=</span> <span class="token boolean">true</span> <span class="token comment">// Boolean</span> <span class="token keyword keyword-val">val</span> myText <span class="token operator">=</span> <span class="token string-literal singleline"><span class="token string">"Hello"</span></span> <span class="token comment">// String</span> |
However, you learned from the previous chapter that it is possible to specify the type if you want:
Example
|
1 2 3 4 5 6 7 |
<span class="token keyword keyword-val">val</span> myNum<span class="token operator">:</span> Int <span class="token operator">=</span> <span class="token number">5</span> <span class="token comment">// Int</span> <span class="token keyword keyword-val">val</span> myDoubleNum<span class="token operator">:</span> Double <span class="token operator">=</span> <span class="token number">5.99</span> <span class="token comment">// Double</span> <span class="token keyword keyword-val">val</span> myLetter<span class="token operator">:</span> Char <span class="token operator">=</span> <span class="token char">'D'</span> <span class="token comment">// Char</span> <span class="token keyword keyword-val">val</span> myBoolean<span class="token operator">:</span> Boolean <span class="token operator">=</span> <span class="token boolean">true</span> <span class="token comment">// Boolean</span> <span class="token keyword keyword-val">val</span> myText<span class="token operator">:</span> String <span class="token operator">=</span> <span class="token string-literal singleline"><span class="token string">"Hello"</span></span> <span class="token comment">// String</span> |
Sometimes you have to specify the type, and often you don’t. Anyhow, it is good to know what the different types represent.
You will learn more about when you need to specify the type later.
Data types are divided into different groups:
- Numbers
- Characters
- Booleans
- Strings
- Arrays
Numbers
Number types are divided into two groups:
Integer types store whole numbers, positive or negative (such as 123 or -456), without decimals. Valid types are Byte, Short, Int and Long.
Floating point types represent numbers with a fractional part, containing one or more decimals. There are two types: Float and Double.
If you don’t specify the type for a numeric variable, it is most often returned as Int for whole numbers and Double for floating point numbers.
Integer Types
Byte
The Byte data type can store whole numbers from -128 to 127. This can be used instead of Int or other integer types to save memory when you are certain that the value will be within -128 and 127:
Example
|
1 2 3 4 |
<span class="token keyword keyword-val">val</span> myNum<span class="token operator">:</span> Byte <span class="token operator">=</span> <span class="token number">100</span> <span class="token function">println</span><span class="token punctuation">(</span>myNum<span class="token punctuation">)</span> |
Short
The Short data type can store whole numbers from -32768 to 32767:
Example
|
1 2 3 4 |
<span class="token keyword keyword-val">val</span> myNum<span class="token operator">:</span> Short <span class="token operator">=</span> <span class="token number">5000</span> <span class="token function">println</span><span class="token punctuation">(</span>myNum<span class="token punctuation">)</span> |
Int
The Int data type can store whole numbers from -2147483648 to 2147483647:
Example
|
1 2 3 4 |
<span class="token keyword keyword-val">val</span> myNum<span class="token operator">:</span> Int <span class="token operator">=</span> <span class="token number">100000</span> <span class="token function">println</span><span class="token punctuation">(</span>myNum<span class="token punctuation">)</span> |
Long
The Long data type can store whole numbers from -9223372036854775808 to 9223372036854775807. This is used when Int is not large enough to store the value. Optionally, you can end the value with an “L”:
Example
|
1 2 3 4 |
<span class="token keyword keyword-val">val</span> myNum<span class="token operator">:</span> Long <span class="token operator">=</span> <span class="token number">15000000000L</span> <span class="token function">println</span><span class="token punctuation">(</span>myNum<span class="token punctuation">)</span> |
Difference Between Int and Long
A whole number is an Int as long as it is up to 2147483647. If it goes beyond that, it is defined as Long:
Example
|
1 2 3 4 |
<span class="token keyword keyword-val">val</span> myNum1 <span class="token operator">=</span> <span class="token number">2147483647</span> <span class="token comment">// Int</span> <span class="token keyword keyword-val">val</span> myNum2 <span class="token operator">=</span> <span class="token number">2147483648</span> <span class="token comment">// Long</span> |
Floating Point Types
Floating point types represent numbers with a decimal, such as 9.99 or 3.14515.
The Float and Double data types can store fractional numbers:
Float Example
|
1 2 3 4 |
<span class="token keyword keyword-val">val</span> myNum<span class="token operator">:</span> Float <span class="token operator">=</span> <span class="token number">5.75F</span> <span class="token function">println</span><span class="token punctuation">(</span>myNum<span class="token punctuation">)</span> |
Double Example
|
1 2 3 4 |
<span class="token keyword keyword-val">val</span> myNum<span class="token operator">:</span> Double <span class="token operator">=</span> <span class="token number">19.99</span> <span class="token function">println</span><span class="token punctuation">(</span>myNum<span class="token punctuation">)</span> |
Use Float or Double?
The precision of a floating point value indicates how many digits the value can have after the decimal point. The precision of Float is only six or seven decimal digits, while Double variables have a precision of about 15 digits. Therefore it is safer to use Double for most calculations.
Also note that you should end the value of a Float type with an “F”.
Scientific Numbers
A floating point number can also be a scientific number with an “e” or “E” to indicate the power of 10:
Example
|
1 2 3 4 5 6 |
<span class="token keyword keyword-val">val</span> myNum1<span class="token operator">:</span> Float <span class="token operator">=</span> <span class="token number">35E3F</span> <span class="token keyword keyword-val">val</span> myNum2<span class="token operator">:</span> Double <span class="token operator">=</span> <span class="token number">12E4</span> <span class="token function">println</span><span class="token punctuation">(</span>myNum1<span class="token punctuation">)</span> <span class="token function">println</span><span class="token punctuation">(</span>myNum2<span class="token punctuation">)</span> |
Booleans
The Boolean data type and can only take the values true or false:
Example
|
1 2 3 4 5 6 |
<span class="token keyword keyword-val">val</span> isKotlinFun<span class="token operator">:</span> Boolean <span class="token operator">=</span> <span class="token boolean">true</span> <span class="token keyword keyword-val">val</span> isFishTasty<span class="token operator">:</span> Boolean <span class="token operator">=</span> <span class="token boolean">false</span> <span class="token function">println</span><span class="token punctuation">(</span>isKotlinFun<span class="token punctuation">)</span> <span class="token comment">// Outputs true</span> <span class="token function">println</span><span class="token punctuation">(</span>isFishTasty<span class="token punctuation">)</span> <span class="token comment">// Outputs false </span> |
Boolean values are mostly used for conditional testing, which you will learn more about in a later chapter.
Characters
The Char data type is used to store a single character. A char value must be surrounded by single quotes, like ‘A’ or ‘c’:
Example
|
1 2 3 4 |
<span class="token keyword keyword-val">val</span> myGrade<span class="token operator">:</span> Char <span class="token operator">=</span> <span class="token char">'B'</span> <span class="token function">println</span><span class="token punctuation">(</span>myGrade<span class="token punctuation">)</span> |
Unlike Java, you cannot use ASCII values to display certain characters. The value 66 would output a “B” in Java, but will generate an error in Kotlin:
Example
|
1 2 3 4 |
<span class="token keyword keyword-val">val</span> myLetter<span class="token operator">:</span> Char <span class="token operator">=</span> <span class="token number">66</span> <span class="token function">println</span><span class="token punctuation">(</span>myLetter<span class="token punctuation">)</span> <span class="token comment">// Error</span> |
Strings
The String data type is used to store a sequence of characters (text). String values must be surrounded by double quotes:
Example
|
1 2 3 4 |
<span class="token keyword keyword-val">val</span> myText<span class="token operator">:</span> String <span class="token operator">=</span> <span class="token string-literal singleline"><span class="token string">"Hello World"</span></span> <span class="token function">println</span><span class="token punctuation">(</span>myText<span class="token punctuation">)</span> |
Arrays
Arrays are used to store multiple values in a single variable, instead of declaring separate variables for each value.
Type Conversion
Type conversion is when you convert the value of one data type to another type.
In Kotlin, numeric type conversion is different from Java. For example, it is not possible to convert an Int type to a Long type with the following code:
Example
|
1 2 3 4 5 |
<span class="token keyword keyword-val">val</span> x<span class="token operator">:</span> Int <span class="token operator">=</span> <span class="token number">5</span> <span class="token keyword keyword-val">val</span> y<span class="token operator">:</span> Long <span class="token operator">=</span> x <span class="token function">println</span><span class="token punctuation">(</span>y<span class="token punctuation">)</span> <span class="token comment">// Error: Type mismatch </span> |
To convert a numeric data type to another type, you must use one of the following functions: toByte(), toShort(), toInt(), toLong(), toFloat(), toDouble() or toChar():
Example
|
1 2 3 4 5 |
<span class="token keyword keyword-val">val</span> x<span class="token operator">:</span> Int <span class="token operator">=</span> <span class="token number">5</span> <span class="token keyword keyword-val">val</span> y<span class="token operator">:</span> Long <span class="token operator">=</span> x<span class="token punctuation">.</span><span class="token function">toLong</span><span class="token punctuation">(</span><span class="token punctuation">)</span> <span class="token function">println</span><span class="token punctuation">(</span>y<span class="token punctuation">)</span> |
Kotlin Operators
Operators are used to perform operations on variables and values.
The value is called an operand, while the operation (to be performed between the two operands) is defined by an operator: