


 and How Data Passes Through Them")


, and Neural Networks in a structured way")
")


 – 2025 Edition")
Low-code tools have opened the doors for anyone — not just developers — to build smart, AI-powered systems. In this guide, I’ll walk you through how to build a fully functional AI data analyst agent using Flowise. The agent will be able to analyze a CSV dataset and answer questions about it using SQL — no heavy coding required.
If you’re curious about other tools in this space, I’ve also included links to similar platforms like n8n, Langflow, and Dify AI at the end of the post.
What Is Flowise?
Flowise is a low-code, open-source tool that lets you build AI workflows using a visual interface. It uses draggable blocks to connect logic like:
-
Prompt templates
-
LLMs (like OpenAI, Claude)
-
Custom JavaScript functions
-
Databases and vector stores
It’s designed for building agents with minimal setup — no need to write hundreds of lines of code. Each block represents a function, and information flows through your workflow just like a pipeline.
Goal: Build an AI Agent That Can Answer CSV-Based Questions
In this project, we’ll:
-
Upload a CSV dataset (student social media habits) to a database (SingleStore)
-
Build a Flowise chat agent that:
-
Understands the table schema
-
Converts user questions into SQL
-
Runs the query
-
Returns answers in natural language
-
Step-by-Step Guide
✅ Step 1: Set Up Flowise

-
Go to flowiseai.com and create an account.
-
Log in to access the dashboard.
️ Step 2: Upload Your CSV Dataset to SingleStore
-
Sign up at SingleStore.
-
Download the dataset (e.g., from Kaggle) and upload it to your SingleStore workspace.
-
SingleStore will automatically create a table based on the CSV.
-
Copy your connection URL from the Deployments tab — you’ll need this for SQL queries.
Step 3: Start a New Chatflow
-
In Flowise, go to the Chatflows section.
-
Click Add New to create a fresh workflow.
Step 4: Add a Custom Function to Describe the Table
This block fetches column names and types from your uploaded table.
-
Drag in a Custom Code block.
-
Add these input variables:
tableName,tableDescription. -
Paste this code:
-
1234567891011121314151617181920const mysql = require('mysql2/promise');const connectionUrl = "<PASTE_YOUR_CONNECTION_STRING_HERE>";const tableName = $tableName;const tableDescription = $tableDescription;async function main() {try {const pool = mysql.createPool(connectionUrl);const [rows] = await pool.query(`DESCRIBE ${tableName}`);const fields = rows.map(row => `${row.Field} of type ${row.Type}`).join("\n");return `Table name: ${tableName}\nTable description:\n${tableDescription.trim()}\nColumns:\n${fields.trim()}`;} catch (error) {return String(error);}}return main();
✏️ Step 5: Create a Prompt Template for SQL Generation
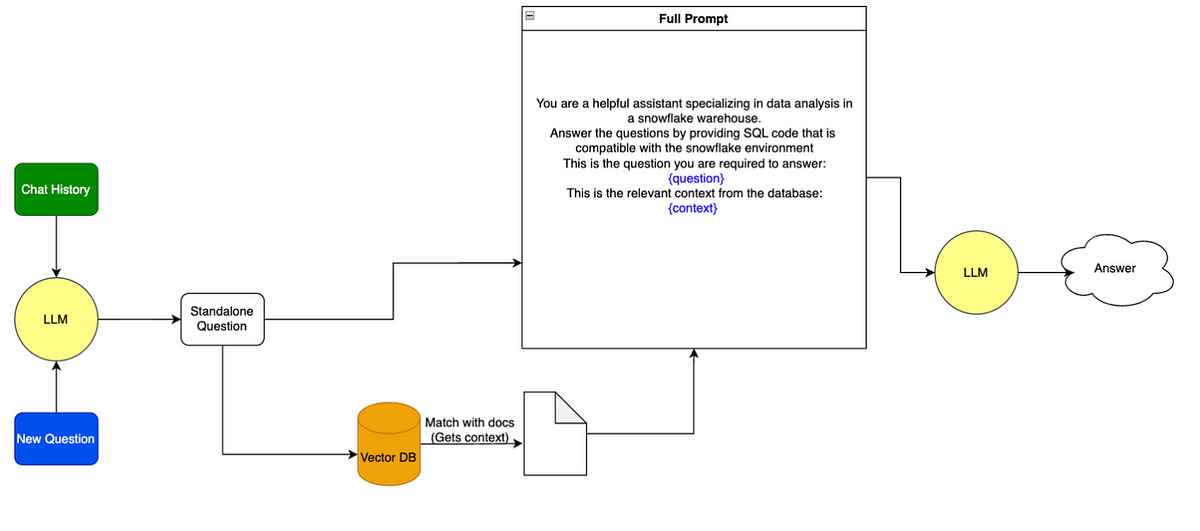
This prompt turns table info + user question into a SQL query.
|
1 2 3 4 5 6 |
Based on the SQL table information and the user's question, return a SQL query that answers that question. TABLE INFORMATION: {tableInformation} QUESTION: {question} |
-
Add a Prompt Template block.
-
Connect it to your custom code block (which provides
tableInformation). -
Configure it to accept two inputs:
tableInformation,question.
Step 6: Connect to an LLM Chain (SQL Generator)
-
Add an LLM Chain block.
-
Add a Model block using OpenAI (paste your API key).
-
Connect:
-
Model → LLM Chain’s “Language Model”
-
Prompt Template → LLM Chain’s “Prompt” input
-
Step 7: Store the Generated SQL
-
Add a Set Variable block.
-
Store the SQL output under a variable like
query.
⚙️ Step 8: Execute the SQL Query
-
Add another Custom Code block.
-
Use this code to run the query:
12345678910111213141516171819202122const mysql = require('mysql2/promise');const connectionUrl = "<PASTE_THE_SAME_URL_USED_BEFORE>";const q = $query;function formatQuery() {let lines = q.trim().split(/\r\n|\r|\n/);if (lines[0].startsWith("```")) {lines = lines.slice(1, lines.length - 1);}return lines.join("\n").trim();}try {const pool = mysql.createPool(connectionUrl);const [rows] = await pool.query(formatQuery());return rows;} catch(error) {return `Query: ${q}\nError: ${String(error)}`;} - Set input variable:
query
Step 9: Create Prompt Template to Answer the Question
This step formats the query + result into a final natural language answer.
|
1 2 3 4 5 6 7 |
Based on the question and the query result, provide an answer to the user's question. Always show the query to the user. QUERY: {query} QUERY RESULT: {queryResult} QUESTION: {question} |
-
Add another Prompt Template block.
-
Inputs:
query,queryResult,question.
Step 10: Final LLM Chain for Answering
-
Add a final LLM Chain block.
-
Connect to the same OpenAI model.
-
Connect the last Prompt Template to this block.
️ Chat With Your Data Analyst Agent
Click the chat icon in the Flowise dashboard and ask questions like:
-
“How many students responded to the survey?”
-
“What’s the average time spent on TikTok?”
-
“Compare Instagram and Twitter usage.”
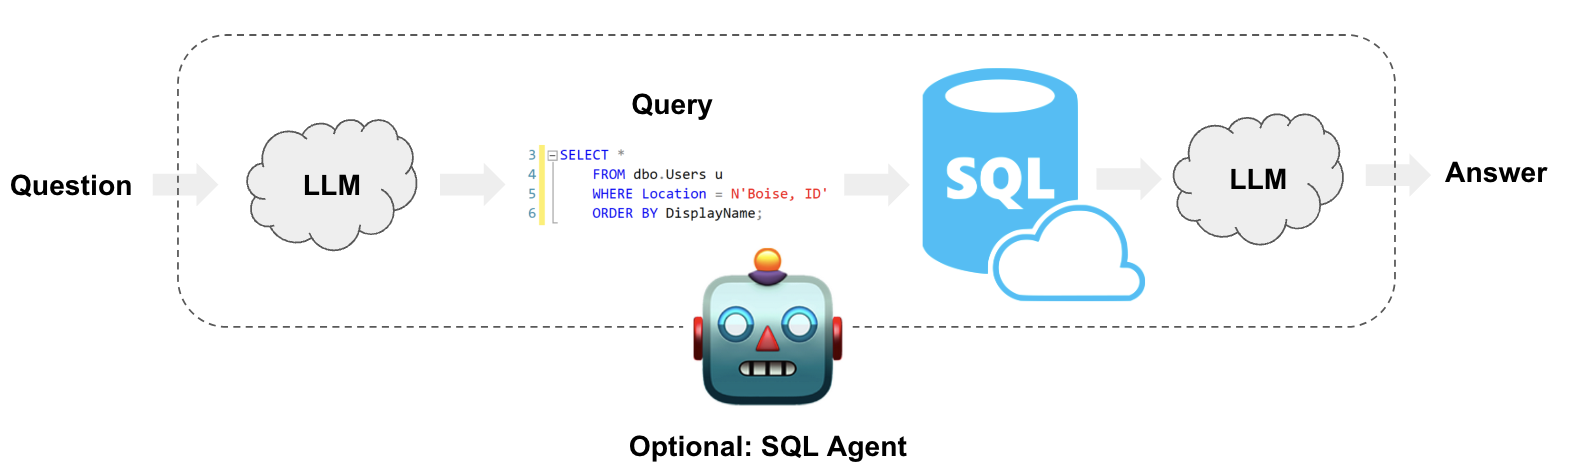
The agent will:
-
Understand your question
-
Generate SQL
-
Run it
-
Summarize the result in plain English
⚠️ My Honest Thoughts on Flowise
While Flowise makes agent building accessible, it has a few usability drawbacks:
-
❌ No clear start node or flow visual indicator
-
❌ Configurations (e.g., input vars) are hidden unless clicked
-
❌ Hard to debug or view intermediate results
-
❌ One small misstep (like deleted variable input) can silently break the flow
Still, it’s a great starting point for rapid prototyping and getting hands-on with agent building.
Related Guides (Highly Recommended)
✅ Conclusion
Flowise allows you to build an intelligent AI analyst without writing much code. By combining prompt templates, LLMs, and SQL logic, you can build agents that truly understand and interact with your data. Despite some UI quirks, it’s a powerful tool worth exploring — especially for solo makers, analysts, and educators.